Log in
Search
Latest topics
» Roger Harris revisitedby rsv1cox Today at 10:46 am
» Duende V model from RC Model magazine 1983.
by MauricioB Today at 10:29 am
» A Little 400 Mile Hop for Some Memory Lane Stuff, and to Hit a Swap Meet.
by getback Today at 7:48 am
» Free Flight Radio Assist
by getback Today at 6:39 am
» Happy 77th birthday Andrew!
by Kim Yesterday at 9:18 am
» Promote the forum with flyers!
by Admin Yesterday at 1:35 am
» Engine choice
by GallopingGhostler Mon Nov 25, 2024 4:03 pm
» My N-1R build log
by roddie Mon Nov 25, 2024 9:19 am
» Night flying at Walters RC park
by 1975 control line guy Sun Nov 24, 2024 7:29 pm
» Cox films/videos...
by GallopingGhostler Sun Nov 24, 2024 7:07 pm
» Cox 020 PeeWee rebuild questions
by LooseSpinner99 Sun Nov 24, 2024 6:13 pm
» Did you spot the Cox engine in this NASA research video?
by balogh Sun Nov 24, 2024 5:08 pm
Cox Engine of The Month
T-Bee-D1 (a Rod-de-sign)
Page 4 of 8
Page 4 of 8 •  1, 2, 3, 4, 5, 6, 7, 8
 Re: T-Bee-D1 (a Rod-de-sign)
enough about that... here's my stab-elev. assembly with its Sig Easy-Hinges (CA type) installed.
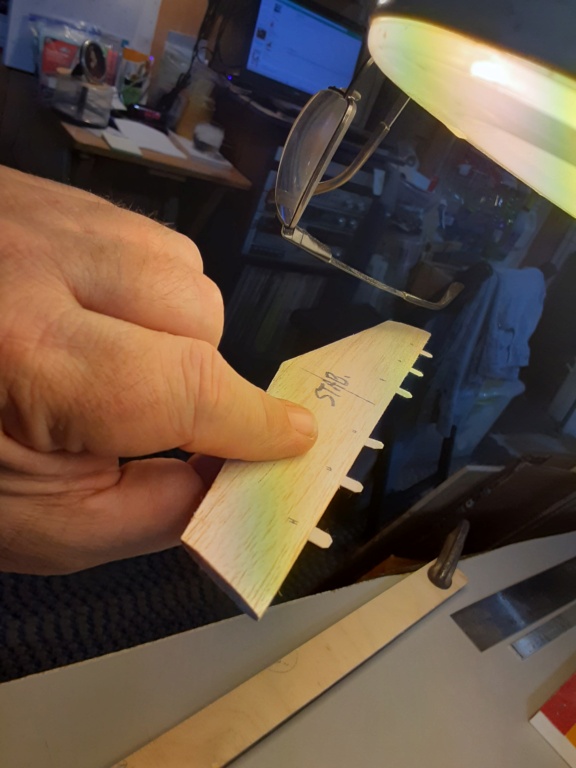
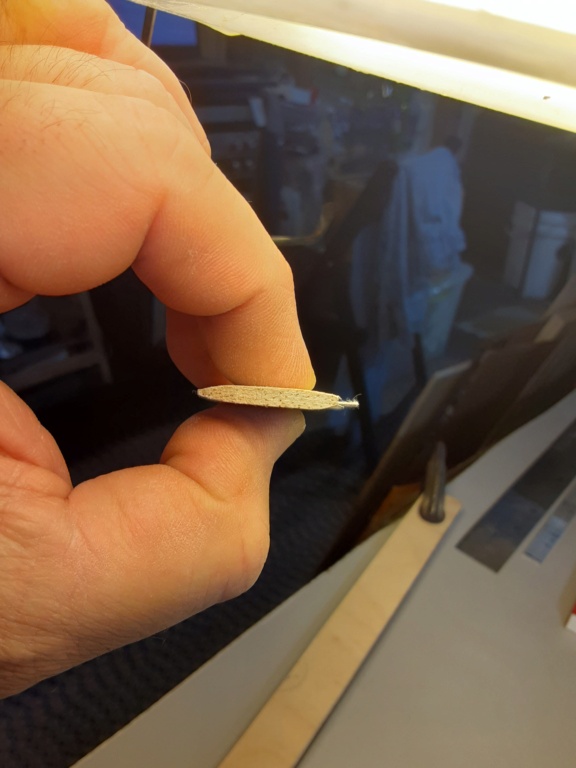
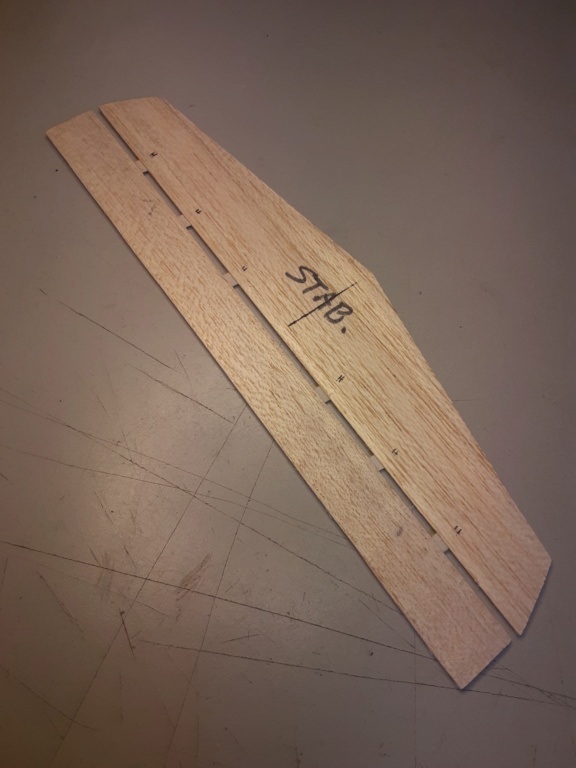

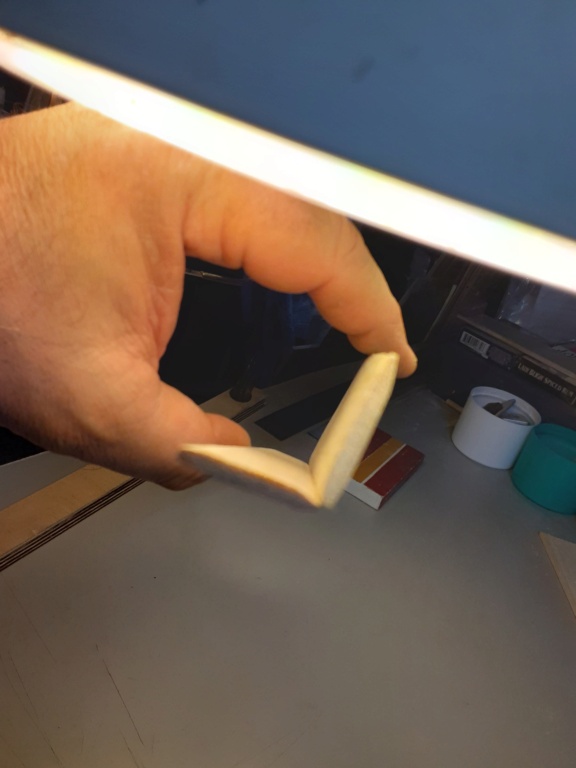
Nice deflection.. yes? Should never need to deflect 90 degrees... but fully-capable if necessary.
I use Dubro #107 1/2A Control Horns on all of my 1/2A builds.. and will use one on this model's elevator.
Next phase for me.... is to cut the "wing-slot" into the fuse.


Nice deflection.. yes? Should never need to deflect 90 degrees... but fully-capable if necessary.
I use Dubro #107 1/2A Control Horns on all of my 1/2A builds.. and will use one on this model's elevator.
Next phase for me.... is to cut the "wing-slot" into the fuse.
 Re: T-Bee-D1 (a Rod-de-sign)
I don't know how to proceed... in a safe manner.. I need to build a fixture/jig to document for repeatability.
 Re: T-Bee-D1 (a Rod-de-sign)
Hi roddie,
I'm guessing you have heard all the 'Playing with your Barbie' jokes...
Looks great. I have not seen a flat plate wing with flaps before...
Long skinny skiis like that here are called, Nancy Greene's. ( a Canadian Olympic skier of the day)
Flying off of snow, is an art form, all its own...
My favourite hinges are/were small Klett brand with the L shaped wire pin. String them up on a wire, every slot gets aligned...
When the first 'plastic hinges' arrived here, there were many failures.
Our club made a rule, you had to 'pin' hinges. (gluing shiny plastic was hard, with the fear of goobering the hinge)
I have moved on.
Dental Floss and CA figure8's. Stronger than balsa, up to .25 sized planes...
Your results may vary,
Dave

HalfaDave- Platinum Member

- Posts : 615
Join date : 2022-12-06
Location : Oakville, Ontario
 Re: T-Bee-D1 (a Rod-de-sign)
HalfaDave wrote:Hi roddie,
I'm guessing you have heard all the 'Playing with your Barbie' jokes...
Looks great. I have not seen a flat plate wing with flaps before...
Long skinny skiis like that here are called, Nancy Greene's. ( a Canadian Olympic skier of the day)
Flying off of snow, is an art form, all its own...
My favourite hinges are/were small Klett brand with the L shaped wire pin. String them up on a wire, every slot gets aligned...
When the first 'plastic hinges' arrived here, there were many failures.
Our club made a rule, you had to 'pin' hinges. (gluing shiny plastic was hard, with the fear of goobering the hinge)
I have moved on.
Dental Floss and CA figure8's. Stronger than balsa, up to .25 sized planes...
Your results may vary,
Dave
I enjoy your commentary immensely Dave! I've wanted to try "stitched-hinges" on one of these builds.. I've wanted to...I swear.. but just haven't yet. My mom is a seamstress. You'd think that would ring the bell.. but I'm a creature of habit. We have fun.. and that's really what it's all about!

 Re: T-Bee-D1 (a Rod-de-sign)
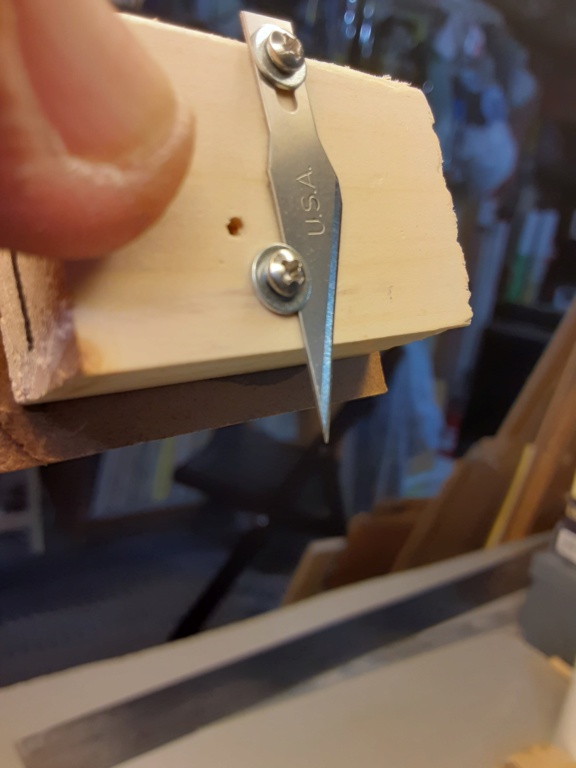
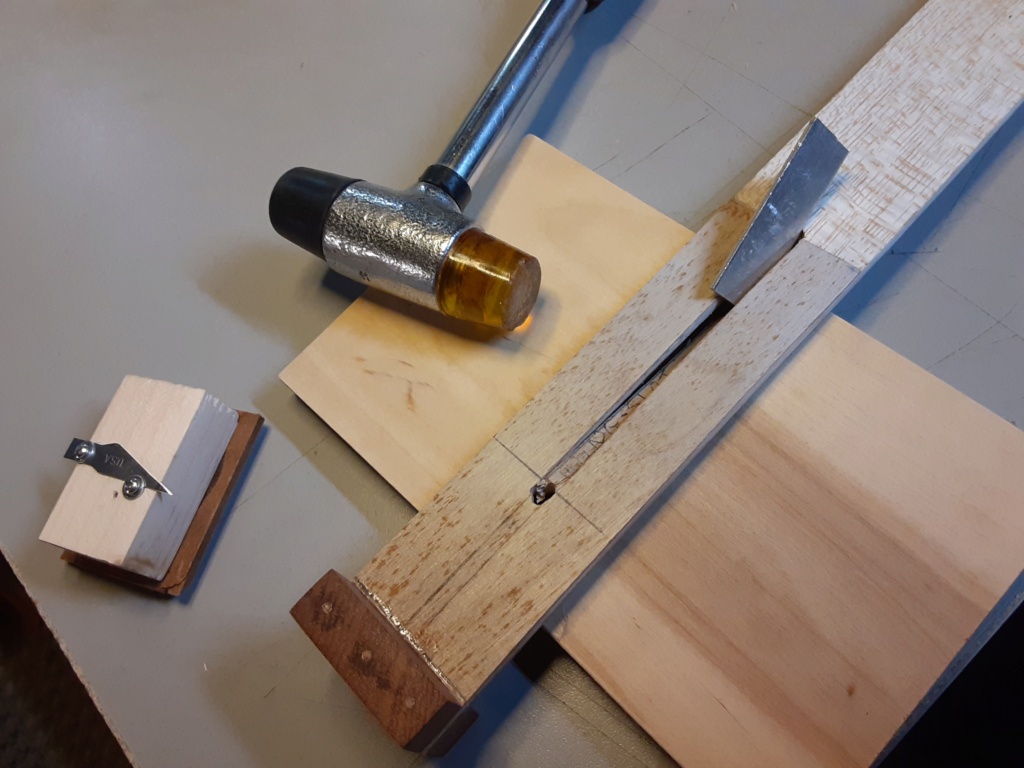
So I made a tool to cut my wing-slot. (RE: my OCD TV thread)
A quick summary; I cut a sm. guage-block... attached a fence.. and a #11 hobby-blade on the opposite side, to score/cut the wing and stab-slots in the fuse.
This required me to finally decide (roll the dice..) on a tail-moment.. which I had allowed for... from the design's inception.
First things first... the tool..
The slots and tail-moment decision..
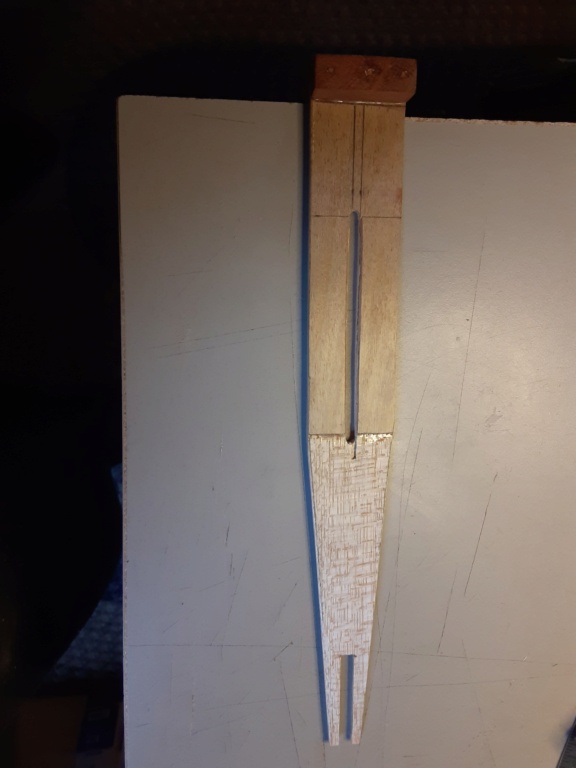
had to revise the drawing.. (This is where it pays to source good quality paper that will tolerate erasures/revisions.)
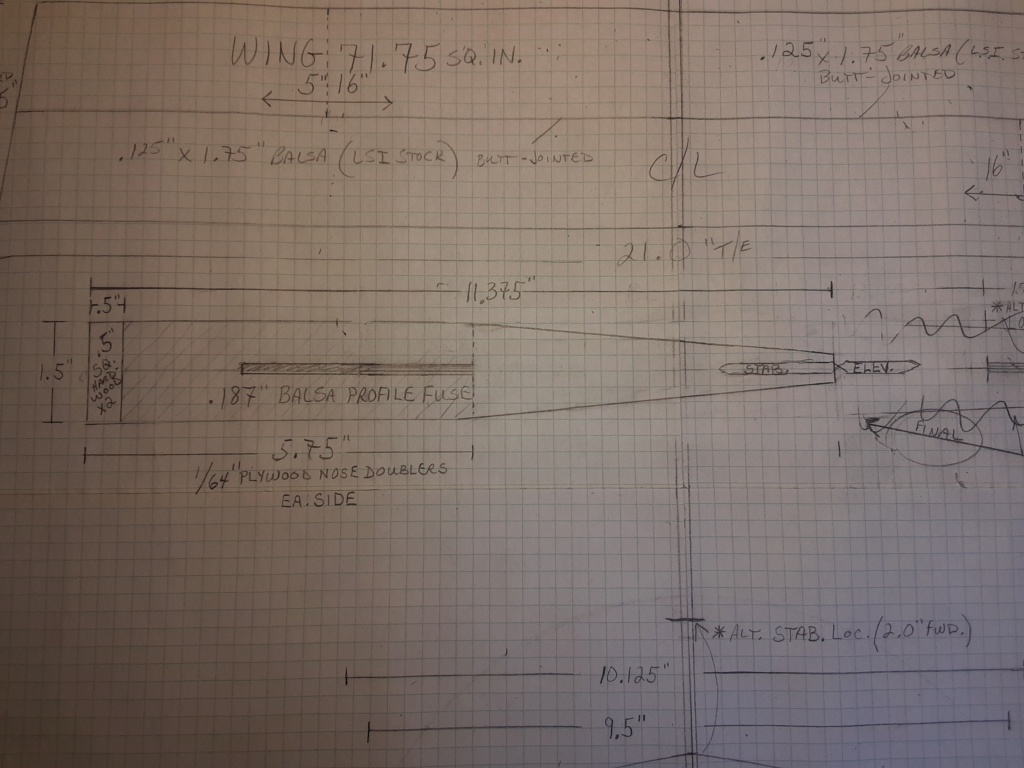
more changes to drawing are needed.. but I will make them.
We now have this layout... and I'm liking it.
A quick summary; I cut a sm. guage-block... attached a fence.. and a #11 hobby-blade on the opposite side, to score/cut the wing and stab-slots in the fuse.
This required me to finally decide (roll the dice..) on a tail-moment.. which I had allowed for... from the design's inception.
First things first... the tool..

The slots and tail-moment decision..


had to revise the drawing.. (This is where it pays to source good quality paper that will tolerate erasures/revisions.)

more changes to drawing are needed.. but I will make them.
We now have this layout... and I'm liking it.
 Re: T-Bee-D1 (a Rod-de-sign)
Beautiful roddie, I like the four panel wing offset. Be a shame to cover it. Take a note from Robert, tissue and dope.
No? Ok then, build two..........or six .010, .020, .049
No? Ok then, build two..........or six .010, .020, .049

rsv1cox- Top Poster


Posts : 11260
Join date : 2014-08-18
Location : West Virginia
 Re: T-Bee-D1 (a Rod-de-sign)
rsv1cox wrote:Beautiful roddie, I like the four panel wing offset. Be a shame to cover it. Take a note from Robert, tissue and dope.
No? Ok then, build two..........or six .010, .020, .049
Thanks Robert! I'll be filling/sanding the wing and priming/painting it when the time comes. No need for silkspan or iron-on film.
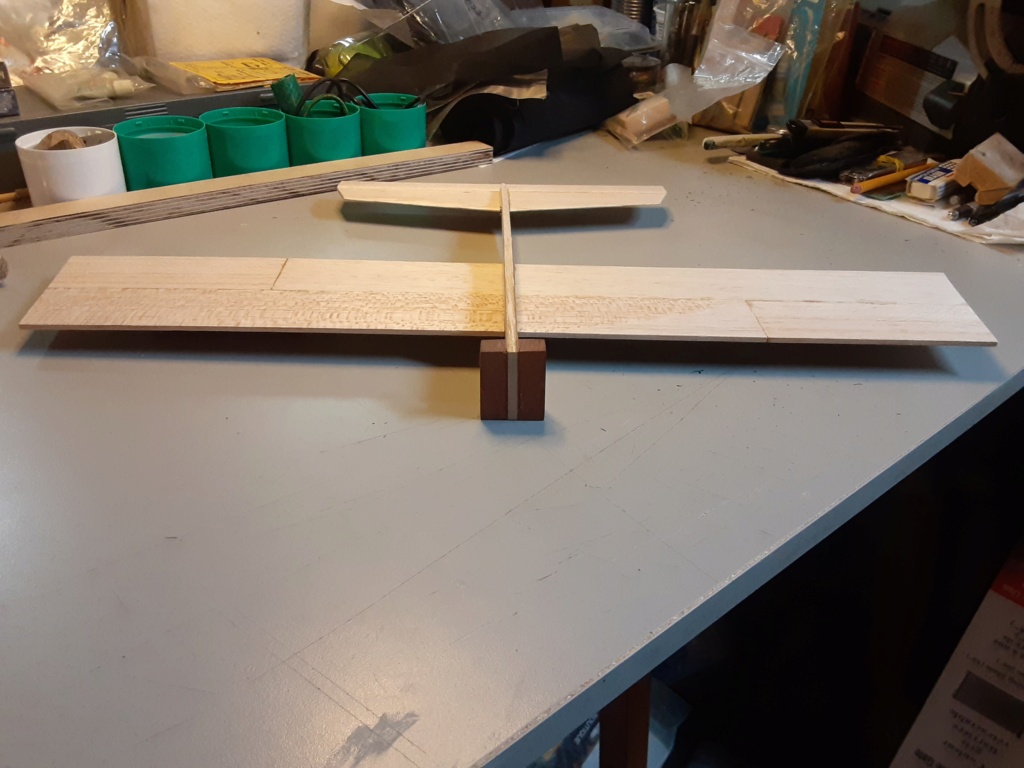
Check-out my wing-alignment system...........

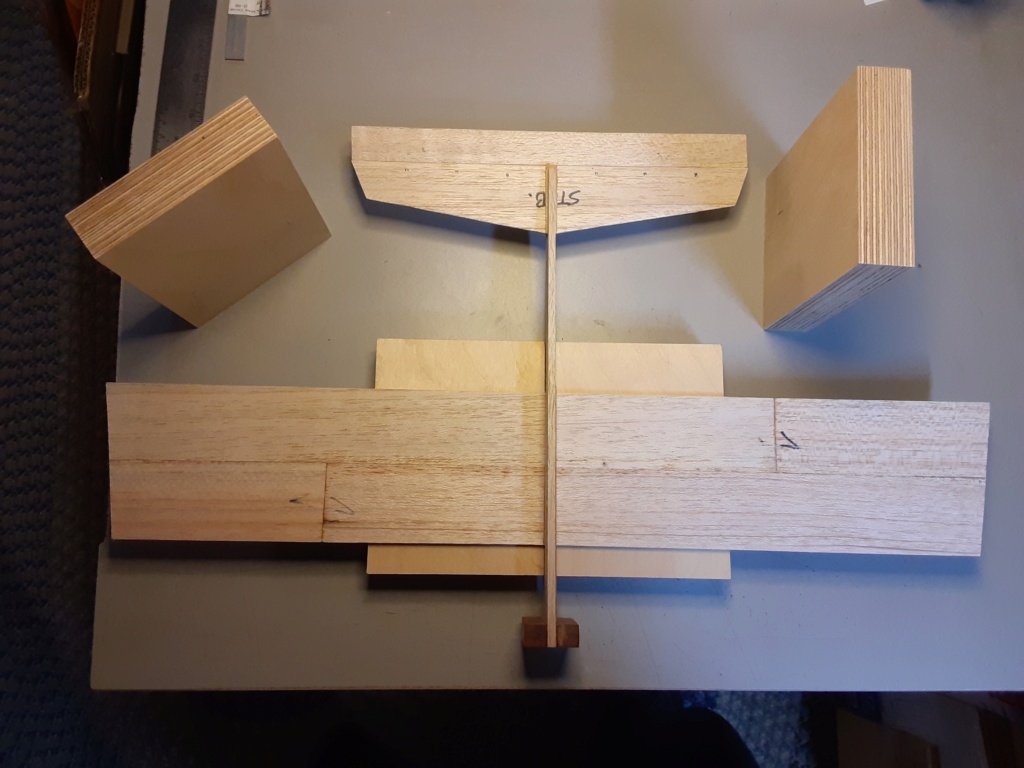
Those blocks are 19-ply 27mm thickness (1.080") Baltic Birch, that I brought home from work. They are CNC cut aperture-scrap (inside cut-outs) to a job I was running on the machine.
X2 blocks will straddle the fuse and are thick enough to "cradle it" with the sheet-wing sitting level across and on top of them. Being perfectly square; they provide for near perfect alignment.
 Re: T-Bee-D1 (a Rod-de-sign)
Very detail oriented Roddie, I like that…. I read something once about building projects, That it was a series of decisions until no more can be made, And the final product is the result… Sounds simple but when you break it down that way it makes each step seem more important…. You have certainly planned each step …I think you’ll be proud of the end result…. Neat and clean workmanship as well ..Fun to watch, Thanks….

rdw777- Diamond Member


Posts : 1723
Join date : 2021-03-11
Location : West Texas
 Re: T-Bee-D1 (a Rod-de-sign)
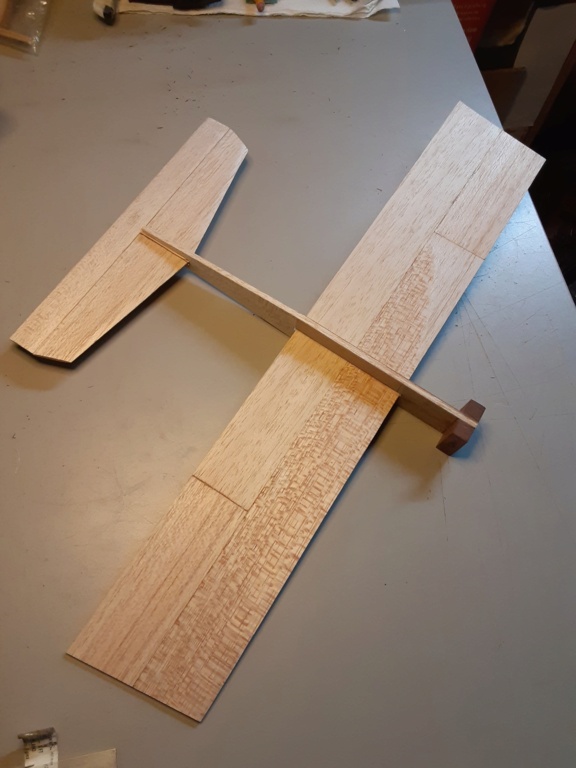
The alignment process had me scratching my head a bit; how to hold and keep the parts in alignment when applying glue. I must say that this build got more attention to "that detail"... than any of my other previous builds. The slots that I cut for the wing and stab. were both too large, requiring me to use shims to make-up the slop.. but it worked-out.
Both slots are on the center-line of the fuse, so I ended up supporting the wing and stab. with guage-blocks.. and letting the fuse "float" which helped to set it's squareness to the wing's trailing-edge and overall perpendicularity. The wing-joint was glued first.. using 5-min. epoxy.
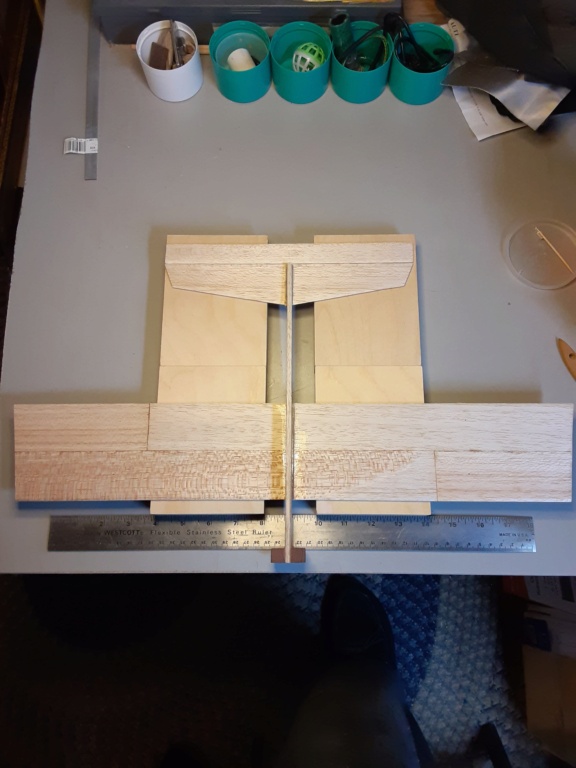
The stab. is currently "tacked" in place with thin CA.. and I'm very happy with the way it all lines-up.
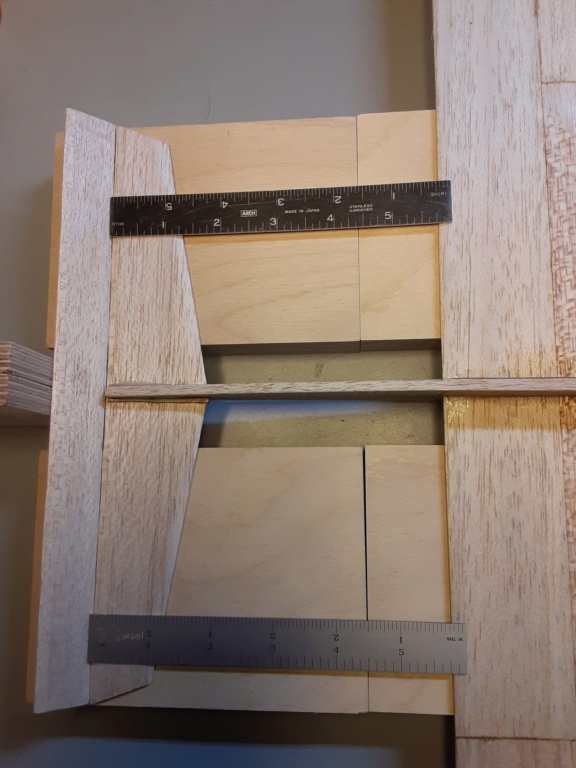

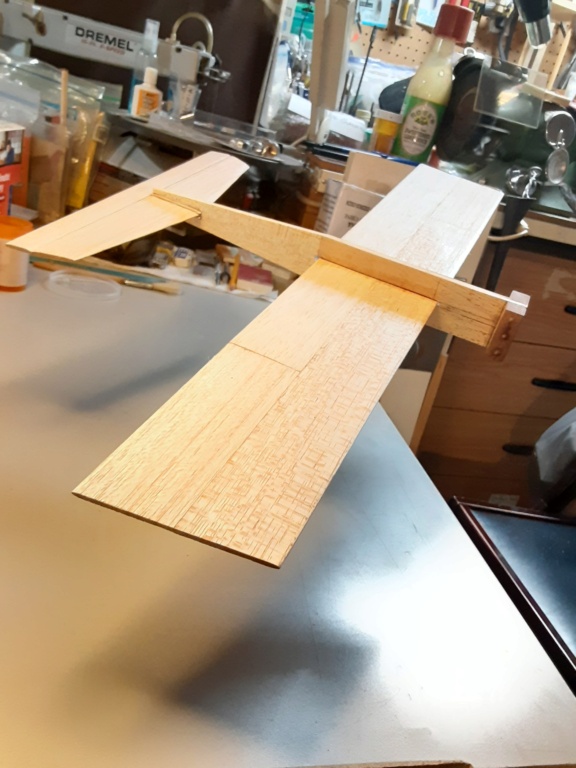
Thinking about a fin-shape now..
Both slots are on the center-line of the fuse, so I ended up supporting the wing and stab. with guage-blocks.. and letting the fuse "float" which helped to set it's squareness to the wing's trailing-edge and overall perpendicularity. The wing-joint was glued first.. using 5-min. epoxy.

The stab. is currently "tacked" in place with thin CA.. and I'm very happy with the way it all lines-up.


Thinking about a fin-shape now..
Last edited by roddie on Sat Feb 11, 2023 11:01 am; edited 1 time in total (Reason for editing : added photos)
 Re: T-Bee-D1 (a Rod-de-sign)
Nice job on the alignment Roddie…. Extra effort there will certainly pay off on fly day…. I bet it will track like it’s on rails…
Nice layout on the wing woodwork too…Hard C grain leading edge and outboard panel…. Softer, lighter on trailing edge…. Multi panel glue joints for warp resistance…. Very well thought out….
Nice layout on the wing woodwork too…Hard C grain leading edge and outboard panel…. Softer, lighter on trailing edge…. Multi panel glue joints for warp resistance…. Very well thought out….

rdw777- Diamond Member


Posts : 1723
Join date : 2021-03-11
Location : West Texas
 Re: T-Bee-D1 (a Rod-de-sign)
rdw777 wrote:Nice job on the alignment Roddie…. Extra effort there will certainly pay off on fly day…. I bet it will track like it’s on rails…
Nice layout on the wing woodwork too…Hard C grain leading edge and outboard panel…. Softer, lighter on trailing edge…. Multi panel glue joints for warp resistance…. Very well thought out….
Thank you very much Rob! Yea... that C-grain outer-forward wing-panel is noticeably heavier. I may not apply much (if any) tip-weight.
Here's a photo of a penny placed on the "inboard" panel.. to help show the imbalance.
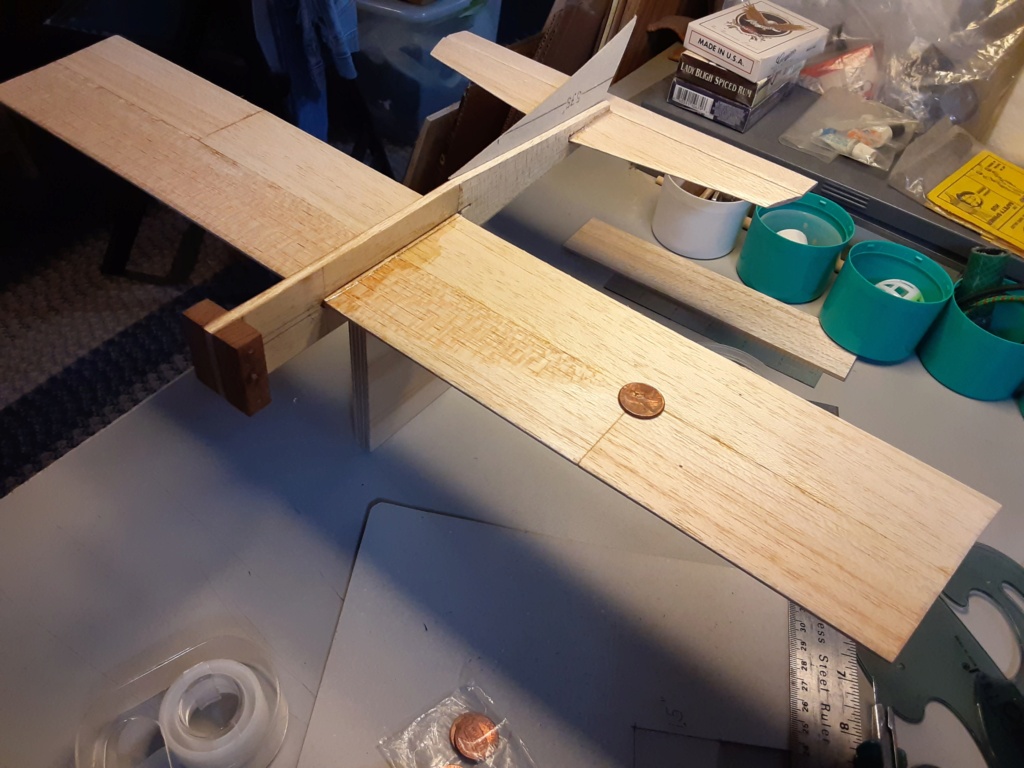
check-out that crazy wood-grain..

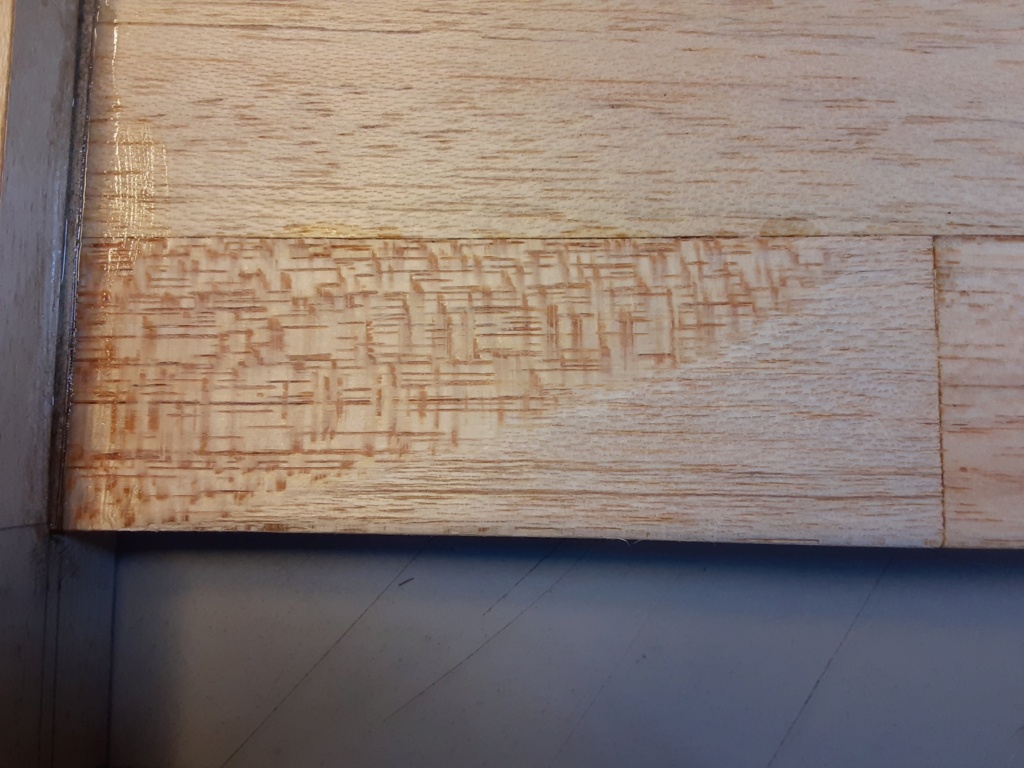
Keep in mind; this is definitely not hobby-grade balsa..
That "fin" is a cardboard template of the shape that I plan to go with. It will be made from 1/8" sheet balsa.. and also of lighter-weight wood. The same will apply to a canopy-profile, which I'll probably try.. to see how it looks. Gahtooo have styling.. ya know?
 Re: T-Bee-D1 (a Rod-de-sign)
roddie wrote:
That "fin" is a cardboard template of the shape that I plan to go with. It will be made from 1/8" sheet balsa.. and also of lighter-weight wood. The same will apply to a canopy-profile, which I'll probably try.. to see how it looks. Gahtooo have styling.. ya know?
It's been brought to my attention.. that the 1st (#1) fin-shape that I drew.. and mounted a cardboard template of and previewed in my OCD thread..... has some favorable aesthetic contrast to the straight-line/geometric styling given to the wing and stab. profiles of this model..
Here are images of the #1 radiussed-shape fin that I thought might "clash". I got the French-curves out, like I did with my last build.. but this design had a much different look.
I started laying-out the fin for this model by measuring the distance between the trailing-edge of the wing and the point where the fuselage terminated at the tail. This is 5.75". I then added 1.5" of length to make the "fin-blank" 7.25" L. X 1.5" high. The 5.75" measurement is the "turtle-deck" measurement.. The 1.5" that I added, is for the trailing-edge of the fin to extend rearward of the fuse.. at an up-swept/rearward way as to not interfere with the elevator's range of motion
See below; photos of my cardboard-template layouts..

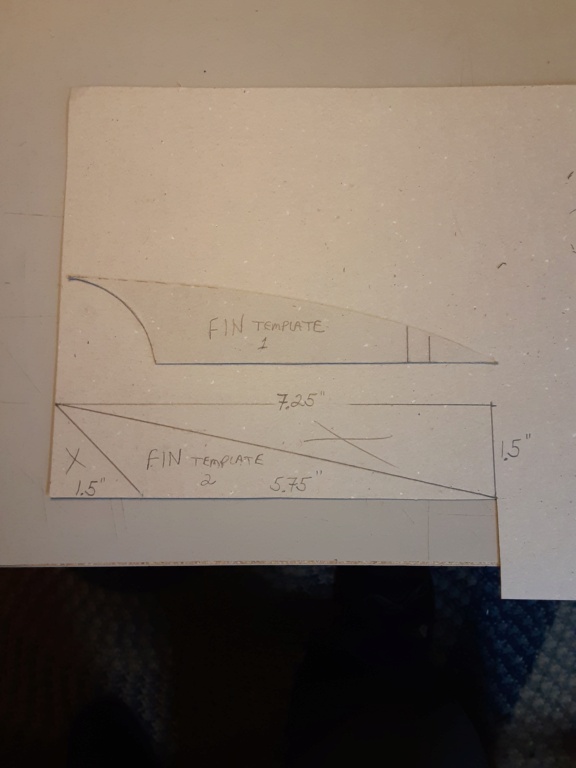
The only difference is in the applied radii.
 Re: T-Bee-D1 (a Rod-de-sign)
nice build Roddie  I have never checked the balance of my plane as you have done several posts above. Makes absolute sense now I have seen it done. Something I too will now do. I like the find on your plane. I like reasonably large sized fins as I believe they provide extra stability to a slab - profile when overhead. Really is looking like a plane that wants to fly well

 I have never checked the balance of my plane as you have done several posts above. Makes absolute sense now I have seen it done. Something I too will now do. I like the find on your plane. I like reasonably large sized fins as I believe they provide extra stability to a slab - profile when overhead. Really is looking like a plane that wants to fly well
Yabby- Platinum Member


Posts : 712
Join date : 2021-06-08
Location : Yorke Peninsula South Australia
 Re: T-Bee-D1 (a Rod-de-sign)
I did notice how that piece of wood transitioned Roddie…. Interesting, that must have been where the tree had twisted…. C grain is similar to quarter sawn in the hardwood world, Cut out of the log with radial cuts like cutting a pie rather than cutting slabs….
Regardless, Excellent choice and use of your materials…
I like the fin but would be good with the straight fin too, Putting more emphasis on the canopy….Maybe even a little dorsal between either fin and canopy…. Looking forward to see what you come up with
Regardless, Excellent choice and use of your materials…
I like the fin but would be good with the straight fin too, Putting more emphasis on the canopy….Maybe even a little dorsal between either fin and canopy…. Looking forward to see what you come up with

rdw777- Diamond Member


Posts : 1723
Join date : 2021-03-11
Location : West Texas
 Re: T-Bee-D1 (a Rod-de-sign)
I like the new fin contor I make my HM models with the out of way of the elevator in mine without having to go through a bunch of bull with the elev. split and all , With the length you should bee fine .  Liken the wild grade wood grain too , adds corrector
 Liken the wild grade wood grain too , adds corrector

getback- Top Poster


Posts : 10448
Join date : 2013-01-18
Age : 67
Location : julian , NC
 Re: T-Bee-D1 (a Rod-de-sign)
getback wrote:I like the new fin contor I make my HM models with the out of way of the elevator in mine without having to go through a bunch of bull with the elev. split and all , With the length you should bee fine .Liken the wild grade wood grain too , adds corrector

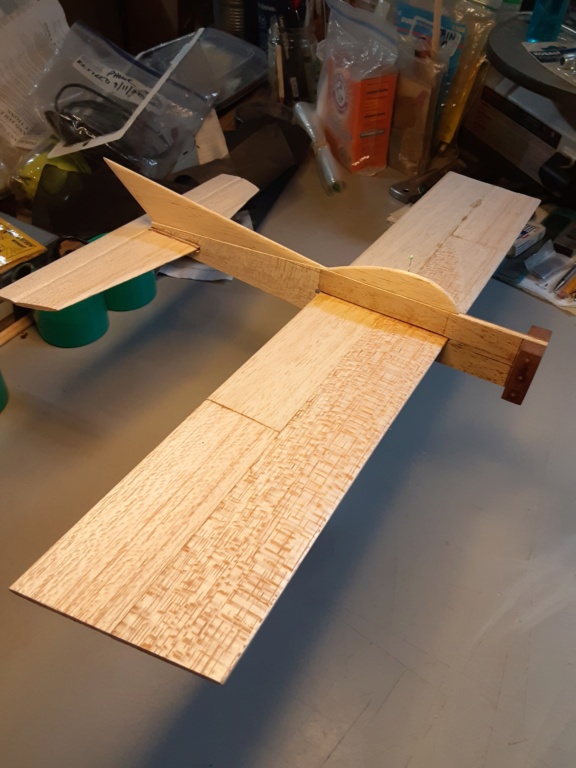
Hi Eric! I like the new (2nd) fin contour too. I made one from 1/8" sheet balsa, using the template this afternoon.. and applied judicial use of taper to the top edge and rear under-cut.
Check it out..
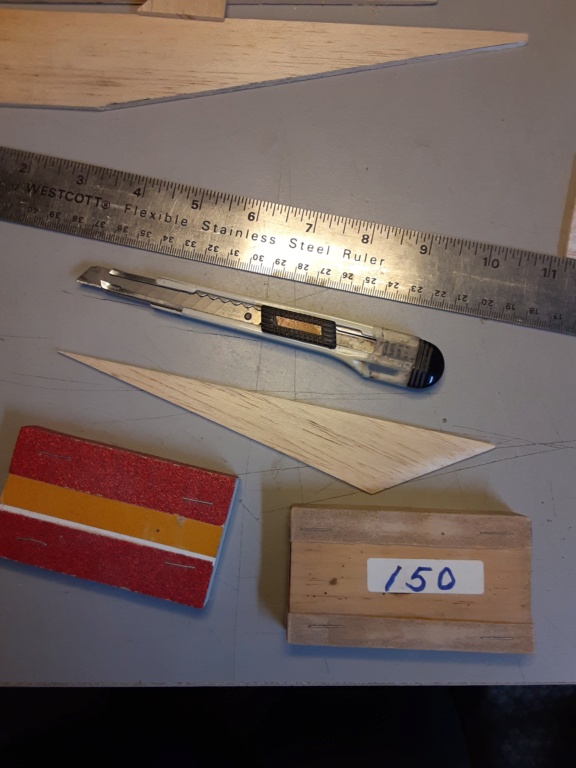

 fin(s) and canopy
Last edited by roddie on Mon Feb 13, 2023 6:27 pm; edited 1 time in total (Reason for editing : added fin-shape #'s)

akjgardner- Diamond Member


Posts : 1603
Join date : 2014-12-28
Age : 65
Location : Greensberg Indiana

Yabby- Platinum Member


Posts : 712
Join date : 2021-06-08
Location : Yorke Peninsula South Australia
 Re: T-Bee-D1 (a Rod-de-sign)
Yabby wrote:Yep, if we are holding a poll, I also like the second fin better
Thanks Gary. My wife and a non-CEF aeromodeler friend like fin-shape #1
 Re: T-Bee-D1 (a Rod-de-sign)
I agree that Fin 1 is the fin for people with some sense of Art and flare  Fin 2 is the Techo no sense of style type selection that I would make. :-) I almost said Fin 1 as I know its more 'stylish.
Go with Fin 1 it has a LOT more style than fin 2. I reckon you should incorporate the similar curve into the trailing edge of the wing near the tips. Would look like something a Viking would fly.
Go with Fin 1 it has a LOT more style than fin 2. I reckon you should incorporate the similar curve into the trailing edge of the wing near the tips. Would look like something a Viking would fly.


Yabby- Platinum Member


Posts : 712
Join date : 2021-06-08
Location : Yorke Peninsula South Australia
 Re: T-Bee-D1 (a Rod-de-sign)
Me 2 vote fin #2  ……..Everything else is hard angles and #2 only compliments….Side view would be cool, Jet like….It’s an entirely subjective choice ultimately left to the designer…Will be interesting to see your paint/trim scheme…

rdw777- Diamond Member


Posts : 1723
Join date : 2021-03-11
Location : West Texas
 Re: T-Bee-D1 (a Rod-de-sign)
Yabby wrote:I agree that Fin 1 is the fin for people with some sense of Art and flareFin 2 is the Techo no sense of style type selection that I would make. :-) I almost said Fin 1 as I know its more 'stylish.
Go with Fin 1 it has a LOT more style than fin 2. I reckon you should incorporate the similar curve into the trailing edge of the wing near the tips. Would look like something a Viking would fly.
Yea.. I thought more than once about applying radii to the wing-tips.. decisions decisions..
Page 4 of 8 •  1, 2, 3, 4, 5, 6, 7, 8
 Similar topics
» Stopped by the local sign shop today.
» Sign of the times
» ***The Traveling Engine TD .049*** SIGN UP!
» Brodak Stop Sign
» Can't sign up for Yahoo - But Comet RTF question
» Sign of the times
» ***The Traveling Engine TD .049*** SIGN UP!
» Brodak Stop Sign
» Can't sign up for Yahoo - But Comet RTF question
Page 4 of 8
Permissions in this forum:
You cannot reply to topics in this forum

 Rules
Rules


