Log in
Search
Latest topics
» Cox films/videos...by Coxfledgling Today at 4:46 am
» Purchased the last of any bult engines from Ken Enya
by Coxfledgling Today at 4:18 am
» My N-1R build log
by roddie Today at 12:32 am
» Happy 77th birthday Andrew!
by akjgardner Today at 12:27 am
» TEE DEE Having issues
by TD ABUSER Yesterday at 9:43 pm
» Landing-gear tips
by roddie Yesterday at 6:17 pm
» Roger Harris revisited
by TD ABUSER Yesterday at 2:13 pm
» Tee Dee .020 combat model
by Ken Cook Yesterday at 1:41 pm
» Retail price mark-up.. how much is enough?
by Ken Cook Yesterday at 1:37 pm
» My latest doodle...
by roddie Yesterday at 10:43 am
» Chocolate chip cookie dough.........
by roddie Fri Nov 22, 2024 1:13 pm
» Free Flight Radio Assist
by rdw777 Fri Nov 22, 2024 9:24 am
Cox Engine of The Month
Q Tee 2ch RC sport model with Cox 049 and home brew tank.
Page 1 of 2
Page 1 of 2 • 1, 2 
 Q Tee 2ch RC sport model with Cox 049 and home brew tank.
I was so impressed by watching Kim's You Tube of him flying his little Q Tee model with a simple Cox motor without throttle.
Mine is now built from scratch with plans from Outer Zone.
It was necessary for me to build a small tank.
0.008" Tin Plate and 3mm copper tube was sourced from my model shop.
The tank build took only an hour to make.
It need to look nice and part of the model.
It was to be mounted on the exterior of the model to avoid a fuel soaked interior.
Rather than bend corners several times to form a square tank , I thought a vintage looking one would look nicer.
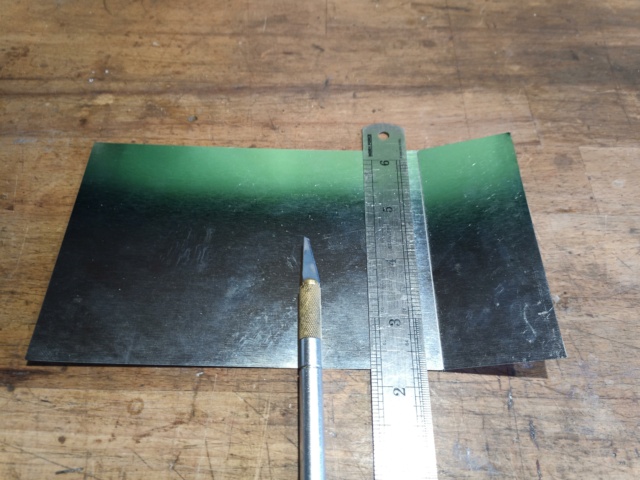
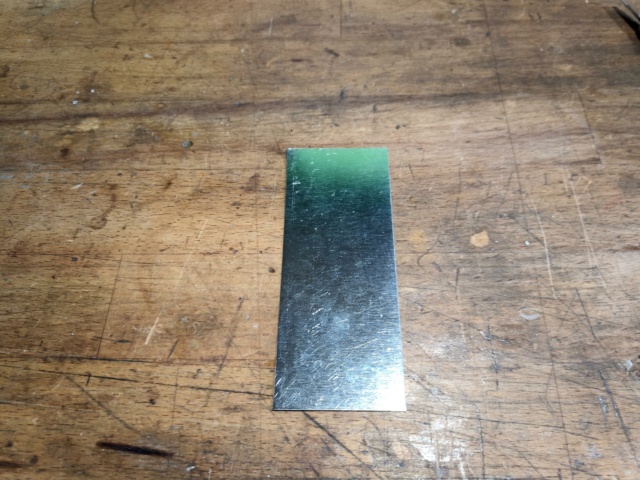
A rectangle was cut from the tin plate with old scissors.
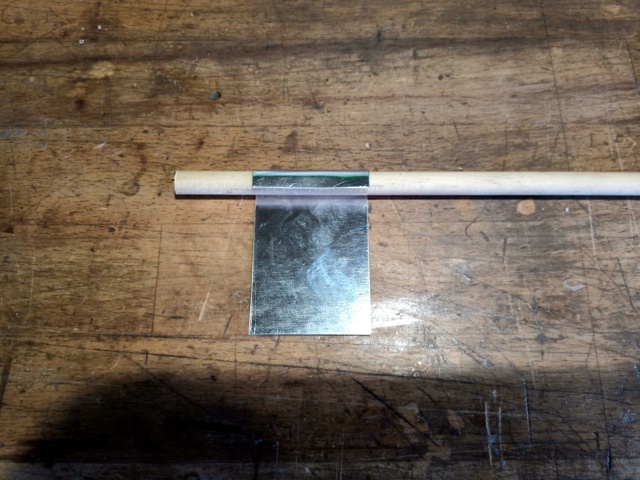
The whole top, bottom and sides were made from this piece using a piece of wooden dowel to form it around. There is not a crease or fold in it...just two half circle curves top and bottom
I have some build pics if any one is interested.
The formed piece was then soldered together using lead/tin mix multi core solder and Bakers soldering fluid for flux.
Two holes were then drilled top and bottom for the feed and vents.
Do not use a 3mm drill as you will rip and distort the metal.
Drill a 2mm hole and enlarge it with a round rat tail.
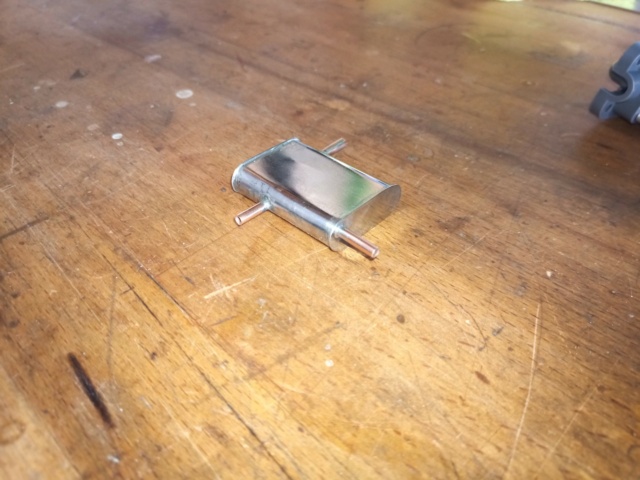
A portion of metal was filed out on the end of each tube so as to allow fuel and air flow.
Tubes then soldered in place.
Now for the clever bit.
Rather than spending ages cutting and filing the two ends to shape and then soldering them, one end was just a piece of rectangular tin plate flat on the bench with the tank held on it and then soldered all around.
After completion of the soldering, the feed tube was inserted after of course drilling the hole.
Quick inspection to make sure no filings or bits of metal inside and then solder the other end.
Finally the remaining metal on each end was cut off with scissors and then filed leaving a 1mm ledge all around.
Voila! Une fuel tank!!!!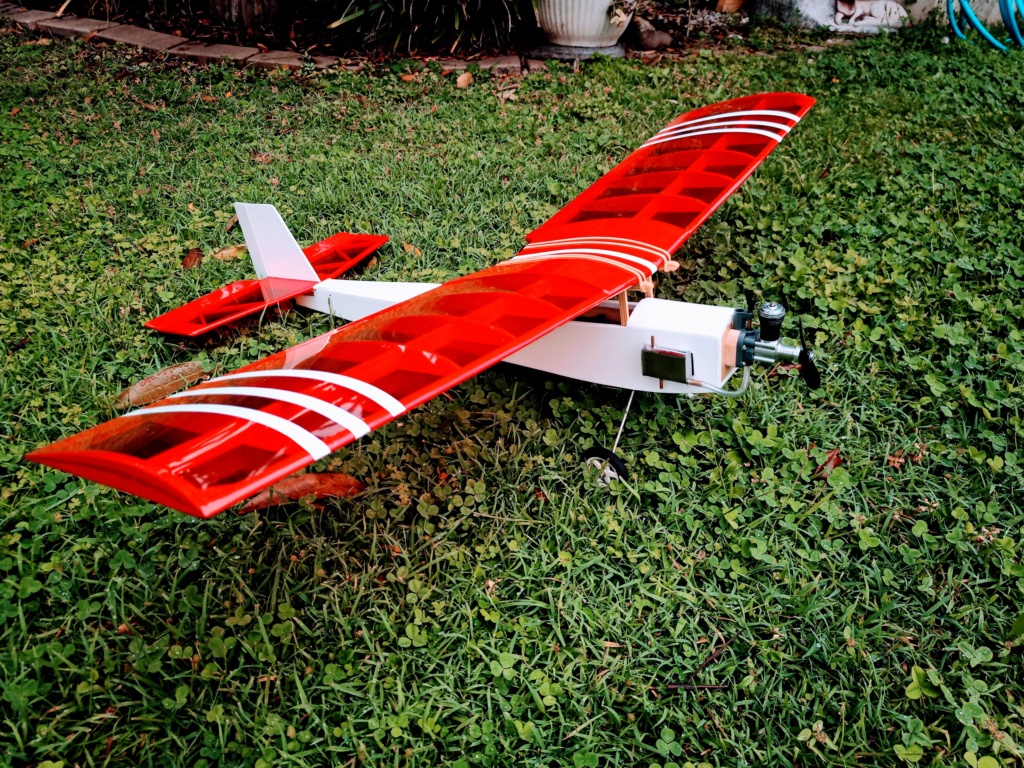


Woody- Gold Member

- Posts : 133
Join date : 2022-04-20
 Re: Q Tee 2ch RC sport model with Cox 049 and home brew tank.
WOW...JUST WOW!!!!!!
Excellent build that just screams "Vintage Cool"!!!!!
Great job, and yet ANOTHER Q-Tee takes to the sky!
Excellent build that just screams "Vintage Cool"!!!!!
Great job, and yet ANOTHER Q-Tee takes to the sky!

Kim- Top Poster


Posts : 8625
Join date : 2011-09-06
Location : South East Missouri
 Re: Q Tee 2ch RC sport model with Cox 049 and home brew tank.
That fuel tank is absolutely beautiful. Held on by doubly sticky foam tape? I have used it. Helps reduce foaming from vibration.
Love your plane. Shows attention to detail, but that castor thrower (Kim hold the rights to "slinger") may still dirty your planes interior unless some windshields are added.
Good luck with it, would love to see it in the air. Any yes, some pictures of the fuel tank under construction would be appreciated.
Bob

rsv1cox- Top Poster


Posts : 11250
Join date : 2014-08-18
Location : West Virginia
 Re: Q Tee 2ch RC sport model with Cox 049 and home brew tank.
rsv1cox wrote:
Love your plane. Shows attention to detail, but that castor thrower (Kim hold the rights to "slinger") may still dirty your planes interior unless some windshields are added.
Bob
I never enforce the copyright!!!!

Kim- Top Poster


Posts : 8625
Join date : 2011-09-06
Location : South East Missouri
 Re: Q Tee 2ch RC sport model with Cox 049 and home brew tank.
Wow. Both a beautiful plane and fuel tank. Great Job. The tank design is something I really like, and also, I like how you mounted it on teh outside of teh airframe. Very ingenius. Great thoughts.

NEW222- Top Poster

- Posts : 3896
Join date : 2011-08-13
Age : 46
Location : oakbank, mb
 Re: Q Tee 2ch RC sport model with Cox 049 and home brew tank.
Thanks for all your nice comments.
I have just spent some time writing a more detailed blurb on the tank build with some pictures ( six).
I have sent them but God knows where they have gone.
Bob ( Moderator??) if you come across them, would you be so kind as to put them in the right place?
Many thanks
Woody.
I have just spent some time writing a more detailed blurb on the tank build with some pictures ( six).
I have sent them but God knows where they have gone.
Bob ( Moderator??) if you come across them, would you be so kind as to put them in the right place?
Many thanks
Woody.

Woody- Gold Member

- Posts : 133
Join date : 2022-04-20
 Re: Q Tee 2ch RC sport model with Cox 049 and home brew tank.
Wow, this is what I call a neat build, down to the smallest details...it sure takes a lot of craft and patience (neither of those I have enough). I wish my builds looked half as beautiful as yours.. 
I guess you have applied some protective coating on the uncovered engine bulkhead to prevent castor from ingressing?
We are looking forward to your video on a maiden flight...
Congratulations!
I guess you have applied some protective coating on the uncovered engine bulkhead to prevent castor from ingressing?
We are looking forward to your video on a maiden flight...
Congratulations!

balogh- Top Poster


Posts : 4958
Join date : 2011-11-06
Age : 66
Location : Budapest Hungary
 Re: Q Tee 2ch RC sport model with Cox 049 and home brew tank.
Thank you for your kind comments.balogh wrote:Wow, this is what I call a neat build, down to the smallest details...it sure takes a lot of craft and patience (neither of those I have enough). I wish my builds looked half as beautiful as yours..
I guess you have applied some protective coating on the uncovered engine bulkhead to prevent castor from ingressing?
We are looking forward to your video on a maiden flight...
Congratulations!
There remain just a few refinements like Maltese Crosses and a Windshield which I am working on.
I will post another picture of the finished product.
I do not possess a go pro for flights but I do have a mobius 3 video camera which I shall mount on board a la Kim's methods.
Yes the firewall has six coats of varnish.

Woody- Gold Member

- Posts : 133
Join date : 2022-04-20
 Re: Q Tee 2ch RC sport model with Cox 049 and home brew tank.
Kim wrote:rsv1cox wrote:
Love your plane. Shows attention to detail, but that castor thrower (Kim hold the rights to "slinger") may still dirty your planes interior unless some windshields are added.
Bob
I never enforce the copyright!!!!


rsv1cox- Top Poster


Posts : 11250
Join date : 2014-08-18
Location : West Virginia
 Re: Q Tee 2ch RC sport model with Cox 049 and home brew tank.
Woody wrote:Thanks for all your nice comments.
I have just spent some time writing a more detailed blurb on the tank build with some pictures ( six).
I have sent them but God knows where they have gone.
Bob ( Moderator??) if you come across them, would you be so kind as to put them in the right place?
Many thanks
Woody.
Not a moderator, I'm just a guy that hangs around and steps in it every now and then. If I come across your photos I will ensure they are published.
Bob

rsv1cox- Top Poster


Posts : 11250
Join date : 2014-08-18
Location : West Virginia
 Re: Q Tee 2ch RC sport model with Cox 049 and home brew tank.
WOW is right that plane Looks great and the tank takes pride out to admire it on the fuse , If it flies as good as it looks you will bee one proud boy ! Yes videos if possible , Thanks 


getback- Top Poster


Posts : 10442
Join date : 2013-01-18
Age : 67
Location : julian , NC
 Re: Q Tee 2ch RC sport model with Cox 049 and home brew tank.
Great build!! Your tank construction technique has eliminated the major obstacles of DIY tanks, particularly the end caps. Very impressive.
Waiting for the pics to show up.
Waiting for the pics to show up.

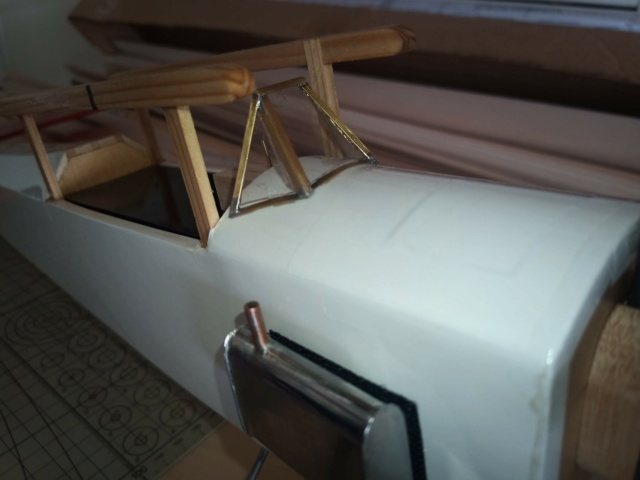
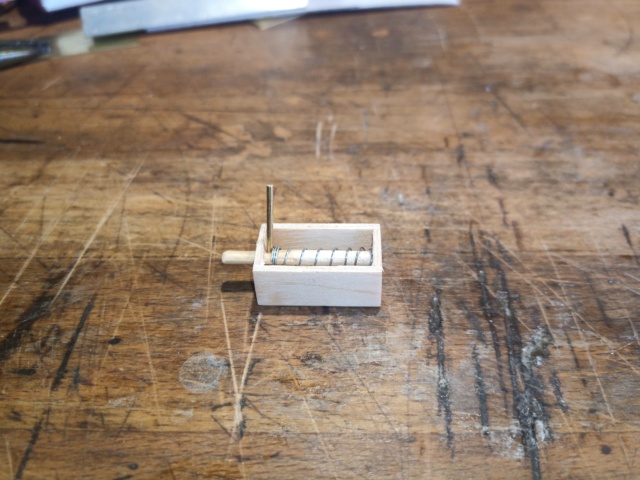
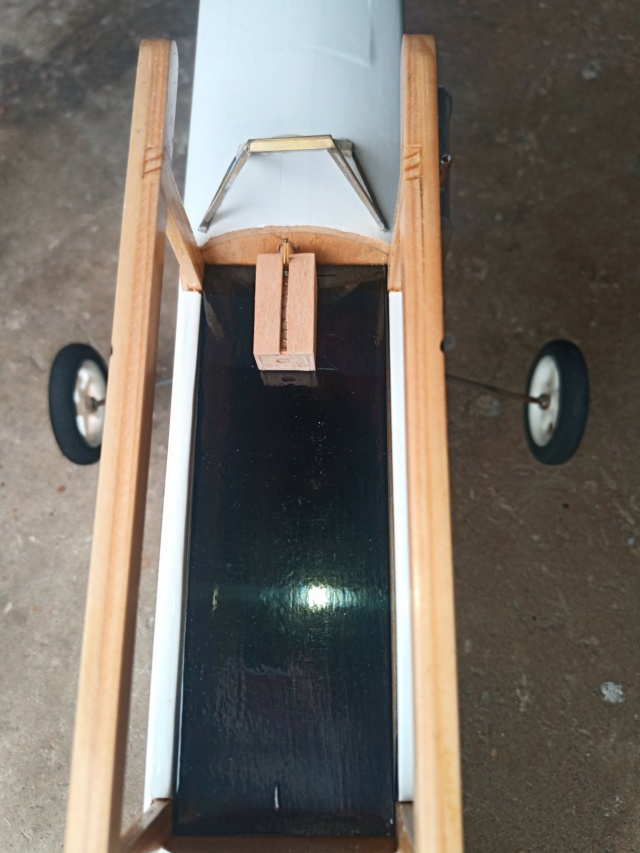
 Fuel tank build pictures.
Last edited by Woody on Wed Apr 27, 2022 4:12 pm; edited 1 time in total (Reason for editing : inclusion of images)

Woody- Gold Member

- Posts : 133
Join date : 2022-04-20
 Re: Q Tee 2ch RC sport model with Cox 049 and home brew tank.
Difference in speed between power on and power off glide under reedie power is only slight, so throttle is not necessary for fun. Q-Tee's forte is its wing area, I've even successfully flown Q-Tee at 6,500 ft. (1,981 m) elevation on Golden Bee power.Woody wrote:I was so impressed by watching Kim's You Tube of him flying his little Q Tee model with a simple Cox motor without throttle.
Nice, you can tell a control line flyer by his tank installation!

Excellent tank construction work, by the way.


GallopingGhostler- Top Poster


Posts : 5724
Join date : 2013-07-13
Age : 70
Location : Clovis NM or NFL KC Chiefs

Woody- Gold Member

- Posts : 133
Join date : 2022-04-20
 Re: Q Tee 2ch RC sport model with Cox 049 and home brew tank.
Beautiful Work!!!

Kim- Top Poster


Posts : 8625
Join date : 2011-09-06
Location : South East Missouri
 Re: Q Tee 2ch RC sport model with Cox 049 and home brew tank.
Thanks Kim.Kim wrote:Beautiful Work!!!
I have been looking through the forum on other people's work and by heck there are some good modellers on board here.
I am getting sorely tempted to make a 1/2 A control liner.
I really like " Coxy"..
Thing is I am a lone star and nobody to launch it.
I will post a thread asking about self launching systems.
My field is a bit rough so I need to peg down some sort of portable take off mat?
Since you hooked me on this!!! ( Thanks) ...I have now got three Cox engines!!!!
Love it.

Woody- Gold Member

- Posts : 133
Join date : 2022-04-20
 Re: Q Tee 2ch RC sport model with Cox 049 and home brew tank.
Um... I think I'm missing something here. The Q Tee is an R/C plane, right? That looks like a (brilliantly constructed) Control line tank to me. I mean, I don't expect the Q Tee to be doing much inverted flying, but is that tank going to do the job? Just thinking out loud.
Rod.
Rod.

Oldenginerod- Top Poster

- Posts : 4018
Join date : 2012-06-15
Age : 62
Location : Drouin, Victoria
 Re: Q Tee 2ch RC sport model with Cox 049 and home brew tank.
Woody wrote:Thanks Kim.Kim wrote:Beautiful Work!!!
I have been looking through the forum on other people's work and by heck there are some good modellers on board here.
I am getting sorely tempted to make a 1/2 A control liner.
Since you hooked me on this!!! ( Thanks) ...I have now got three Cox engines!!!!
Love it.
"The Force is Strong with This One!!!"
Darth Kim


Kim- Top Poster


Posts : 8625
Join date : 2011-09-06
Location : South East Missouri
 Re: Q Tee 2ch RC sport model with Cox 049 and home brew tank.

GallopingGhostler- Top Poster


Posts : 5724
Join date : 2013-07-13
Age : 70
Location : Clovis NM or NFL KC Chiefs
 Re: Q Tee 2ch RC sport model with Cox 049 and home brew tank.
Very good built, excellent craftsmanship 
Be sure to flush fuel tank with alcohol to clean flux residue. Engine mount is fuelproofed?

Be sure to flush fuel tank with alcohol to clean flux residue. Engine mount is fuelproofed?


Levent Suberk- Diamond Member

- Posts : 2265
Join date : 2017-12-24
Location : Türkiye
 Re: Q Tee 2ch RC sport model with Cox 049 and home brew tank.
Levent Suberk wrote:Very good built, excellent craftsmanship
Be sure to flush fuel tank with alcohol to clean flux residue. Engine mount is fuelproofed?

Thank you for reminding me. I will do that.
I left the engine mount unfuel proofed as I did nt think it would matter if it gets fuel soaked?

Woody- Gold Member

- Posts : 133
Join date : 2022-04-20
 Re: Q Tee 2ch RC sport model with Cox 049 and home brew tank.
Woody wrote:Levent Suberk wrote:Very good built, excellent craftsmanship
Be sure to flush fuel tank with alcohol to clean flux residue. Engine mount is fuelproofed?

Thank you for reminding me. I will do that.
I left the engine mount unfuel proofed as I did nt think it would matter if it gets fuel soaked?
It is good to fuelproof bare wood with alcohol thinned 24 hr epoxy or what kind of fuelproofer you favor. Otherwise wood defects within time, especially plywood.

Levent Suberk- Diamond Member

- Posts : 2265
Join date : 2017-12-24
Location : Türkiye
 Re: Q Tee 2ch RC sport model with Cox 049 and home brew tank.
Levent Suberk wrote:Woody wrote:Levent Suberk wrote:Very good built, excellent craftsmanship
Be sure to flush fuel tank with alcohol to clean flux residue. Engine mount is fuelproofed?

Thank you for reminding me. I will do that.
I left the engine mount unfuel proofed as I did nt think it would matter if it gets fuel soaked?
It is good to fuelproof bare wood with alcohol thinned 24 hr epoxy or what kind of fuelproofer you favor. Otherwise wood defects within time, especially plywood.
Brilliant...
I have 24 hr Araldite epoxy.
so I thin this with alcohol?...Methelated spirit?
Thats an excellent tip.
I thank you for this.
Always something to learn.

Woody- Gold Member

- Posts : 133
Join date : 2022-04-20
 Re: Q Tee 2ch RC sport model with Cox 049 and home brew tank.
Woody wrote:Levent Suberk wrote:Woody wrote:Levent Suberk wrote:Very good built, excellent craftsmanship
Be sure to flush fuel tank with alcohol to clean flux residue. Engine mount is fuelproofed?

Thank you for reminding me. I will do that.
I left the engine mount unfuel proofed as I did nt think it would matter if it gets fuel soaked?
It is good to fuelproof bare wood with alcohol thinned 24 hr epoxy or what kind of fuelproofer you favor. Otherwise wood defects within time, especially plywood.
Brilliant...
I have 24 hr Araldite epoxy.
so I thin this with alcohol?...Methelated spirit?
Thats an excellent tip.
I thank you for this.
Always something to learn.
I thin 24 hr epoxy with ethyl alcohol, but a little alcohol must be used, otherwise it will be rubbery. I brush the thinned epoxy on wood. Brush marks can be invisible with a heat gun, but no need too much heat because too much heat can deform covering film.
I didn't try methylated spirits, rubbing alcohol but I think that it can be used, because alcohol is alcohol when we speak for thinning a chemical.

Levent Suberk- Diamond Member

- Posts : 2265
Join date : 2017-12-24
Location : Türkiye
Page 1 of 2 • 1, 2 
 Similar topics
» Scientific P-40 Red Tiger
» Wanted: Firewall & tank for Super Sport Trainer PLUS Landing Gear
» Ken Willard Photo--Endurance Model---in an old Model Airplane News
» There is a Cox model airplane fan over on the Model Train Forum
» My "Model of a Model" Tiny Lazy Bee !!!!
» Wanted: Firewall & tank for Super Sport Trainer PLUS Landing Gear
» Ken Willard Photo--Endurance Model---in an old Model Airplane News
» There is a Cox model airplane fan over on the Model Train Forum
» My "Model of a Model" Tiny Lazy Bee !!!!
Page 1 of 2
Permissions in this forum:
You cannot reply to topics in this forum

 Rules
Rules


