Log in
Search
Latest topics
» Cox films/videos...by Coxfledgling Today at 4:46 am
» Purchased the last of any bult engines from Ken Enya
by Coxfledgling Today at 4:18 am
» My N-1R build log
by roddie Today at 12:32 am
» Happy 77th birthday Andrew!
by akjgardner Today at 12:27 am
» TEE DEE Having issues
by TD ABUSER Yesterday at 9:43 pm
» Landing-gear tips
by roddie Yesterday at 6:17 pm
» Roger Harris revisited
by TD ABUSER Yesterday at 2:13 pm
» Tee Dee .020 combat model
by Ken Cook Yesterday at 1:41 pm
» Retail price mark-up.. how much is enough?
by Ken Cook Yesterday at 1:37 pm
» My latest doodle...
by roddie Yesterday at 10:43 am
» Chocolate chip cookie dough.........
by roddie Fri Nov 22, 2024 1:13 pm
» Free Flight Radio Assist
by rdw777 Fri Nov 22, 2024 9:24 am
Cox Engine of The Month
Wood removal
Page 1 of 2
Page 1 of 2 • 1, 2 
 Re: Wood removal
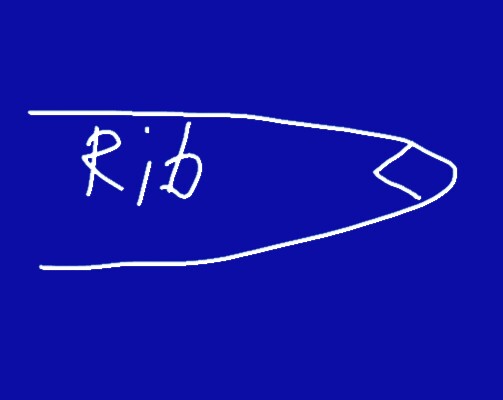
Turn the wood 45º and have one corner facing forward, one up, one down etc. That way you should only need to round off the front edge.

Oldenginerod- Top Poster

- Posts : 4018
Join date : 2012-06-15
Age : 62
Location : Drouin, Victoria
 Re: Wood removal
On reflection, that would depend on your rib configuration. You really need a triangular section rather than square so that the inner face of the leading edge is perpendicular, assuming the the ribs have a vertical front edge.
All the kits I built as a kid (Aussie Areoflyte) used a square / diamond section leading edge with the front of each rib having a birds-mouth cut-out.
All the kits I built as a kid (Aussie Areoflyte) used a square / diamond section leading edge with the front of each rib having a birds-mouth cut-out.
Last edited by Oldenginerod on Fri Oct 30, 2020 1:28 am; edited 1 time in total (Reason for editing : Additional info.)

Oldenginerod- Top Poster

- Posts : 4018
Join date : 2012-06-15
Age : 62
Location : Drouin, Victoria

Oldenginerod- Top Poster

- Posts : 4018
Join date : 2012-06-15
Age : 62
Location : Drouin, Victoria
 Re: Wood removal
#50 sandpaper on a long block. It actually works great and you can finish up with something finer.

706jim- Gold Member

- Posts : 472
Join date : 2013-11-29
 Re: Wood removal
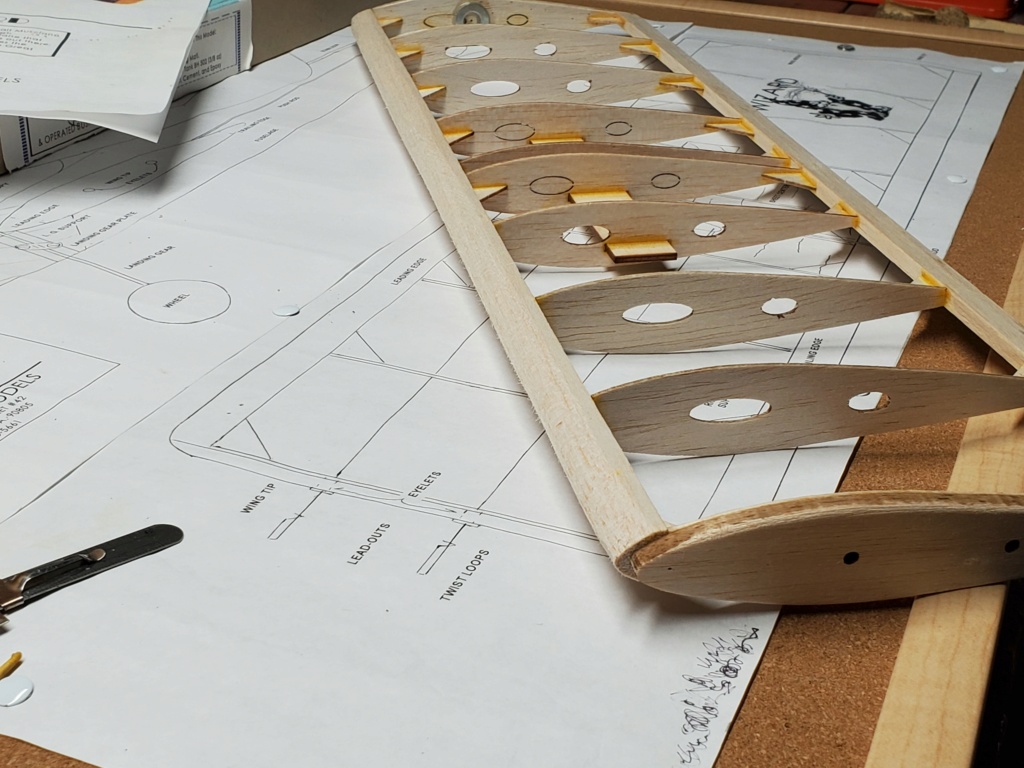
Ya...this thing had squared off rib ends butted up to the leading and trailing edges. Thats the way the kit was designed and made. I'm used to slotted pre-formed leading edges!

OhBee- Platinum Member

- Posts : 698
Join date : 2016-03-23
Age : 73
Location : Minnesota
 Re: Wood removal
Following directions to the letter, but never saw a wing built like this! Not into redesigning the kit...and it's a bit late for that!

OhBee- Platinum Member

- Posts : 698
Join date : 2016-03-23
Age : 73
Location : Minnesota
 Re: Wood removal
Yes.. kits can throw you some curve-balls. You expect this when building from plans.. but not a kit. Try taking a breather from it for a few days. It will "click" before too long.. and you'll get it built.
 Re: Wood removal
Ya...I hit a snag,or somethimg I need to ponder for awhile,and I just move on to something else for
a change ...like landing gear today. Tiny parts are becoming a challenge!
a change ...like landing gear today. Tiny parts are becoming a challenge!

OhBee- Platinum Member

- Posts : 698
Join date : 2016-03-23
Age : 73
Location : Minnesota
 Re: Wood removal
OhBee,
A little late now, but this is where a home-made notching tool would help. Mine is an old hacksaw blade piece about 7" long, with fences super glued to either side of the blade. The fences keep the blade from cutting too deeply. If the wing is truly just a rectangle, then the leading edge and trailing edge are set side-by-side, and the rib notches are cut into both pieces at once. If the rib is thicker, double up your hacksaw blades. My thicker one has two blades with the teeth cutting in each direction.
Then it is just a process to trim the LE/TE with a small hobby wood plane. I have two planes. One is an antique that uses my cast-off DE razors (too dull for face is just fine for balsa wood). The other is a newer one from Lowe's...a cheapie that can be resharpened.
It appears to me that this wing will then have fairly flat wing tips with very blunt, but rounded edges around the wing tips.
Last edited by 944_Jim on Sat Oct 31, 2020 6:00 pm; edited 1 time in total
_________________
Never enough time to build them all...always enough time to smash them all!
944_Jim- Diamond Member


Posts : 2022
Join date : 2017-02-08
Age : 59
Location : NE MS
 Re: Wood removal
Hey Jim!....ya... this is kinda a learn as you go project! A bit different than what I recall back in the day.
No rush....it'll all come together eventually!
No rush....it'll all come together eventually!

OhBee- Platinum Member

- Posts : 698
Join date : 2016-03-23
Age : 73
Location : Minnesota
 Re: Wood removal
All the gussets I see have their grain orientated incorrectly. You didn't install them incorrectly, they were made incorrectly. The grain needs to run parallel to the 45 deg angle. The only thing that I see them actually doing is offering more glue area. If the center section is sheeted the only ribs requiring them would be the outer tip rips in all four corners.

Ken Cook- Top Poster

- Posts : 5640
Join date : 2012-03-27
Location : pennsylvania
 Re: Wood removal
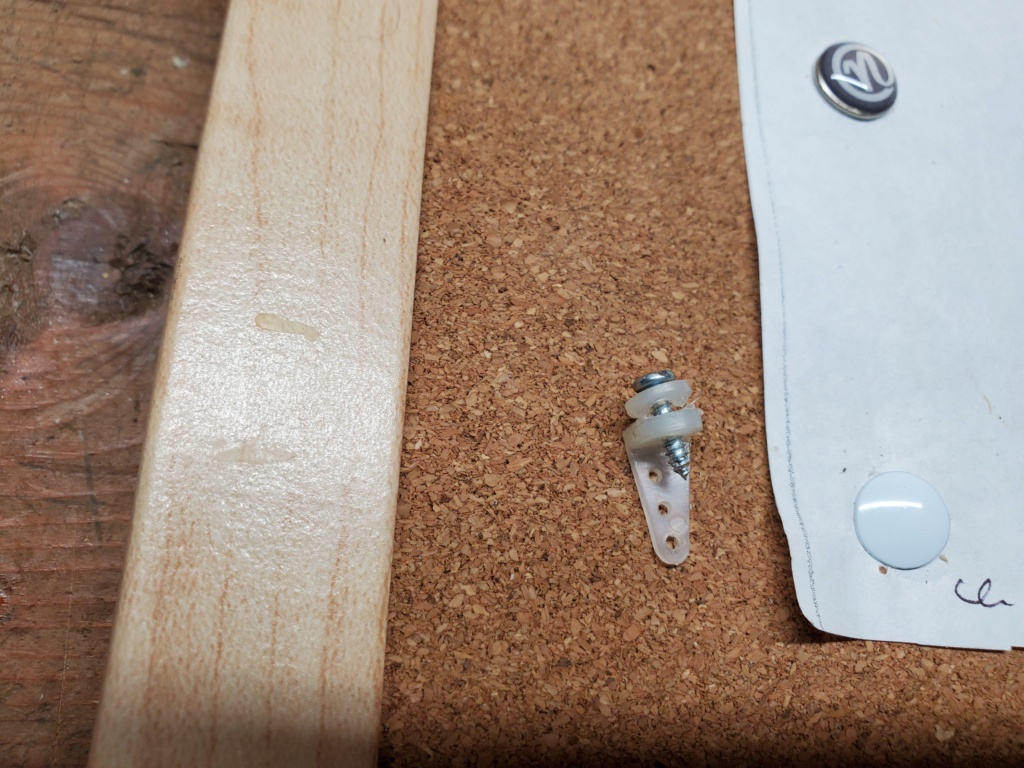
Never noticed that Ken! There's a few that are right! After ripping a hole in the elevator trying to install the control horn...I'm done!

OhBee- Platinum Member

- Posts : 698
Join date : 2016-03-23
Age : 73
Location : Minnesota
 Re: Wood removal
The wood or the control horn? If it’s the wood then the large end toward the stabilizing surface.
If you are talking about the horn then it was just made improperly. Don’t sweat the small things. It will bolt together and work just fine.
If you are talking about the horn then it was just made improperly. Don’t sweat the small things. It will bolt together and work just fine.

Cribbs74- Moderator


Posts : 11907
Join date : 2011-10-24
Age : 50
Location : Tuttle, OK
 Re: Wood removal
The control horn itself....flat edge forward?

OhBee- Platinum Member

- Posts : 698
Join date : 2016-03-23
Age : 73
Location : Minnesota
 Re: Wood removal
That's how I'd do it.OhBee wrote:The control horn itself....flat edge forward?


Oldenginerod- Top Poster

- Posts : 4018
Join date : 2012-06-15
Age : 62
Location : Drouin, Victoria
 Re: Wood removal
I've used those horns before and they're not the best. A little too flexible and can easily loosen and rotate, causing them to bind on the pushrod. A dab of CA can help. The type with two screws are better.

Oldenginerod- Top Poster

- Posts : 4018
Join date : 2012-06-15
Age : 62
Location : Drouin, Victoria
 Re: Wood removal
Razor plane then longboard sander.
Use some wide angle aluminum to make a cheap long board sander with adhesive paper.
Make a female template accurate to the plan including part of the rib.
Have fun, that is going to take a while.
Phil
Use some wide angle aluminum to make a cheap long board sander with adhesive paper.
Make a female template accurate to the plan including part of the rib.
Have fun, that is going to take a while.
Phil

pkrankow- Top Poster

- Posts : 3025
Join date : 2012-10-02
Location : Ohio
 Re: Wood removal
Ya..I don't have a plane....what I did was carefully take off a bunch with a razor sharp jacknife,then switched to a small block wrapped with 60 grit! Getting there but tedious. All the sawdust causes my nose to run ,and lots of coughing!.......no I don't got a mask!

OhBee- Platinum Member

- Posts : 698
Join date : 2016-03-23
Age : 73
Location : Minnesota
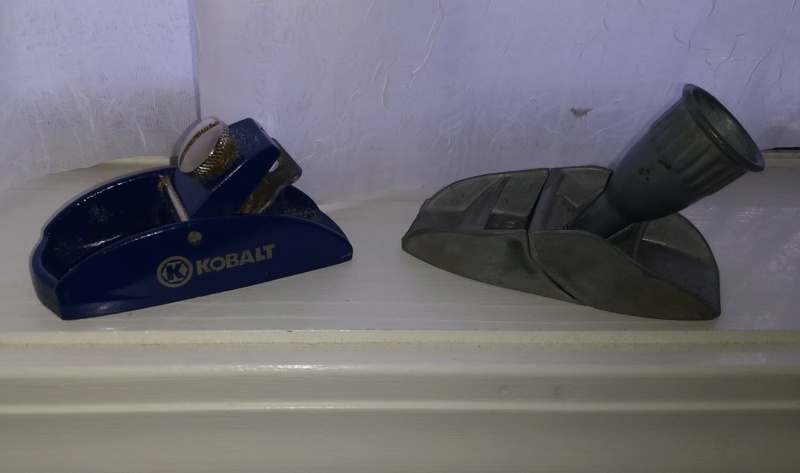
 My smallest planes
Looking good, OhBee!
The Kobalt is a Lowe's item...$11. Depth of cut is adjustable, but the knife edge needs to be dressed from time to time. I'm getting better at sharpening it.
The WilKro is an antique picked up on eBay. I like it because it uses my DE razor blades (after they lose too much edge for my face). It can be re-configured as a bull-nose, a spoke-shave, or long like it is here. Depth of cut can't be changed very much. But it would cut potatoes thinly enough to make almost see through potato chips!

_________________
Never enough time to build them all...always enough time to smash them all!

944_Jim- Diamond Member


Posts : 2022
Join date : 2017-02-08
Age : 59
Location : NE MS
 Re: Wood removal
I'd swear I have a small plane somewhere from when I made archery bows! ...Not a clue where. Half my stuff is still in boxes from moving in May!.....and a lot of stuff still in a storage unit 30 mi. away!

OhBee- Platinum Member

- Posts : 698
Join date : 2016-03-23
Age : 73
Location : Minnesota
Page 1 of 2 • 1, 2 
 Similar topics
» F-82 Twin Mustang build thread- preliminary
» Wood glues and other questions
» Balsa wood.
» Wanted: Plier marked TD drive plates
» Bed Wood restoration
» Wood glues and other questions
» Balsa wood.
» Wanted: Plier marked TD drive plates
» Bed Wood restoration
Page 1 of 2
Permissions in this forum:
You cannot reply to topics in this forum

 Rules
Rules


