Log in
Search
Latest topics
» Cox films/videos...by Coxfledgling Today at 4:46 am
» Purchased the last of any bult engines from Ken Enya
by Coxfledgling Today at 4:18 am
» My N-1R build log
by roddie Today at 12:32 am
» Happy 77th birthday Andrew!
by akjgardner Today at 12:27 am
» TEE DEE Having issues
by TD ABUSER Yesterday at 9:43 pm
» Landing-gear tips
by roddie Yesterday at 6:17 pm
» Roger Harris revisited
by TD ABUSER Yesterday at 2:13 pm
» Tee Dee .020 combat model
by Ken Cook Yesterday at 1:41 pm
» Retail price mark-up.. how much is enough?
by Ken Cook Yesterday at 1:37 pm
» My latest doodle...
by roddie Yesterday at 10:43 am
» Chocolate chip cookie dough.........
by roddie Fri Nov 22, 2024 1:13 pm
» Free Flight Radio Assist
by rdw777 Fri Nov 22, 2024 9:24 am
Cox Engine of The Month
Baby Ringmaster fever
Page 2 of 3
Page 2 of 3 •  1, 2, 3
 Re: Baby Ringmaster fever
Oldenginerod wrote:The Pat King 21" span Beginners Ringmaster plan shows a 2 1/8" SIG 1/2A bellcrank through a 3/4" leadout guide. Guide is an inch back from the leading edge, centre of the bellcrank 1 1/2" back.
How can I attach PDF files? Otherwise Bob, if you want a copy of the plan PM me your email address & I'll shoot it off.
Rod.
Thanks Rod, PM sent.
Wondering about the forward position of the guide, on the leading edge?
A long time ago I bought a lot of 1/2A parts and among them was a box of vintage bell cranks. Small maybe but over time I have been using them up. Anyone want one, PM me your address and I'll pop one in an envelope and send it along.
I have run out of brass grommets unless I steal a couple from a servo, so I'm using blind nuts instead. Imrov,

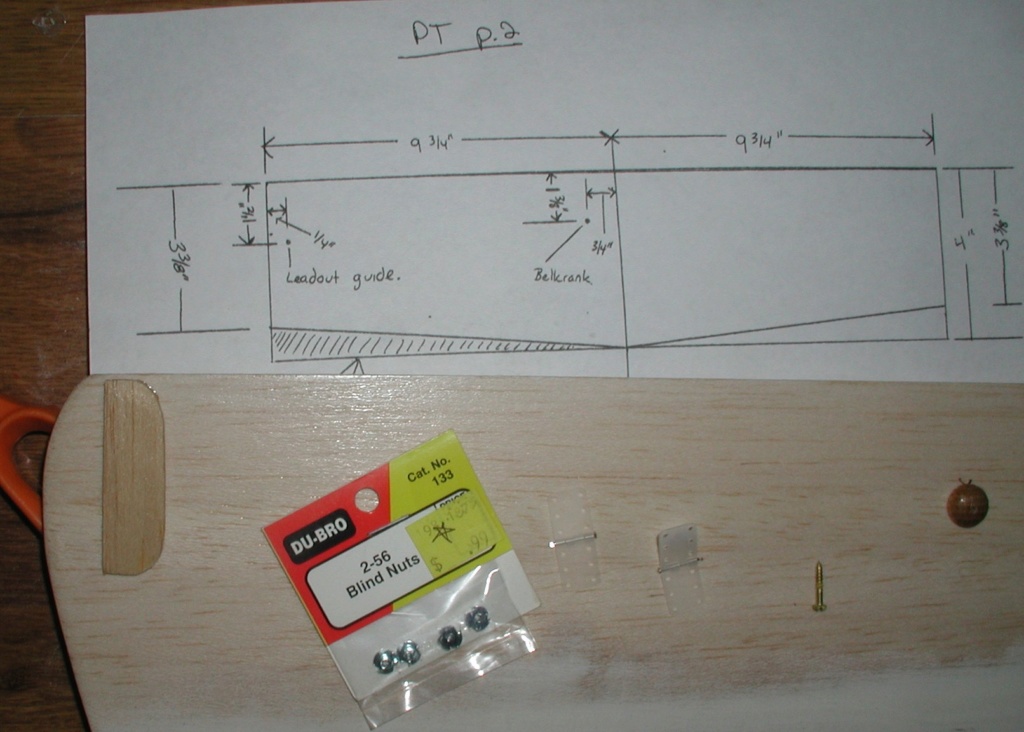
Bob

rsv1cox- Top Poster


Posts : 11250
Join date : 2014-08-18
Location : West Virginia
 Re: Baby Ringmaster fever
Bob,
I just saw your last post. That IS the same pattern I have!
So I know Chancey's pattern was used in Canada, and Northeast MS. Where are you Bob? Anyone in the extreme Northwest or Southwest using this pattern?
I guess we could have "The Travelling Pattern," and a related "BBRMC" day...that is, the "Beginner's Baby Ring Master Clone" day. I can have mine ready for winter flying if anyone wants to fly in December/January.
Bob, really sweet Cyclone! Oh, the BBRM is cute too.
Last edited by 944_Jim on Wed Oct 10, 2018 9:25 pm; edited 1 time in total (Reason for editing : Fix a person's incorrectly spelled name (sorry Chancey))
944_Jim- Diamond Member


Posts : 2022
Join date : 2017-02-08
Age : 59
Location : NE MS
 Re: Baby Ringmaster fever
If I'm reading Chancey's tracing correctly it shows the lead-out guide positioned at the leading edge of the wing. But Rod sent me PDF files (thanks Rod) of the Beginners Ring and the Baby Ring that shows it about an inch back. A critical design input.
Getting ready this morning to epoxy it in, I think I'm going to position it an inch back.
All for BBRMC day.
Bob
Getting ready this morning to epoxy it in, I think I'm going to position it an inch back.
All for BBRMC day.
Bob

rsv1cox- Top Poster


Posts : 11250
Join date : 2014-08-18
Location : West Virginia
 Lead out position
Bob, both of my Baby Ringmasters, flat wing and build up, have the leading lead out at 1" behind the front edge of the wing, both fly good and will stunt. Eddy

Eddy- Silver Member

- Posts : 94
Join date : 2018-04-29
Age : 80
Location : Portage, Michigan
 Re: Baby Ringmaster fever
Eddy wrote:Bob, both of my Baby Ringmasters, flat wing and build up, have the leading lead out at 1" behind the front edge of the wing, both fly good and will stunt. Eddy
Thanks, Eddy, that's about where I put it. Epoxied it in this morning along with the pivot base for the bell crank.
Paint time, although it's quite humid here.
Bob

rsv1cox- Top Poster


Posts : 11250
Join date : 2014-08-18
Location : West Virginia
 Re: Baby Ringmaster fever
Got out my handy dandy hinge cutter which opened here to less than rave reviews last year and cut eight hinge slots in less than a minute. Works for me, and everybody has their own favorite method.
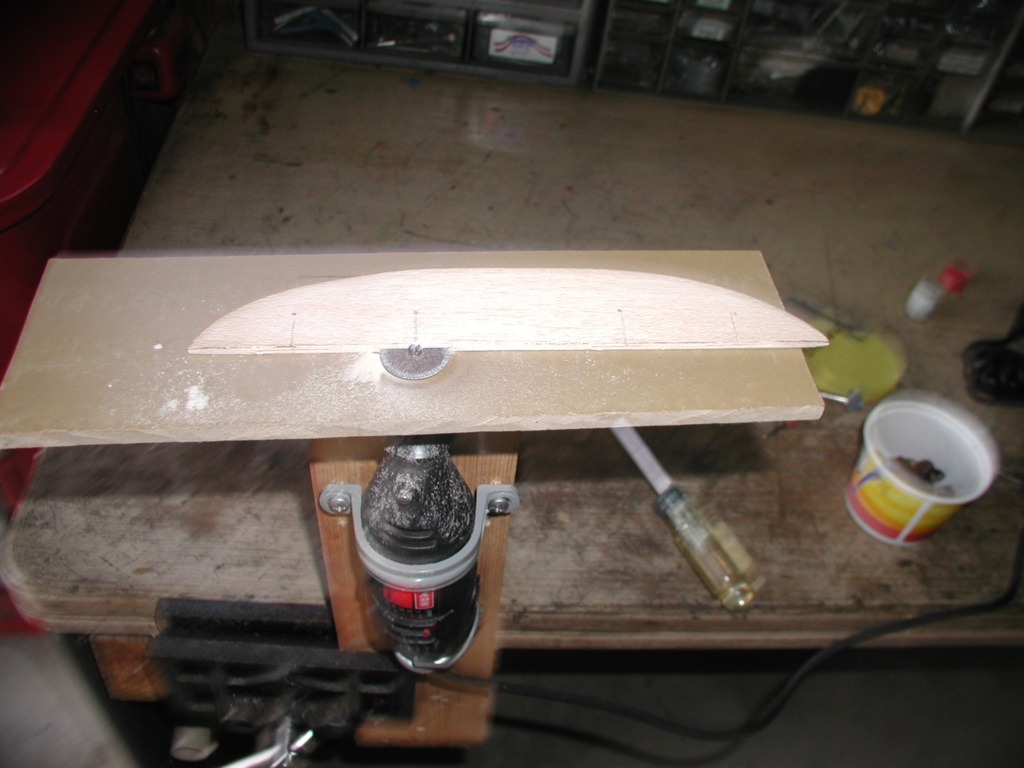
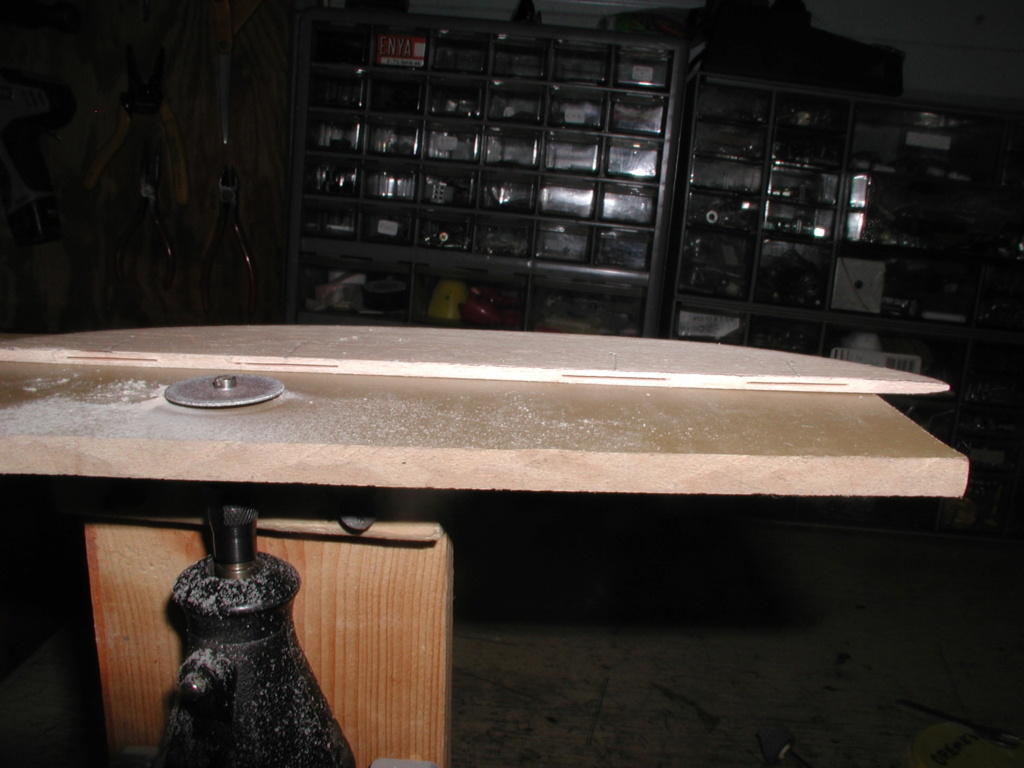
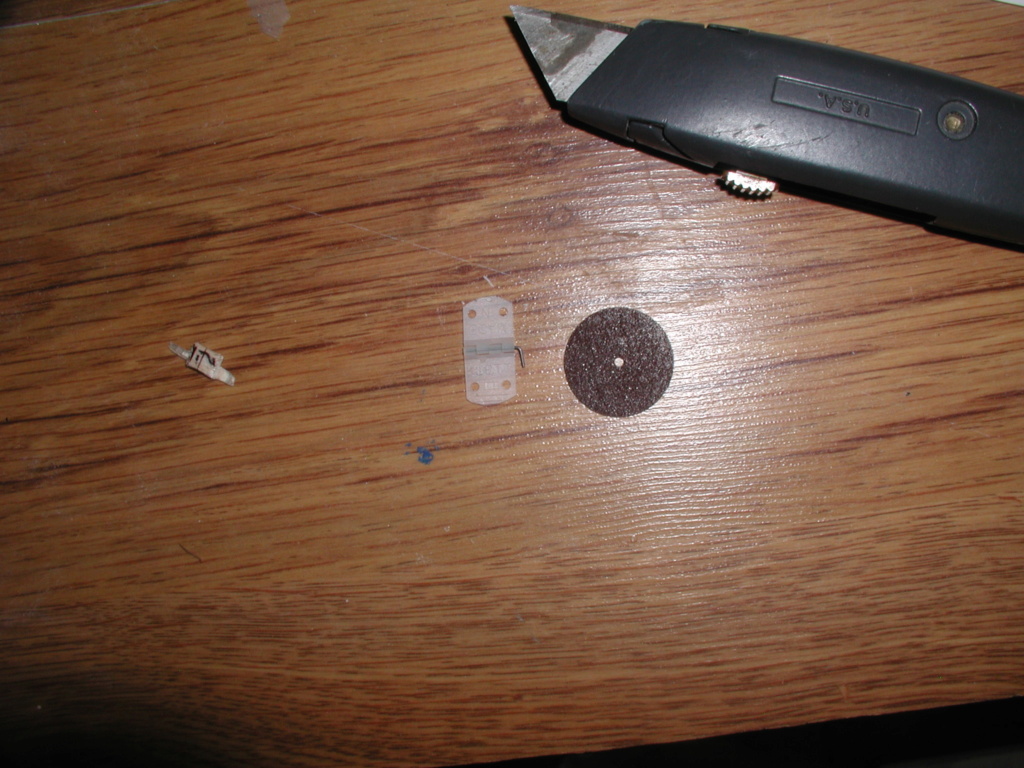
Trimmed to fit. I usually common pin them right in the middle and CA. Used to use tooth picks.
Paint next.
Bob


Trimmed to fit. I usually common pin them right in the middle and CA. Used to use tooth picks.
Paint next.
Bob

rsv1cox- Top Poster


Posts : 11250
Join date : 2014-08-18
Location : West Virginia
 Re: Baby Ringmaster fever
rsv1cox wrote:I'm following NEWS (Ok, 222 is it Chauncy, Chancy, or Chauncey?). roddie has it one way, Jim, another -and me? Who knows. sketches to the T and hoping for the best. Including the position of the bellcrank base.
Two things. First, the correct spelling is Chancey.
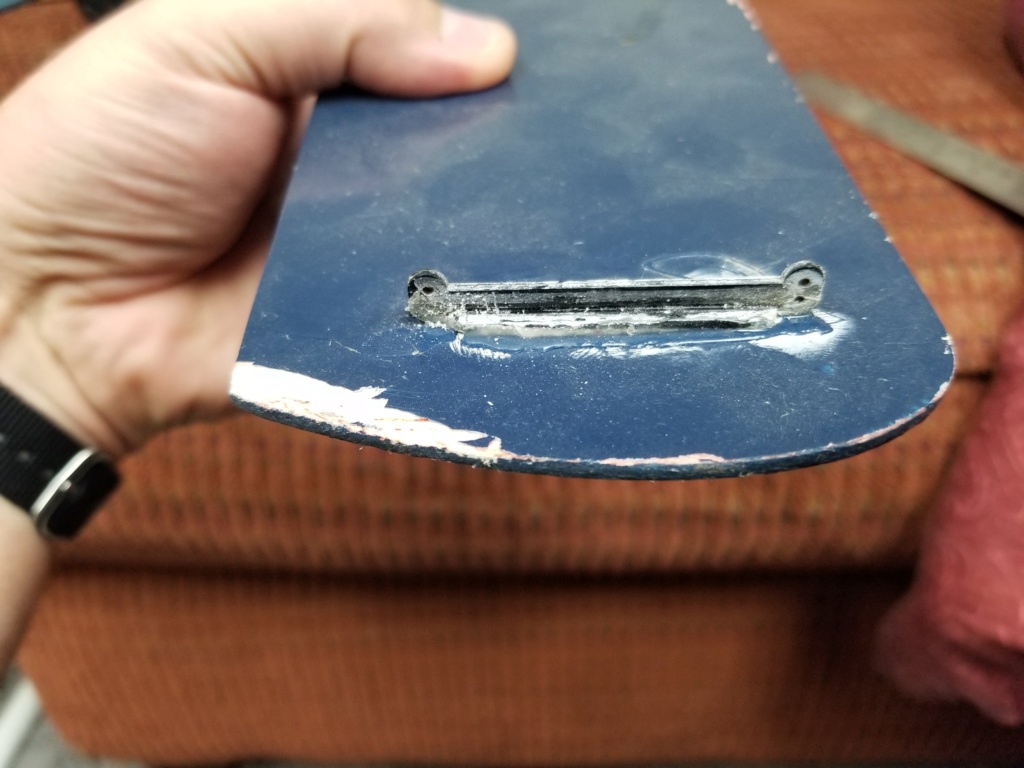
But back to the leadouts. The Estes version this was copied from included a plastic leadout guide. The distance between the holes is 1 13/16" apart, and the guide has two sets of holes to choose from. They are both 3/32" and 3/16" from the surface of the wing. I just ran outside to measure. Hope this helps some, as I missed this post yesterday.

NEW222- Top Poster

- Posts : 3896
Join date : 2011-08-13
Age : 46
Location : oakbank, mb

NEW222- Top Poster

- Posts : 3896
Join date : 2011-08-13
Age : 46
Location : oakbank, mb
 Re: Baby Ringmaster fever
I really like the looks of your hinge slotter. Much better and neater than my freehand. The last couple years however, I have switched to sewn hinges and love the freedom of movement.

NEW222- Top Poster

- Posts : 3896
Join date : 2011-08-13
Age : 46
Location : oakbank, mb
 Re: Baby Ringmaster fever
rsv1cox wrote:Got out my handy dandy hinge cutter which opened here to less than rave reviews last year and cut eight hinge slots in less than a minute. Works for me, and everybody has their own favorite method.
Bob
I love the idea! Maybe my cheap HF-clone has the power to do this. The idea of a few minutes work for practically zero hinge gap is appealing. My sewn hinges take an awfully long time to sort and sew. I don't like the appearance of taped over under hinges.
Bravo, Bob!
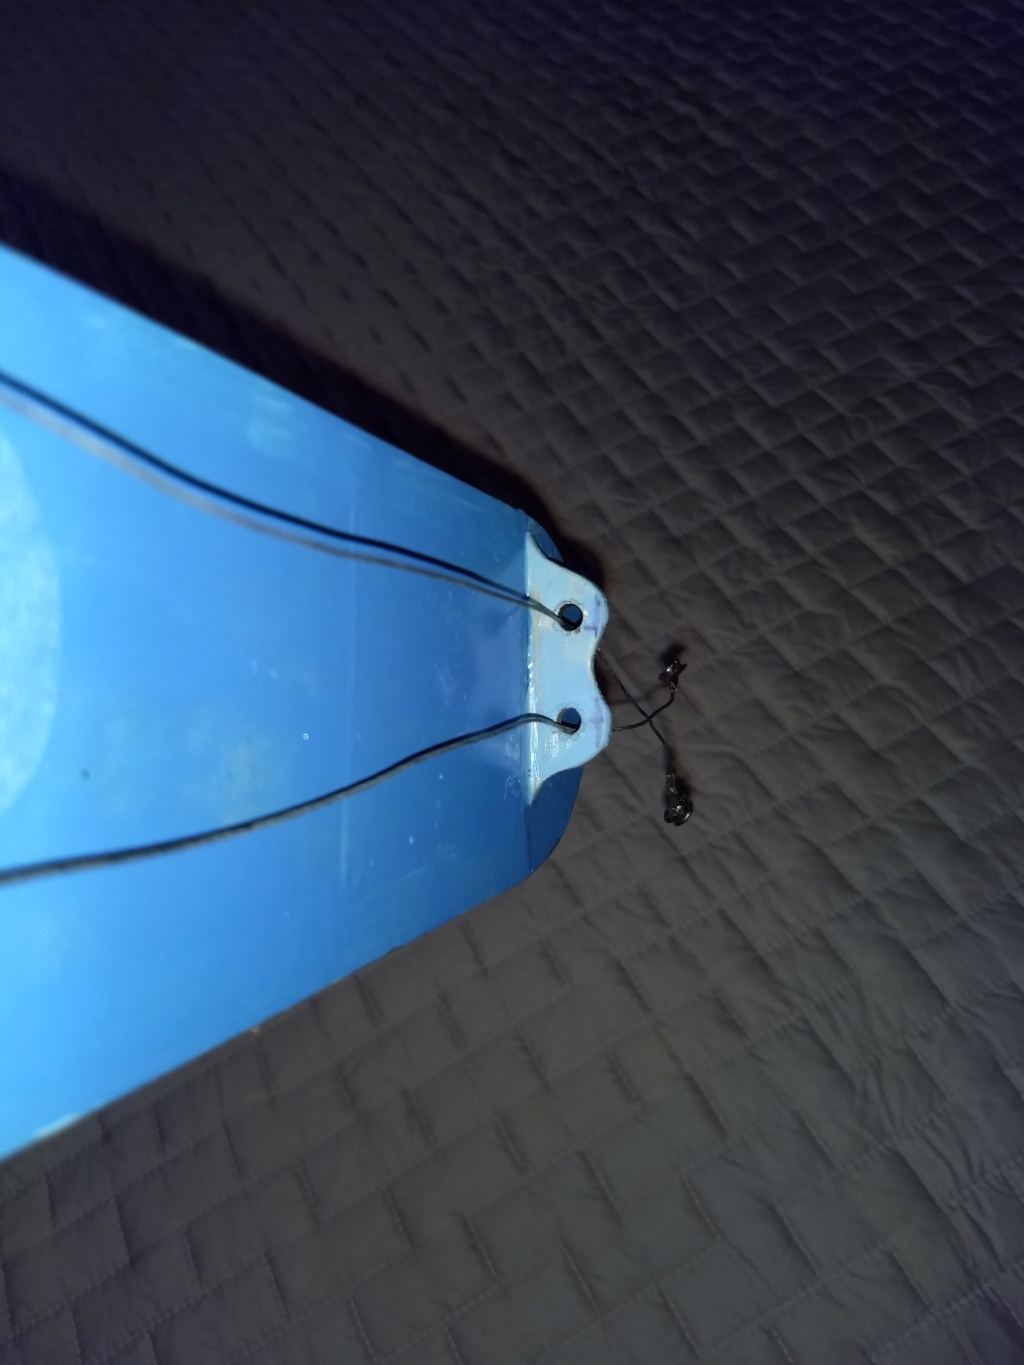
Oh, Bob...concerning your leadout guides using blind nuts: I used cheap mini eyelets from Hobby Lobby (in their sewing section) on the Scientific kits the boys built with plywood guides. While the holes are "only" 3/16" in diameter, the eyelets were somewhere around $4 for 16-ish including the anvils to swage them onto the plywood. Is it super accurate? Nope, but neither are the planes for stunting. The first two slabbies I built for them had ZERO anti-wear solutions on the guides. Those planes had steel spring wire leadouts, which were slippery enough to not cut the plywood for as long (or short) as the planes lasted.
Last edited by 944_Jim on Wed Oct 10, 2018 10:34 pm; edited 1 time in total (Reason for editing : Clarity)

944_Jim- Diamond Member


Posts : 2022
Join date : 2017-02-08
Age : 59
Location : NE MS
 Re: Baby Ringmaster fever
That looks really good there Jim. If I'm not mistaken, did you add plywood doubters to yours?

NEW222- Top Poster

- Posts : 3896
Join date : 2011-08-13
Age : 46
Location : oakbank, mb
 Re: Baby Ringmaster fever
Thanks for the picture Chancy, looks to be about 1 13/16" lead out guide width. I just guessed at mine at 1 3/8". Seems to be an arbitrary measurement though as looking at some of mine (balsa and plastic) they vary greatly. In fact the PDF that Rod sent me shows the distance to be quite constricted when compared to the bell crank. The Cox PT-19 being very wide.


For the lead outs I now use solid piano wire, a transition from stranded. Always a worry about "sawing" through the bell crank.
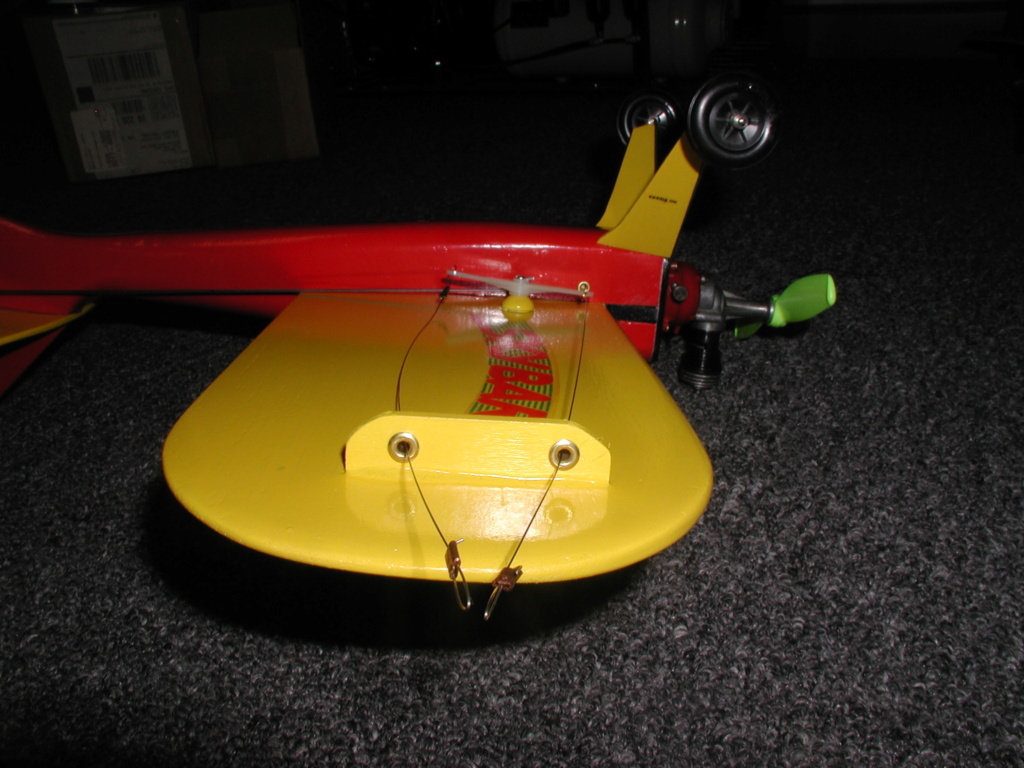
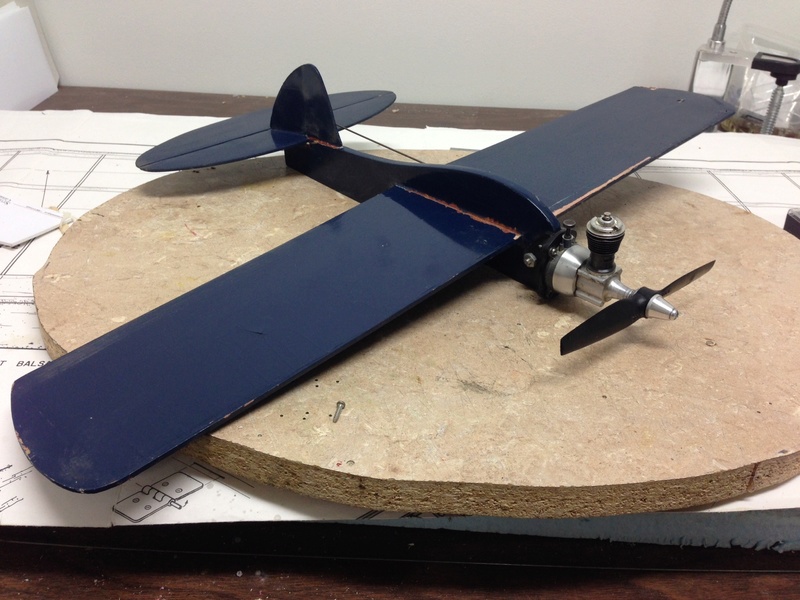
Sturdy Baby Ring Jim. My original is reinforced right at the mount. I can't reinforce the current Baby Ring as I'm going to use the Goldberg mount in the picture.
Where I am now.


Bob


For the lead outs I now use solid piano wire, a transition from stranded. Always a worry about "sawing" through the bell crank.

Sturdy Baby Ring Jim. My original is reinforced right at the mount. I can't reinforce the current Baby Ring as I'm going to use the Goldberg mount in the picture.
Where I am now.


Bob

rsv1cox- Top Poster


Posts : 11250
Join date : 2014-08-18
Location : West Virginia
 Re: Baby Ringmaster fever
Bob, Looking good !! i think the lead outs will work just fine were you got them . What Gage is that music wires ur using , the stain stuff can bee a PIA to work with most time ( for me ) and Jim are you going to leave it natural ( looks Good ) Like the way you reinforced the bulk head ! 

getback- Top Poster


Posts : 10442
Join date : 2013-01-18
Age : 67
Location : julian , NC
 Re: Baby Ringmaster fever
getback wrote:Bob, Looking good !! i think the lead outs will work just fine were you got them . What Gage is that music wires ur using , the stain stuff can bee a PIA to work with most time ( for me ) and Jim are you going to leave it natural ( looks Good ) Like the way you reinforced the bulk head !
Thanks Eric, Not sure about the gage, thin for sure. I bought several lengths at Hobby Town before it went out of local business and failed to take note. Bends easy though.
Yes, I like the way Jim split his wing and reinforced the fuselage. Added 90 degree wingtips too. Not sure about the relief in the horizontal stab for the rudder, no offset Jim? Edit: Thought about it. Upside down? Grooved to fit down over the fuselage...

I may actually position the vertical stab on mine correctly this time.
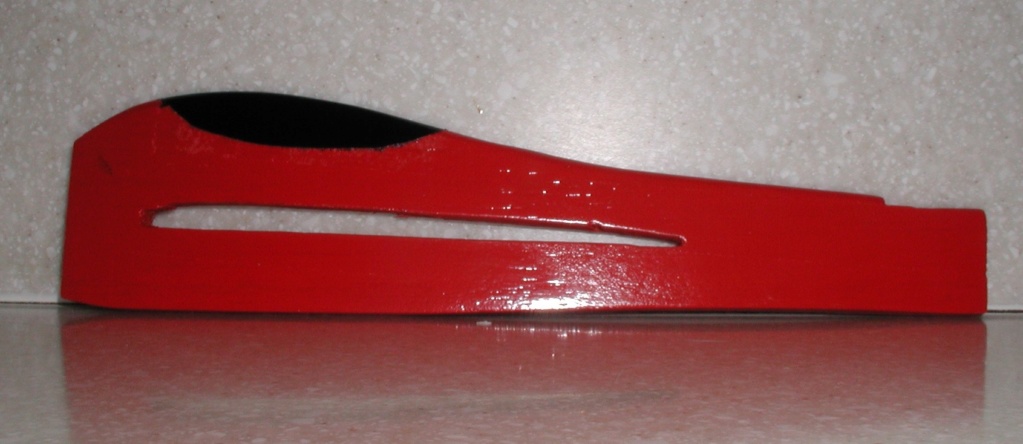
Painted the cockpit this afternoon, rainy and humid, so the black flashed. Second coat I stuck it in an open toaster oven, no flash. I made the cockpit to duplicate the look of my original. Masked everything off fearing adhesive stick. I'm out of frog and painters tape so it's kind of ragged. I'll live with it. Sure enough, right around the cockpit. Goo Gone time once the paint cures enough.

rsv1cox- Top Poster


Posts : 11250
Join date : 2014-08-18
Location : West Virginia
 Re: Baby Ringmaster fever
That looks really nice now with some color added. I like that you will have matching Baby and Beginner Ringmasters.

NEW222- Top Poster

- Posts : 3896
Join date : 2011-08-13
Age : 46
Location : oakbank, mb
 Re: Baby Ringmaster fever
Hi guys,
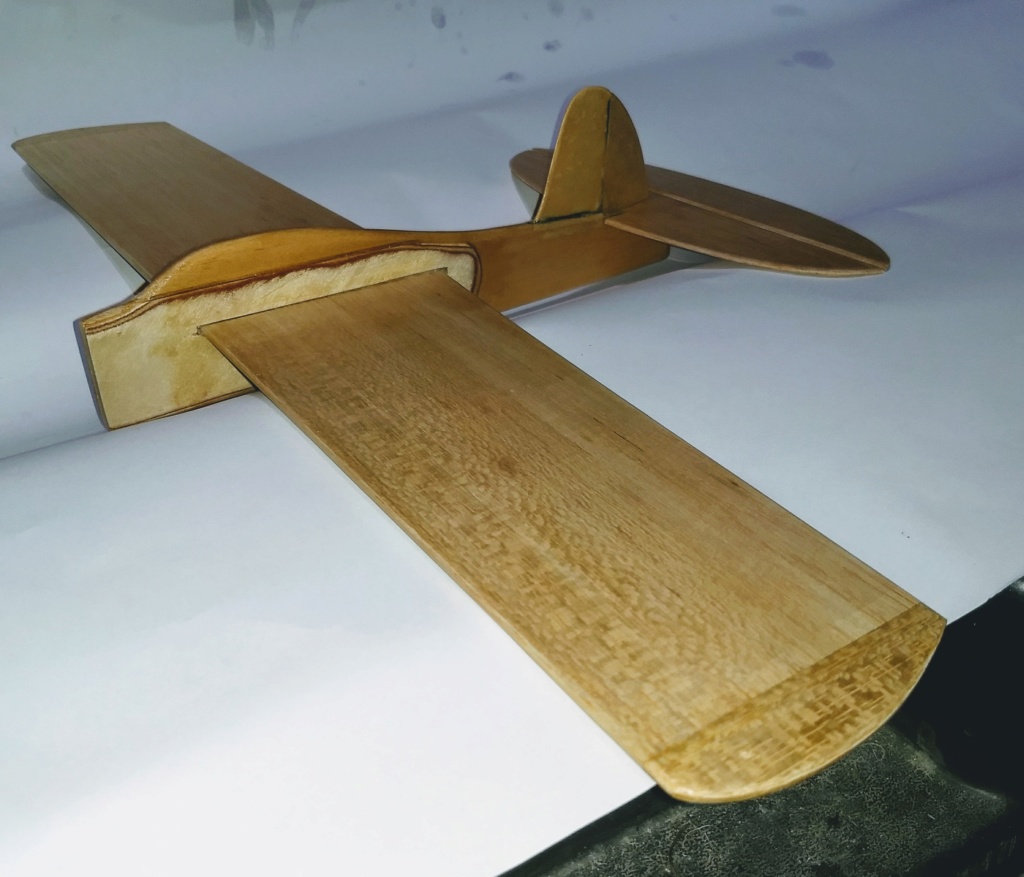
This has been sitting in the garage as you see it since late April. I wanted to make an ARF for one of my boys' friends. The project stalled...Bob instigated me again (he got my Mosquito going a while back).
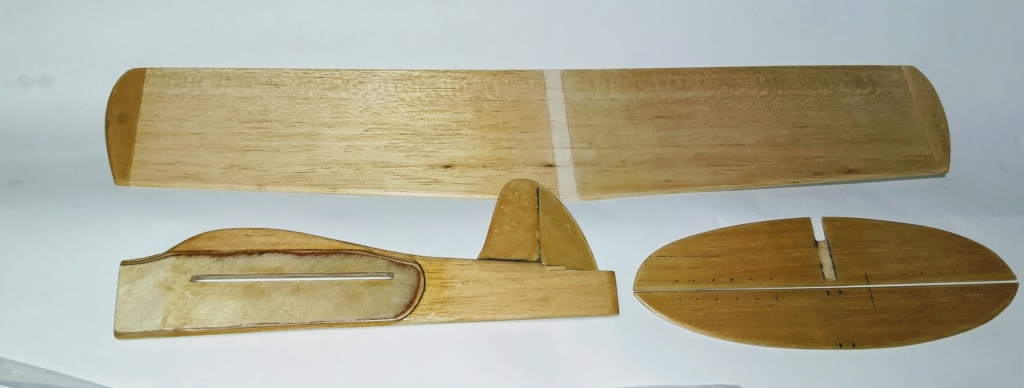
Yes, plywood doublers on each side. I believe either 1/16" or 1/32nd" to handle the abuse a newbie would put it through. The wing isn't split, I left the center unfinished for better glue penetration. I slid it left so you can see the "glue line. The rudder is offset. I think I switched the stab for the elevator, so that is the reason for the notch you see. The rudder was reinforced with dope-n-paper. More details in the pic. Now to find the mounts, LG wire, and wheels.
Hmm. Leave it in a wood finish? I may ponder that one. It sure isn't camo!


944_Jim- Diamond Member


Posts : 2022
Join date : 2017-02-08
Age : 59
Location : NE MS
 Re: Baby Ringmaster fever
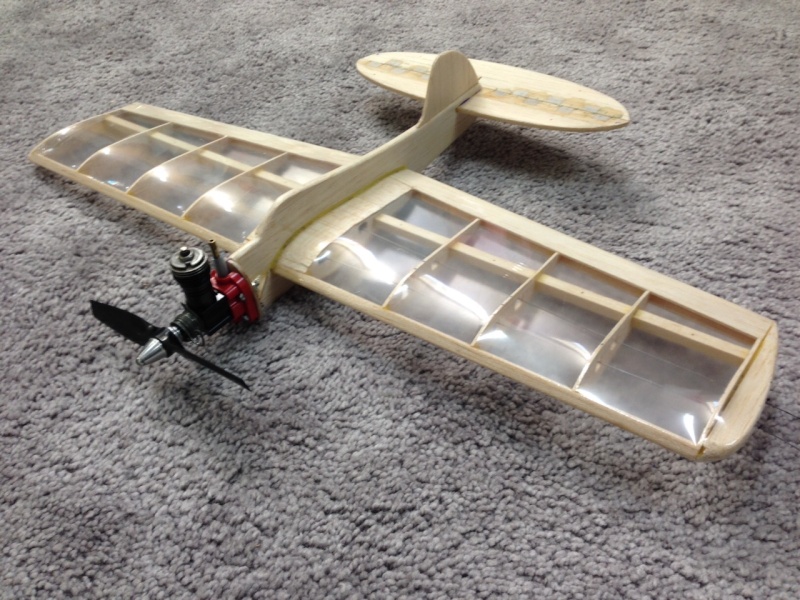
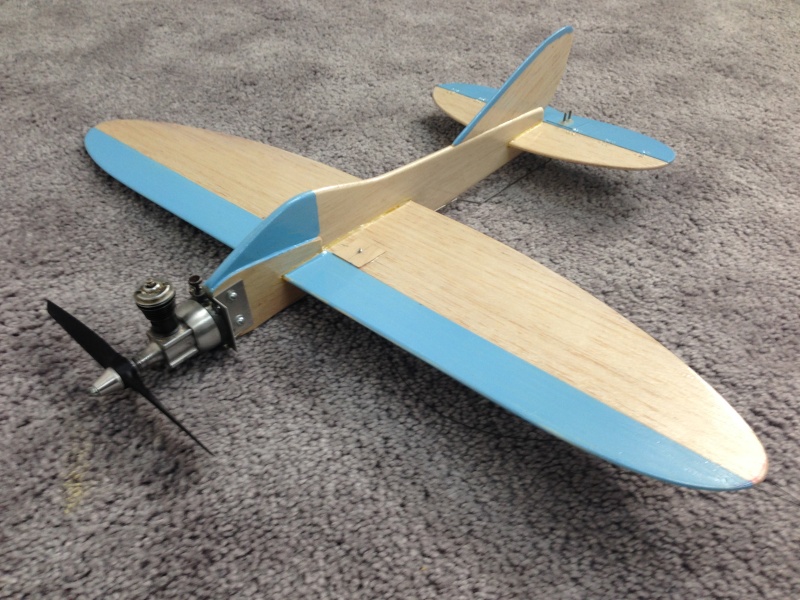
Hey there Jim. If I could build that nice, I would leave it as it is with the nice woodgrain. So far, I have done only 1 plane completely in woodgrain, and one that has a bit of color. And funny to say, one was my Baby Ringmaster. If I had only known when I was building it, I would NOT have used blue pen/marker to mark out my elevator hinges.....


NEW222- Top Poster

- Posts : 3896
Join date : 2011-08-13
Age : 46
Location : oakbank, mb

NEW222- Top Poster

- Posts : 3896
Join date : 2011-08-13
Age : 46
Location : oakbank, mb
 Re: Baby Ringmaster fever
Split wing? That's me jumping to conclusions Jim. It's safe to say that my powers of observation are lacking. 
I love the "naturals" Chancy, especially the blue trimmed example with the elliptical wing. Cockpit treatment is a winner.
Bob
I love the "naturals" Chancy, especially the blue trimmed example with the elliptical wing. Cockpit treatment is a winner.
Bob

rsv1cox- Top Poster


Posts : 11250
Join date : 2014-08-18
Location : West Virginia
 Re: Baby Ringmaster fever
Wow, Chancey! Those are pretty birds! I always like a translucent tissue job. That clear skin on the built-up wing is cool!
I also dig the sewn elevator hinge.on the Baby blue and wood plane. Nice, tight, and compact. How did you make the engine mount?
I may need to try tightening up my sewn hinges.
Each one of your planes has really special qualities.
Bob, see below for small eyelets on leadouts guides. I needed something in a pinch too.

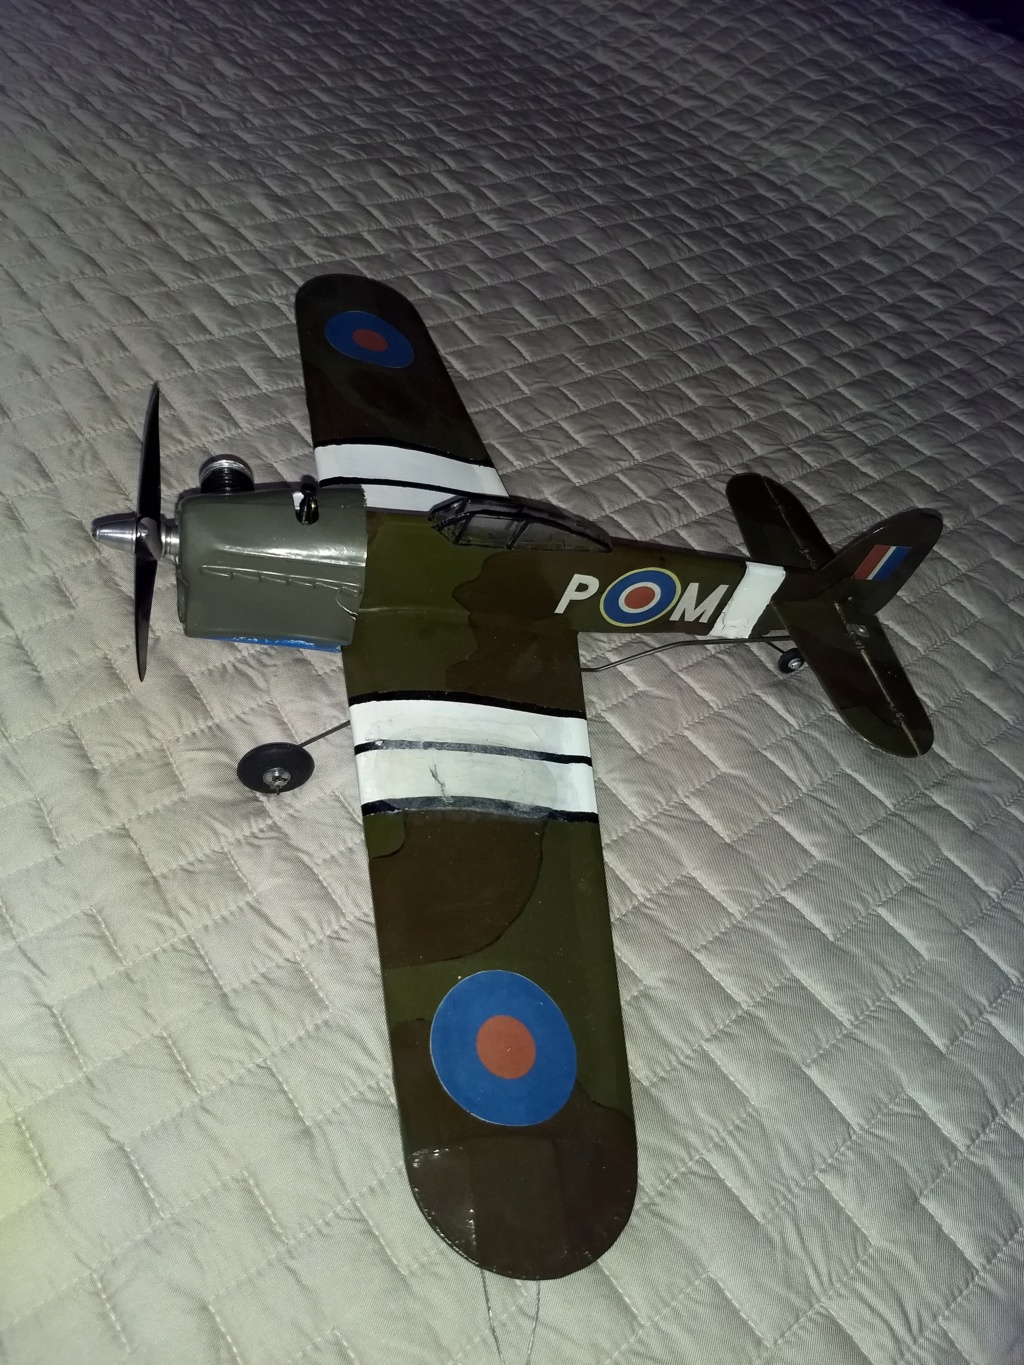
ISTR someone asking about Sterling vs Guillows vs Scientific, but can't find the thread...please pardon the threadjack. This came up recently either here, or RCG, or Stunt Hanger (or FaceBook). If it was here, well, here is a Scientific clone kitted by Dave Cowell.
I also dig the sewn elevator hinge.on the Baby blue and wood plane. Nice, tight, and compact. How did you make the engine mount?
I may need to try tightening up my sewn hinges.
Each one of your planes has really special qualities.
Bob, see below for small eyelets on leadouts guides. I needed something in a pinch too.


ISTR someone asking about Sterling vs Guillows vs Scientific, but can't find the thread...please pardon the threadjack. This came up recently either here, or RCG, or Stunt Hanger (or FaceBook). If it was here, well, here is a Scientific clone kitted by Dave Cowell.

944_Jim- Diamond Member


Posts : 2022
Join date : 2017-02-08
Age : 59
Location : NE MS
 Re: Baby Ringmaster fever
That engine mount is nothing more than two small pieces of light gauge aluminum folded at 90 degrees. Once bent, I put them nose down on the table, and clamp then tight at either the top or bottom. I then drill a hole for the mounting screw, screw it together, then remove the clamp and repeat. After I have my top and bottom holes, I stand the plane on its nose and drill the holes using one of the brackets as a guide, then install the other and screw together. Probably more than you asked for, but I hope this helps.

NEW222- Top Poster

- Posts : 3896
Join date : 2011-08-13
Age : 46
Location : oakbank, mb
 Re: Baby Ringmaster fever
I get Scientific and Sterling mixed up all the time Jim, mainly expressed on these pages. I'm still not sure which one was my original Baby Ringmaster. I think I have some of those eyelets around somewhere. Haven't as yet terminated the outside lead outs.
I was at Hobby Lobby last weekend looking for some thin aluminum to duplicate the originals on my first BR. Couldn't find any so I'm using the Goldberg.
I was at Hobby Lobby last weekend looking for some thin aluminum to duplicate the originals on my first BR. Couldn't find any so I'm using the Goldberg.

rsv1cox- Top Poster


Posts : 11250
Join date : 2014-08-18
Location : West Virginia
 Re: Baby Ringmaster fever
Chancey,
Any way we could see the fuel tank setup on your built-up wing BRM? Did the CG shift back with the shorter product type engine?
Anyone care to share your BBRM fuel system? I'm curious how most have dealt with a wing lined up right on the center of the venturi...that is, the ones not using an integral tanked Bee variant.
TIA

944_Jim- Diamond Member


Posts : 2022
Join date : 2017-02-08
Age : 59
Location : NE MS
 Re: Baby Ringmaster fever
944_Jim wrote:Chancey,
Any way we could see the fuel tank setup on your built-up wing BRM? Did the CG shift back with the shorter product type engine?
Anyone care to share your BBRM fuel system? I'm curious how most have dealt with a wing lined up right on the center of the venturi...that is, the ones not using an integral tanked Bee variant.
TIA
Sorry, but that cannot happen right now. The plane is there with the engine, but unfortunately, I do not have a fuel tank on it at the moment. I used a homemade tank on it though when I flew it. Sorry I canot be of more help with this one. And I cannot quite honestly remember the CG of it then either. I have not flown it for almost 2 years.

NEW222- Top Poster

- Posts : 3896
Join date : 2011-08-13
Age : 46
Location : oakbank, mb
Page 2 of 3 •  1, 2, 3
 Similar topics
» Baby Ringmaster build
» Baby Ringmaster to fly soon
» Baby Ringmaster
» Which Engine On Baby Ringmaster
» Baby Ringmaster Decal
» Baby Ringmaster to fly soon
» Baby Ringmaster
» Which Engine On Baby Ringmaster
» Baby Ringmaster Decal
Page 2 of 3
Permissions in this forum:
You cannot reply to topics in this forum

 Rules
Rules


