Log in
Search
Latest topics
» Cox films/videos...by Coxfledgling Today at 4:46 am
» Purchased the last of any bult engines from Ken Enya
by Coxfledgling Today at 4:18 am
» My N-1R build log
by roddie Today at 12:32 am
» Happy 77th birthday Andrew!
by akjgardner Today at 12:27 am
» TEE DEE Having issues
by TD ABUSER Yesterday at 9:43 pm
» Landing-gear tips
by roddie Yesterday at 6:17 pm
» Roger Harris revisited
by TD ABUSER Yesterday at 2:13 pm
» Tee Dee .020 combat model
by Ken Cook Yesterday at 1:41 pm
» Retail price mark-up.. how much is enough?
by Ken Cook Yesterday at 1:37 pm
» My latest doodle...
by roddie Yesterday at 10:43 am
» Chocolate chip cookie dough.........
by roddie Fri Nov 22, 2024 1:13 pm
» Free Flight Radio Assist
by rdw777 Fri Nov 22, 2024 9:24 am
Cox Engine of The Month
Making lines...not lead outs. Bring in your favorite methods!
Page 1 of 1
 Making lines...not lead outs. Bring in your favorite methods!
Hi all,
By way of introduction to a new lines thread,
I didn't want to threadjack Roddie's P-38 with sideband. So this is a start of my "lines" quest. I'll add my input as a separate post later.
When I got back into the hobby a couple years ago, I found out hobby supplies just don't exist around here (Northeast MS). Supplies targetting our hobby had to be mail ordered, or sourced from other hobbies.
It was very exciting to discover the obsolescence of Dacron, and the acceptable use of SpideWire in its place! Considering the size of the models I tend to build, the smaller line seemed appropriate. Even fishing clips seemed to be ok. The local fishing supply shops now had a new customer, although they all looked at me funny when I couldn't tell them what kind of fishing I did.
I've watched YouTube videos on crimping and wrapping. All of them surround this aspect from the perspective of larger planes. Then I've tried to distill the methods and scale down solutions to our little birds.
Bring in your favorite methods! Thanks for sharing.
944_Jim- Diamond Member


Posts : 2022
Join date : 2017-02-08
Age : 59
Location : NE MS
 Re: Making lines...not lead outs. Bring in your favorite methods!
Well, there's 2 methods crimped vs wrapped. I have experimented for years with different crimps and crimp pliers. My favorite set of crimp pliers was a set my father modified for me which did the nicest job out of any pliers I ever purchased. They worked so well that they caught the eye of a fellow editor of PAMPA Stunt News and were featured in the safety column some years ago. I unfortunately lost the pliers at my last Huntersville contest in 2015. Seeking replacements have been a struggle and seeing my father is retired now, it would be a impossible task to replicate exactly what he had done. Those pliers were true works or art. They never let me down.
I have had many line breaks and hardware failures over the years. Eliminating the X factor is priority. If your looking for a fail safe crimp, look no further because nothing like that exists. Even wrapped lines can and will fail. We as modelers have to do what is necessary to eliminate the stress placed in the critical areas. If your crimping, you absolutely need to chamfer both ends of the crimps. In addition, many people that cut their own crimp tubes, rolling a knife on the tubing, pipe cutter, etc. the edge needs to be filed smooth. After the termination, it's imperative to use QUALITY heat shrink tubing. This is the most important step as this is where the failure is going to occur directly behind the crimp due to flexing. Once the strands start fraying, it's anybody's guess as to when that wire will fail. Shrink tubing stiffens this area in the same manner that wrapping does and eliminates the flex.
Crimp tubes are not created equal. Copper is always mentioned due to it being soft enough that it doesn't work harden. This is the problem with brass. Brass if not annealed properly will crack and is not always visible therefore it can let go whenever. Obviously this is 1/2A but I use these same methods for much larger and powerful planes. The same theory applies large or small. The days of tying Dacron are far and few and with the newer synthetic lines, it pretty much makes the old Dacron lines very dated. I'll admit it though, I still have Dacron line sets and still use them for very low powered stuff.
One thing I like to use especially with external controls is slotted bell cranks and button bellcranks. The support these two offer in the end of the termination far excel compared to a traditional line clip. When I use these methods, I double the loops on the end of the termination, therefore my flying wire is now inside the crimp tube 5X's not to mention the safety of a additional loop. This is not required for Cox powered equipment but I thought I would show it for clarification as this could be applied to any external bellcrank.
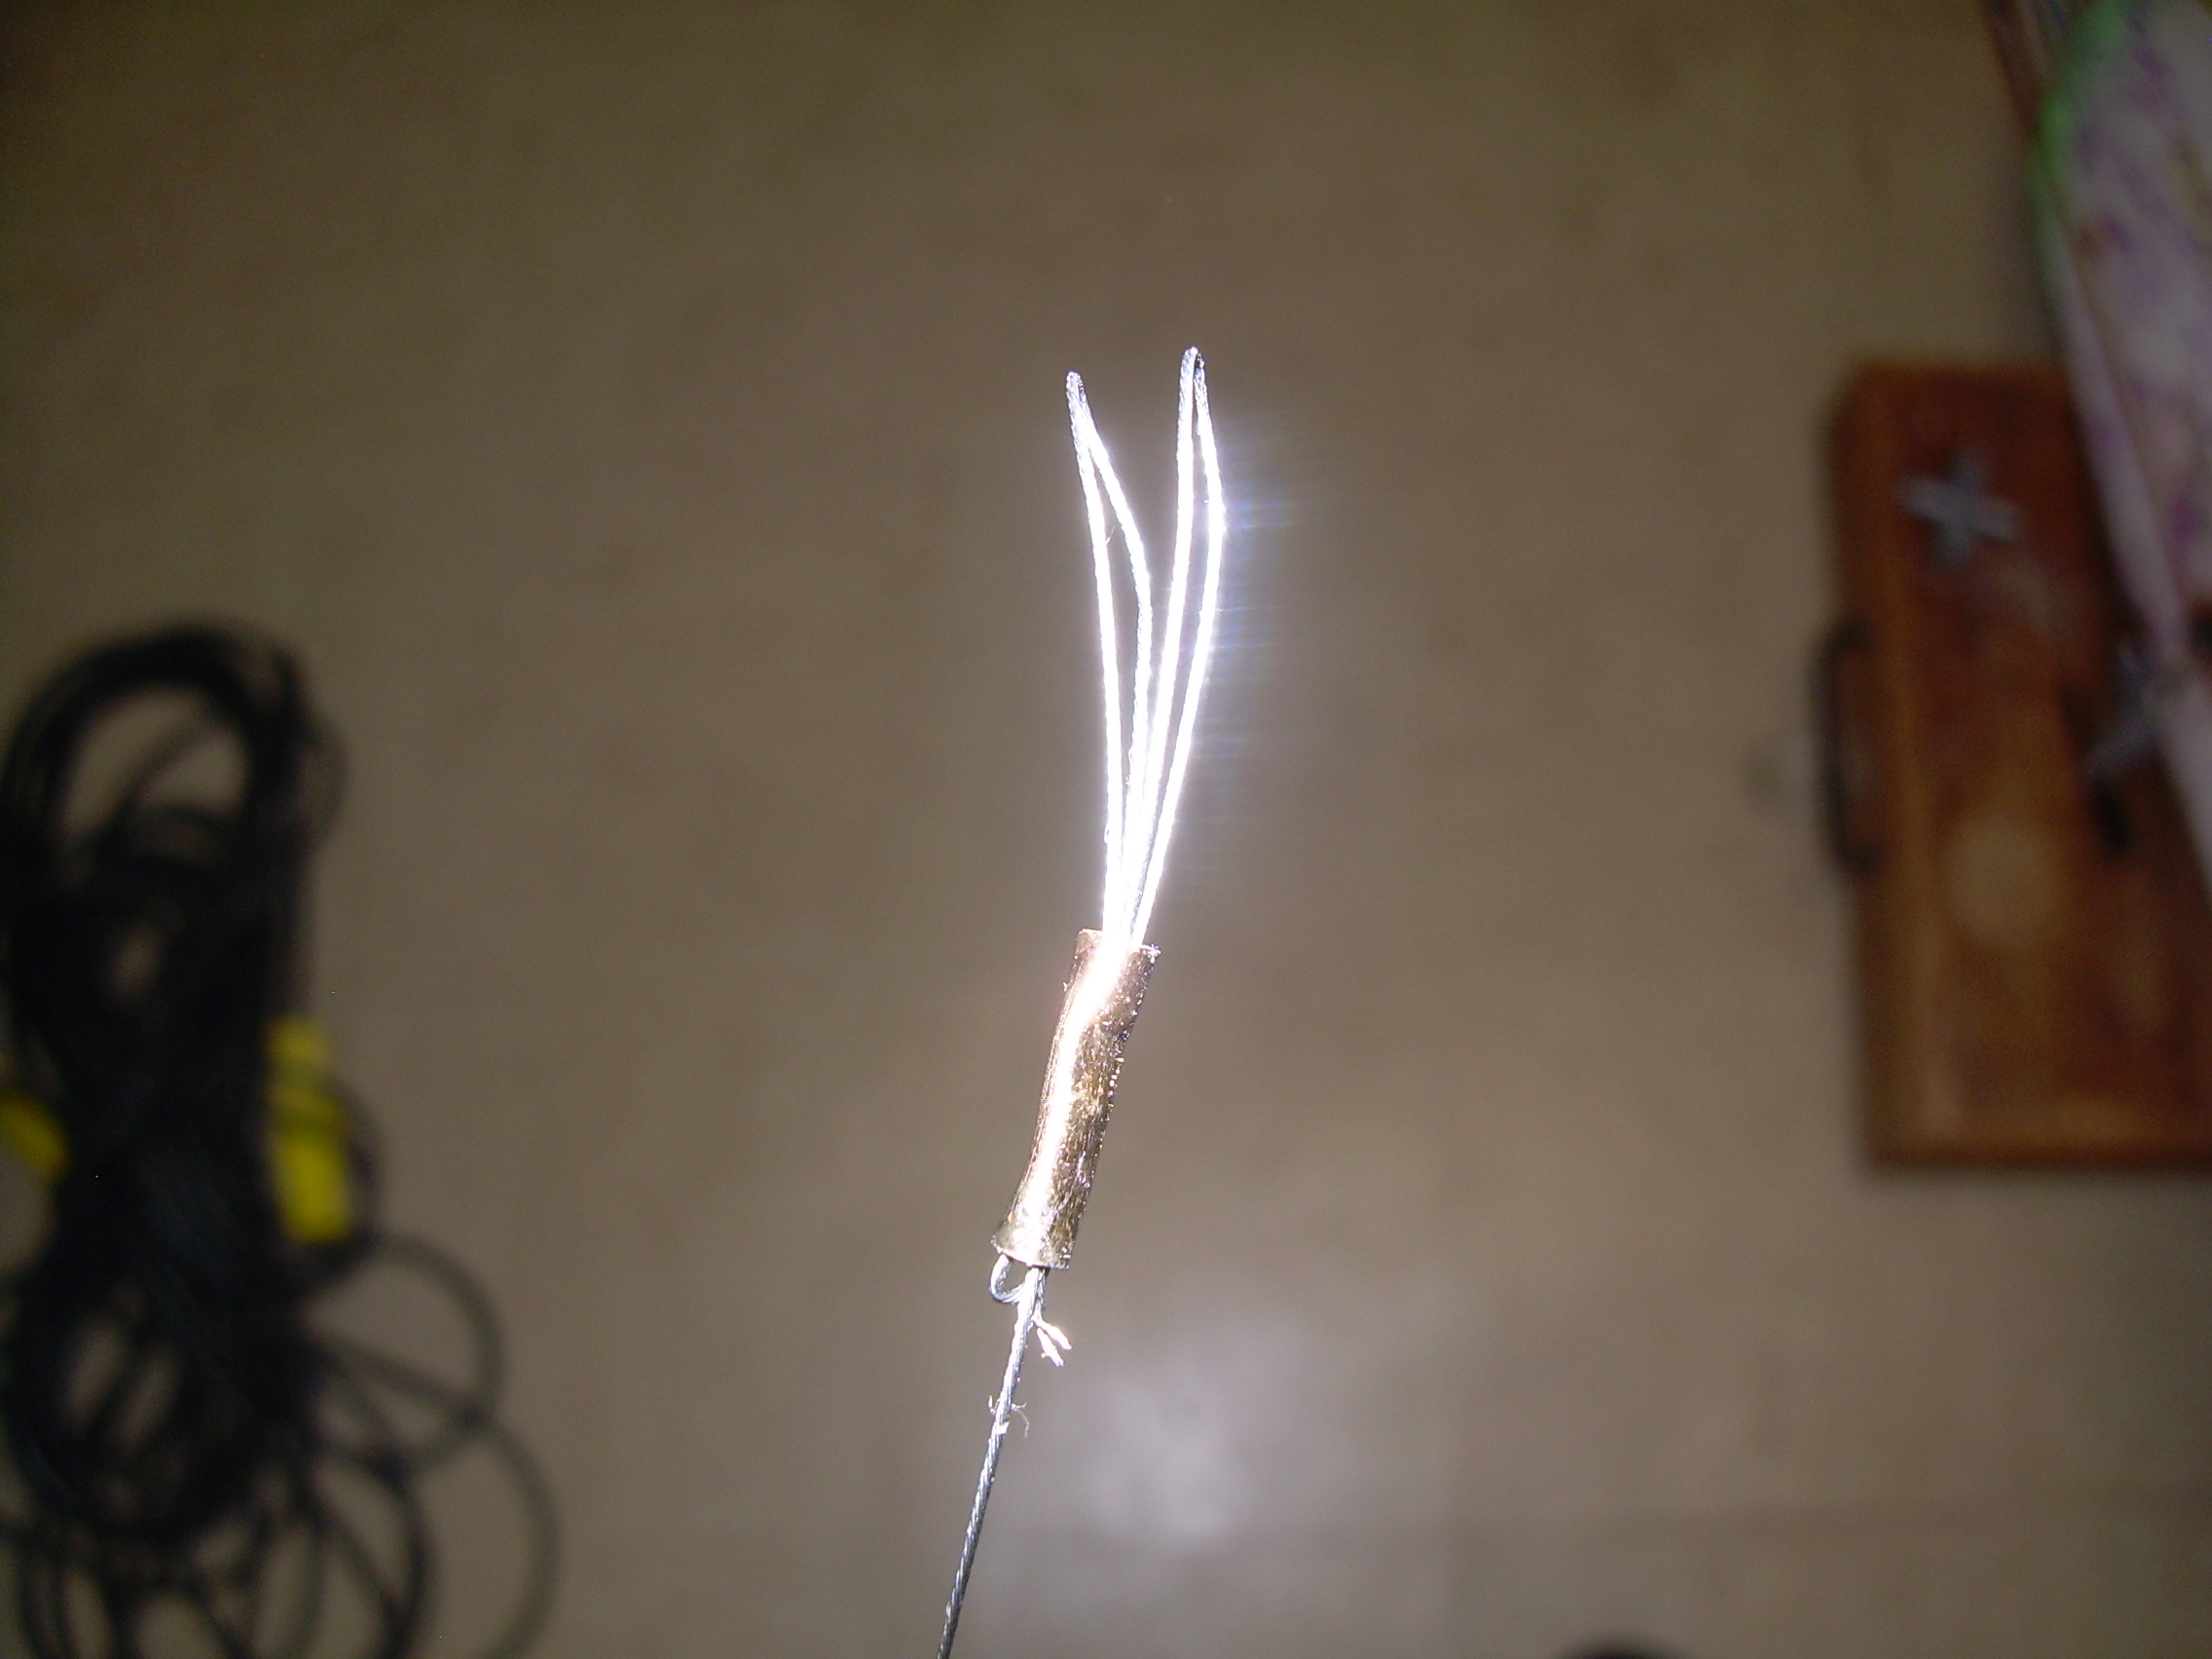
here's the double loops using ,012" lines I use this for all high powered equipment. I have a jig that gets used which allows both loops to be the same size.
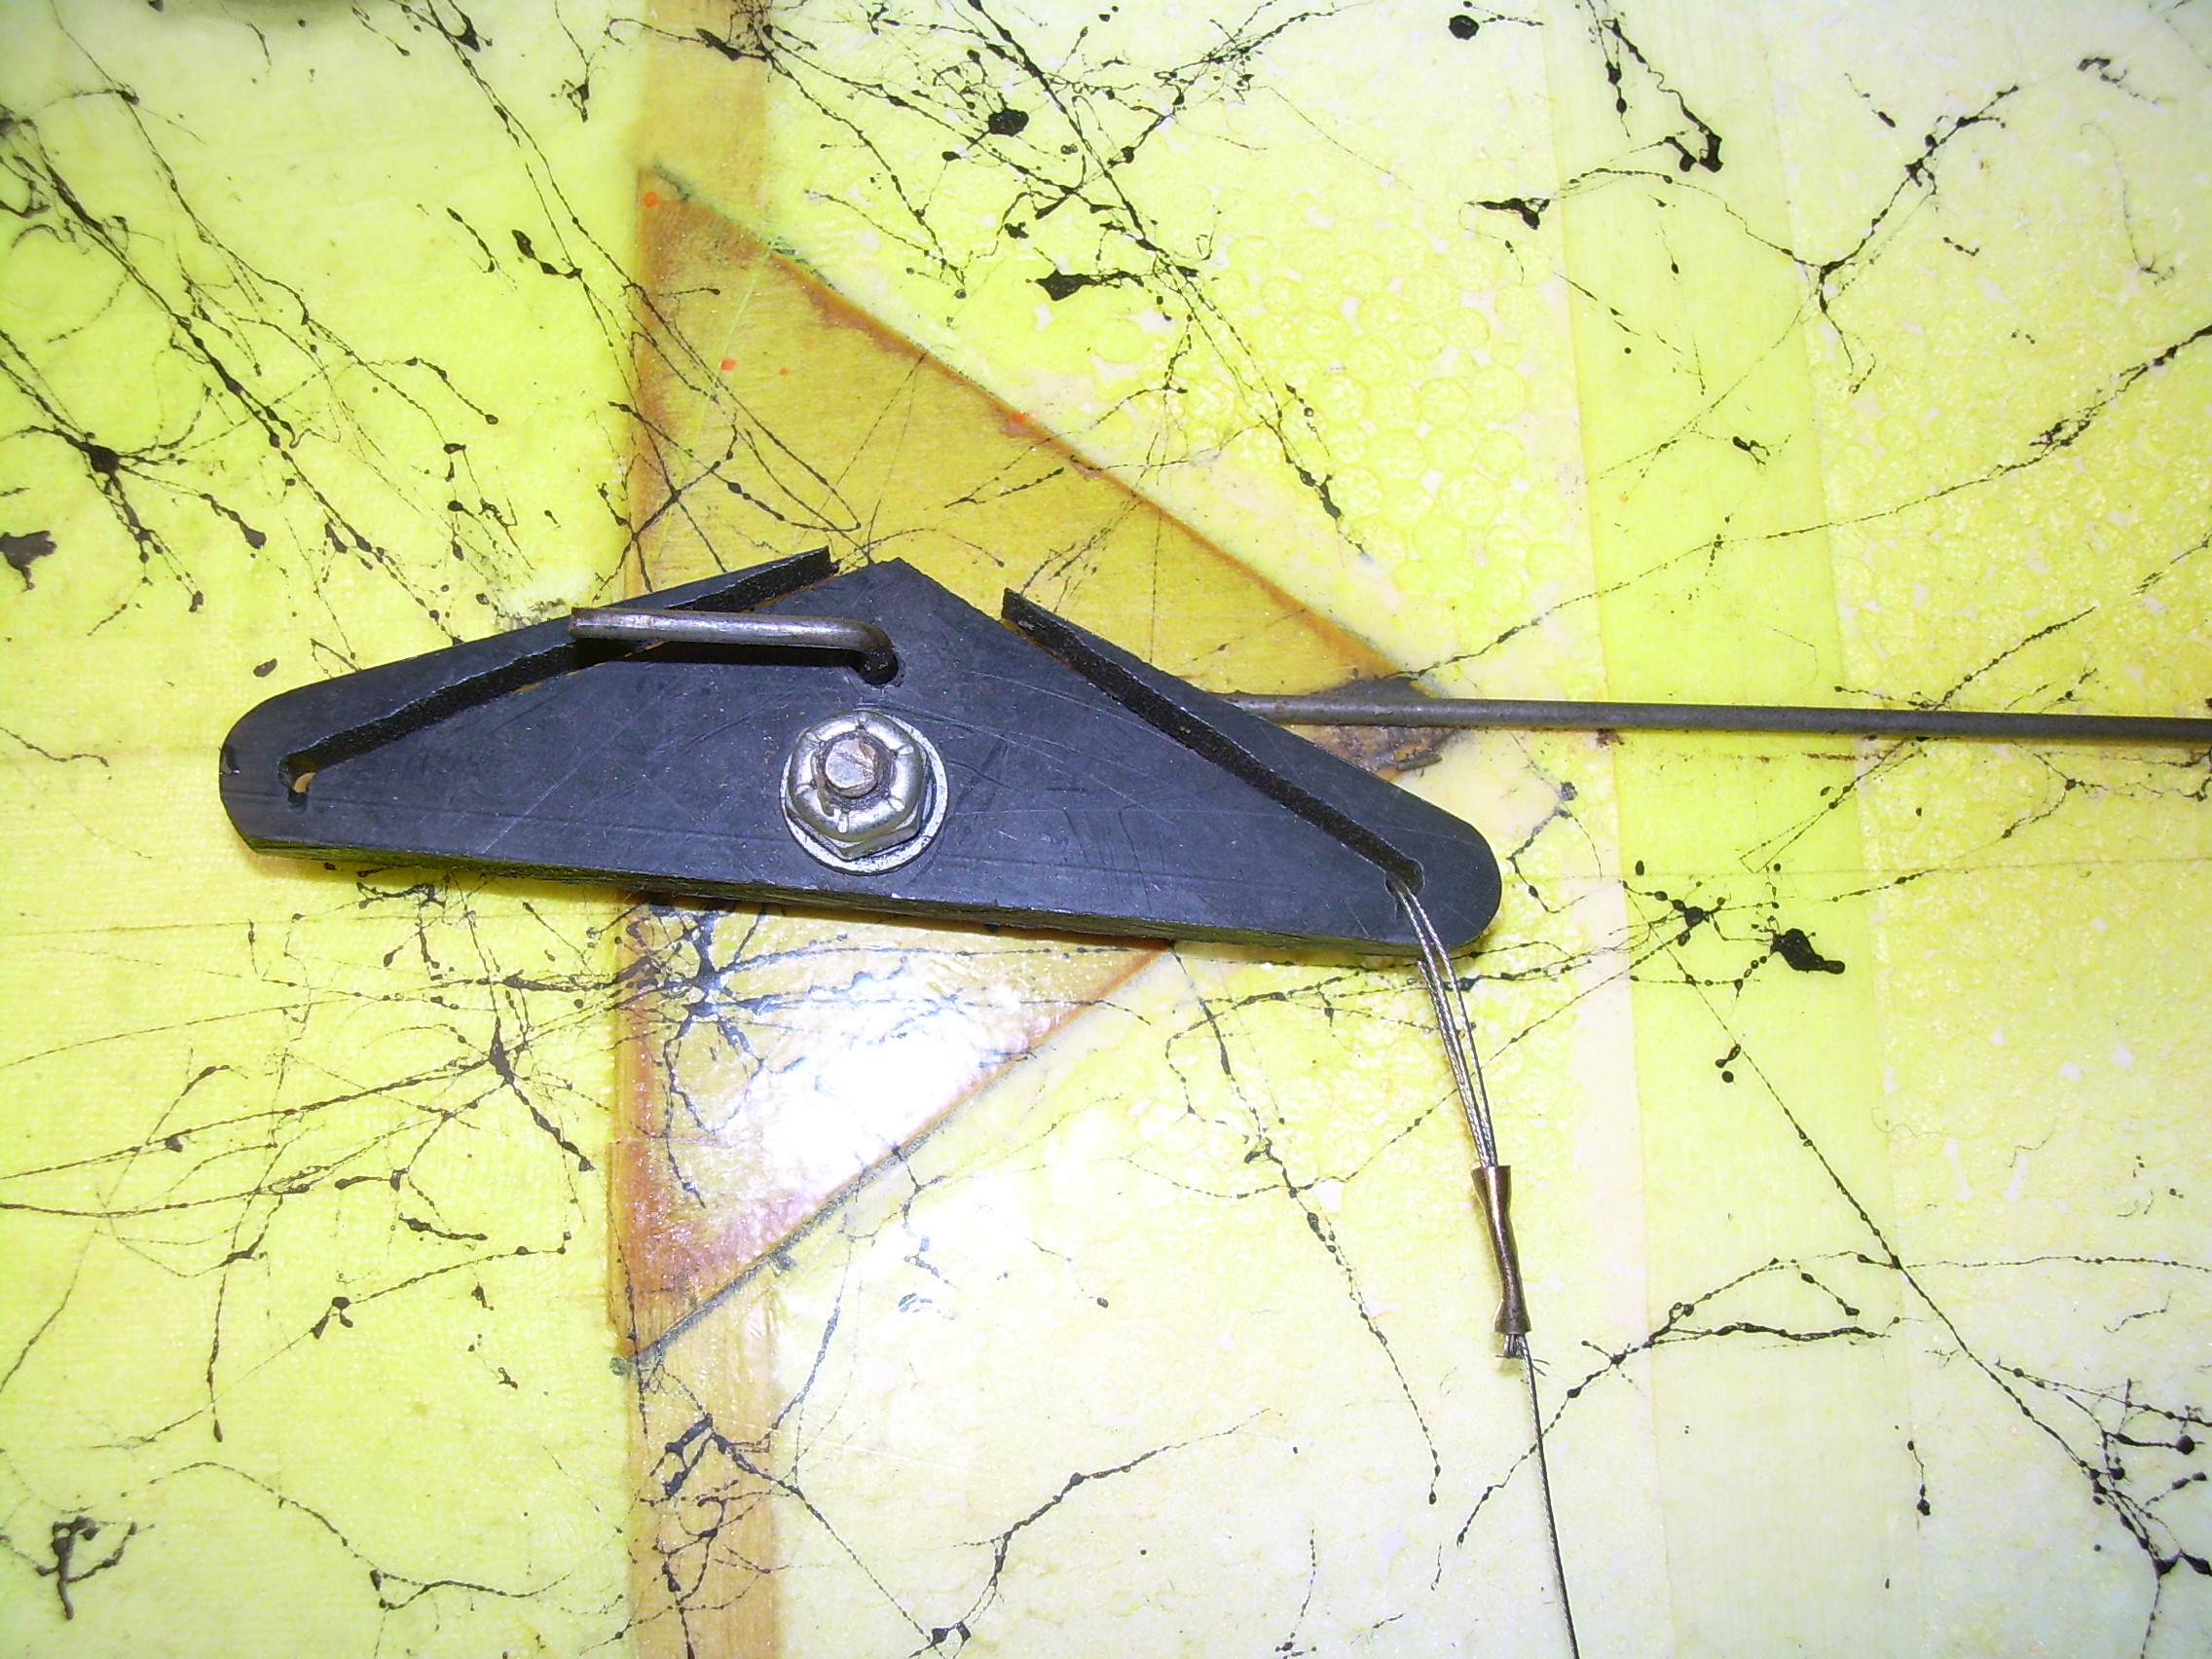
Here's a slotted bellcrank which is made of Kydex. I use this same method using a razor saw on Sig bellcranks typically found in most 1/2A kits. It's my go to method and it's incredibly strong and reliable

Here's a button bellcrank in which I made using a Fox 3" bellcrank I do this with many of the 2" Fox bellcranks which is nice as it eliminates leadouts on exposed bellcrank planes.
I have had many line breaks and hardware failures over the years. Eliminating the X factor is priority. If your looking for a fail safe crimp, look no further because nothing like that exists. Even wrapped lines can and will fail. We as modelers have to do what is necessary to eliminate the stress placed in the critical areas. If your crimping, you absolutely need to chamfer both ends of the crimps. In addition, many people that cut their own crimp tubes, rolling a knife on the tubing, pipe cutter, etc. the edge needs to be filed smooth. After the termination, it's imperative to use QUALITY heat shrink tubing. This is the most important step as this is where the failure is going to occur directly behind the crimp due to flexing. Once the strands start fraying, it's anybody's guess as to when that wire will fail. Shrink tubing stiffens this area in the same manner that wrapping does and eliminates the flex.
Crimp tubes are not created equal. Copper is always mentioned due to it being soft enough that it doesn't work harden. This is the problem with brass. Brass if not annealed properly will crack and is not always visible therefore it can let go whenever. Obviously this is 1/2A but I use these same methods for much larger and powerful planes. The same theory applies large or small. The days of tying Dacron are far and few and with the newer synthetic lines, it pretty much makes the old Dacron lines very dated. I'll admit it though, I still have Dacron line sets and still use them for very low powered stuff.
One thing I like to use especially with external controls is slotted bell cranks and button bellcranks. The support these two offer in the end of the termination far excel compared to a traditional line clip. When I use these methods, I double the loops on the end of the termination, therefore my flying wire is now inside the crimp tube 5X's not to mention the safety of a additional loop. This is not required for Cox powered equipment but I thought I would show it for clarification as this could be applied to any external bellcrank.

here's the double loops using ,012" lines I use this for all high powered equipment. I have a jig that gets used which allows both loops to be the same size.

Here's a slotted bellcrank which is made of Kydex. I use this same method using a razor saw on Sig bellcranks typically found in most 1/2A kits. It's my go to method and it's incredibly strong and reliable

Here's a button bellcrank in which I made using a Fox 3" bellcrank I do this with many of the 2" Fox bellcranks which is nice as it eliminates leadouts on exposed bellcrank planes.

Ken Cook- Top Poster

- Posts : 5640
Join date : 2012-03-27
Location : pennsylvania
 Re: Making lines...not lead outs. Bring in your favorite methods!
Ken Cook, what is the reasoning or benefits of the slotted bellcrank? I no longer have hair left from scratching my head.  I like to see everyones mods to things, but I am having a hard time trying to understand it, however, it is probably something easy that I missed as usual. Is the slotted bellcrank something you do on large models, small models, or both? Thank you.
 I like to see everyones mods to things, but I am having a hard time trying to understand it, however, it is probably something easy that I missed as usual. Is the slotted bellcrank something you do on large models, small models, or both? Thank you.
NEW222- Top Poster

- Posts : 3896
Join date : 2011-08-13
Age : 46
Location : oakbank, mb
 Re: Making lines...not lead outs. Bring in your favorite methods!
Wow! Nice write up, Ken.
I keyed in specifically on brass used instead of copper.
I read your piece and thought "go return the brass tubing!"
This was bought in a pinch Thursday because Hobby Lobby stocked a four-pack of puny stuff in brass. The copper tube came in a 3 pack of different sizes. The largest size wasn't something I'd use. The middle could be used for hime-built tanks, and the smallest would suffice for only 4-6 line sets.
Here is my line types.
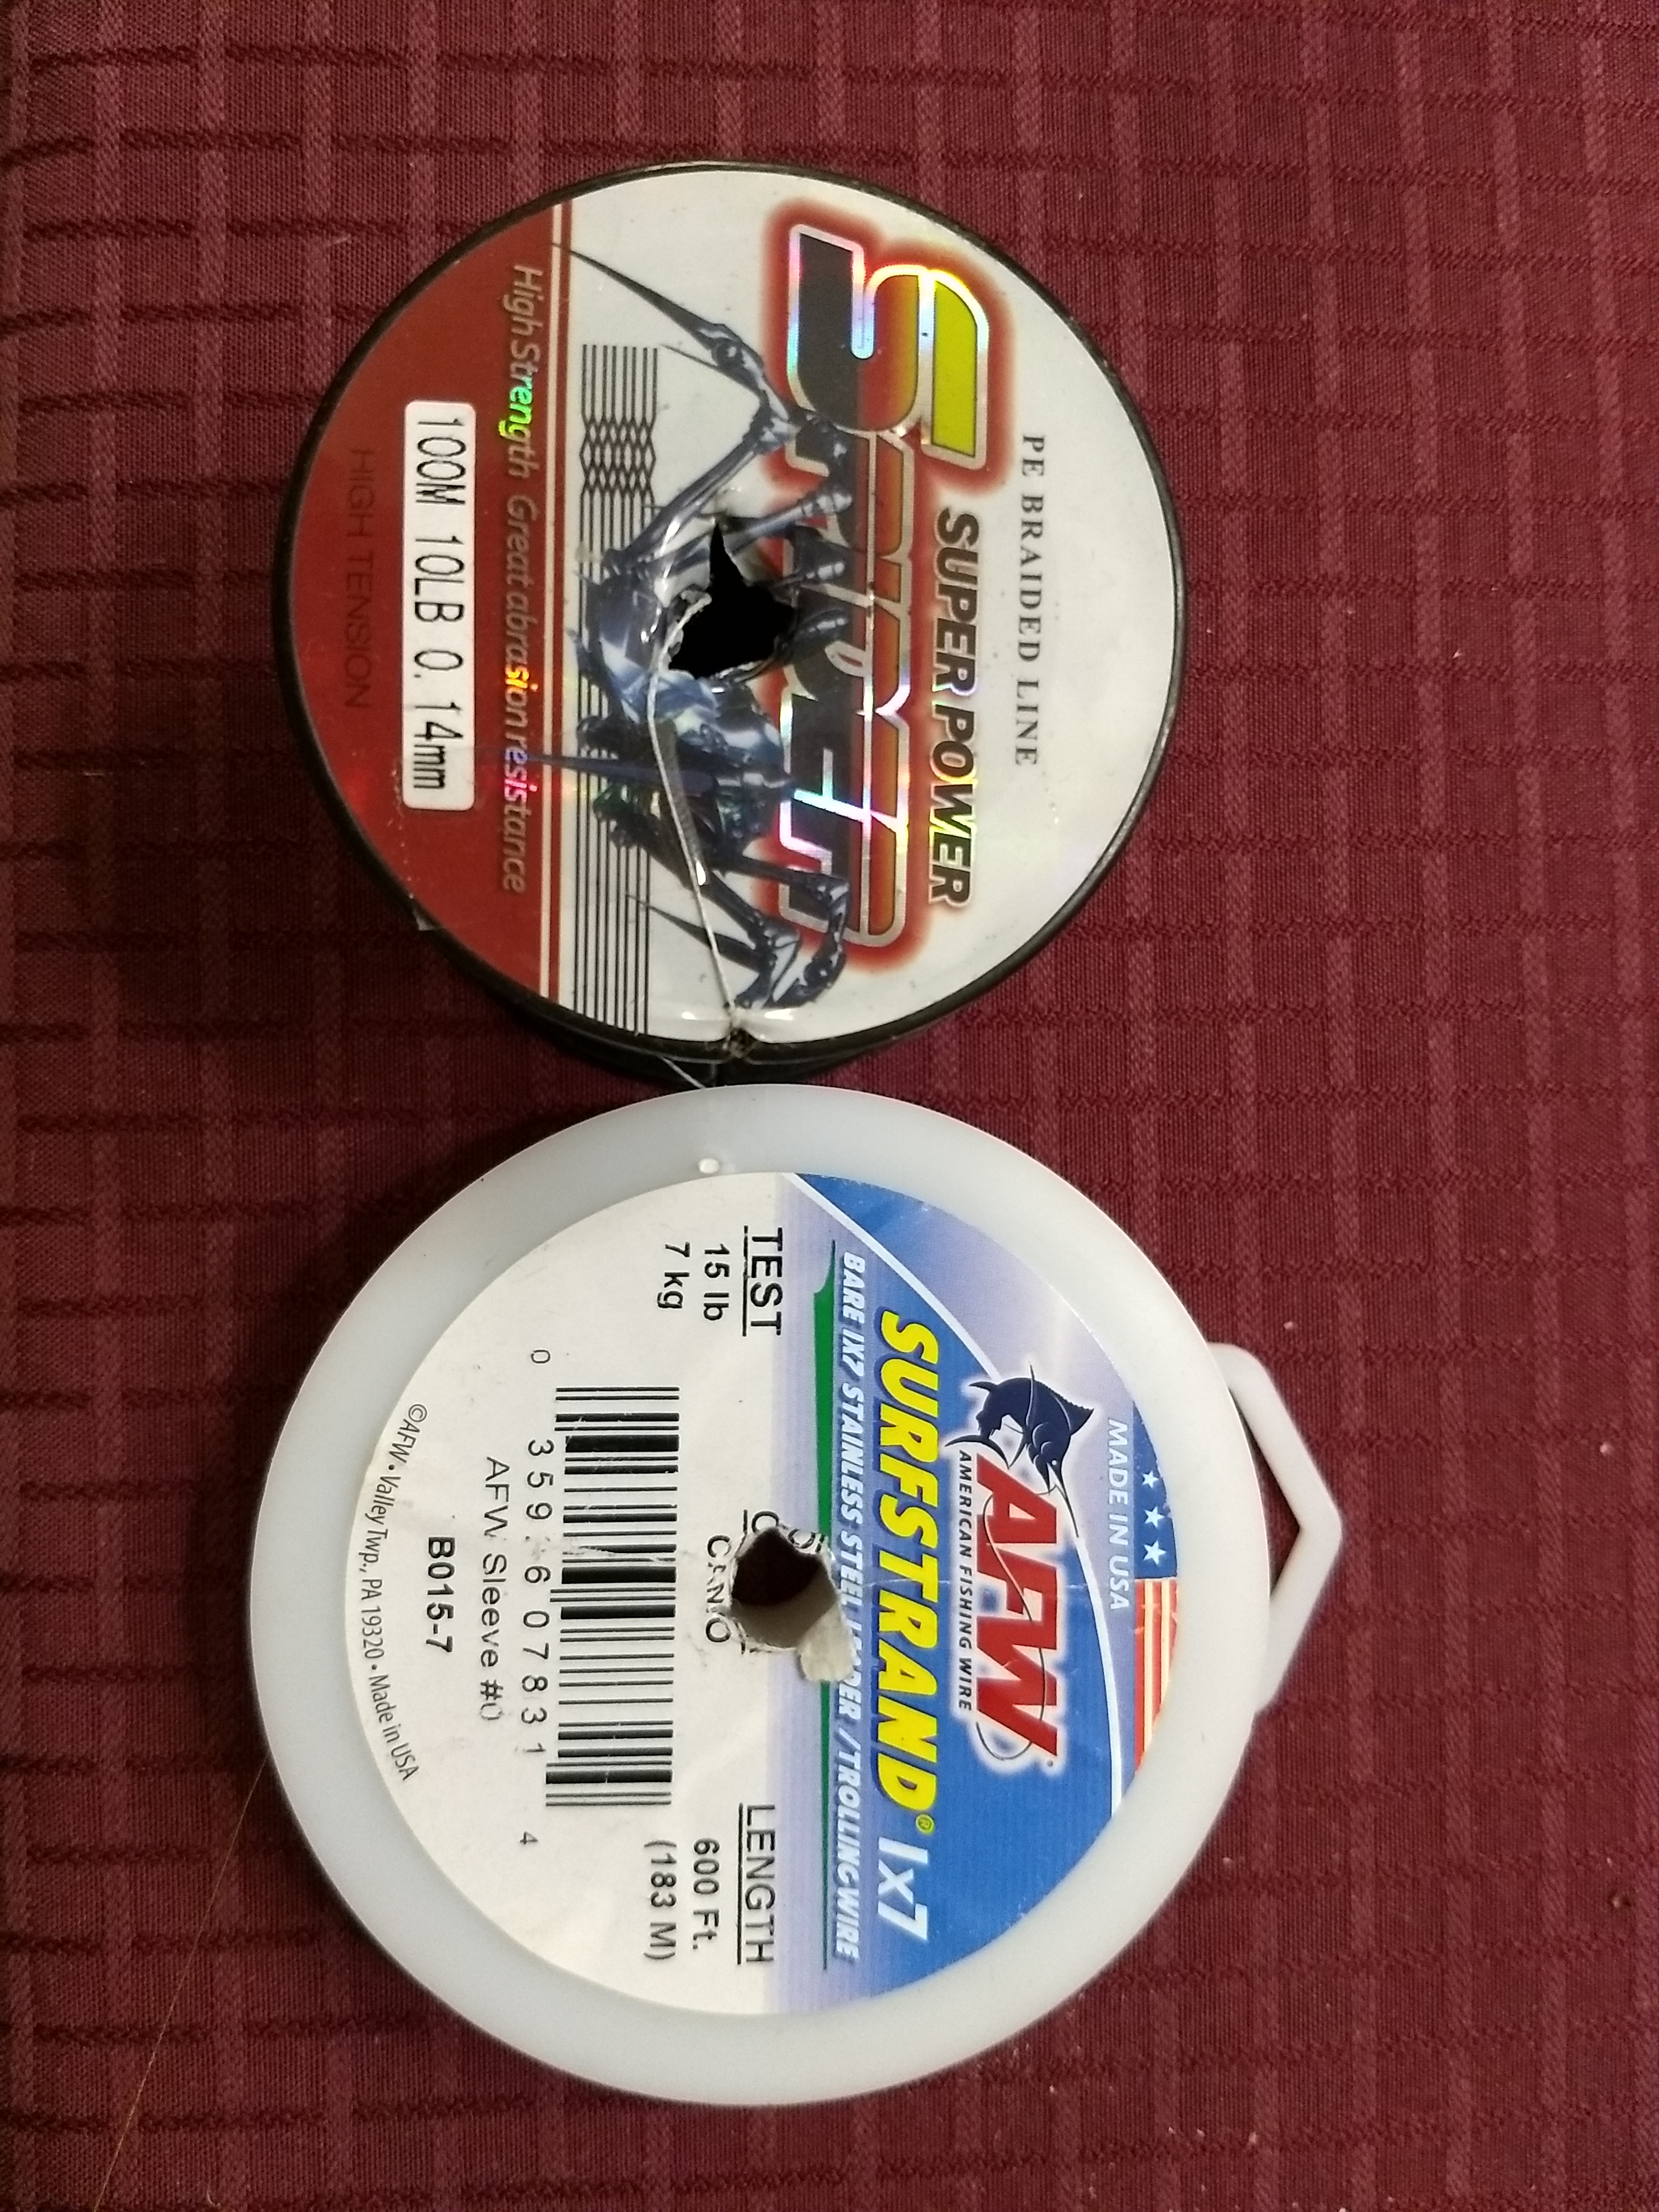
I still need to make a line making jig to minimize differences in line lengths...but that is a later post for another day.
I keyed in specifically on brass used instead of copper.
I read your piece and thought "go return the brass tubing!"
This was bought in a pinch Thursday because Hobby Lobby stocked a four-pack of puny stuff in brass. The copper tube came in a 3 pack of different sizes. The largest size wasn't something I'd use. The middle could be used for hime-built tanks, and the smallest would suffice for only 4-6 line sets.
Here is my line types.

I still need to make a line making jig to minimize differences in line lengths...but that is a later post for another day.

944_Jim- Diamond Member


Posts : 2022
Join date : 2017-02-08
Age : 59
Location : NE MS
 Re: Making lines...not lead outs. Bring in your favorite methods!
Jim, I have witnessed Sullivan over the years go from their once standard copper crimp to brass and then to aluminum. What certainly seems apparent here is cost. You know the saying, " They don't make it like they used to". I do use brass when the copper is unavailable to me. However, heat the brass tubing over a gas range burner until it glows cherry red, remove from heat and let it cool by itself back to room temp. Knock off the slag and burnt residue from the tubing and proceed to cut it. You will note the once hard and brittle tubing is now rubbery. That's all it takes and your back in business.
When I make my lines for combat, my handle is non adjustable. My son flies with a handle he can adjust in the air during flying. Therefore for me, my line sets have to be spot on and my planes elevator trimmed accordingly. This is very simple and easy to do once you have mastered a systematic way of doing it. My jig utilizes a bellcrank and once I terminate one end of my lines, I stake the other end and run out the entire length and use my jig. I generally do this at our field when I need to do so. I also make several sets during my outing with the jig. Here's a pic of my jig.
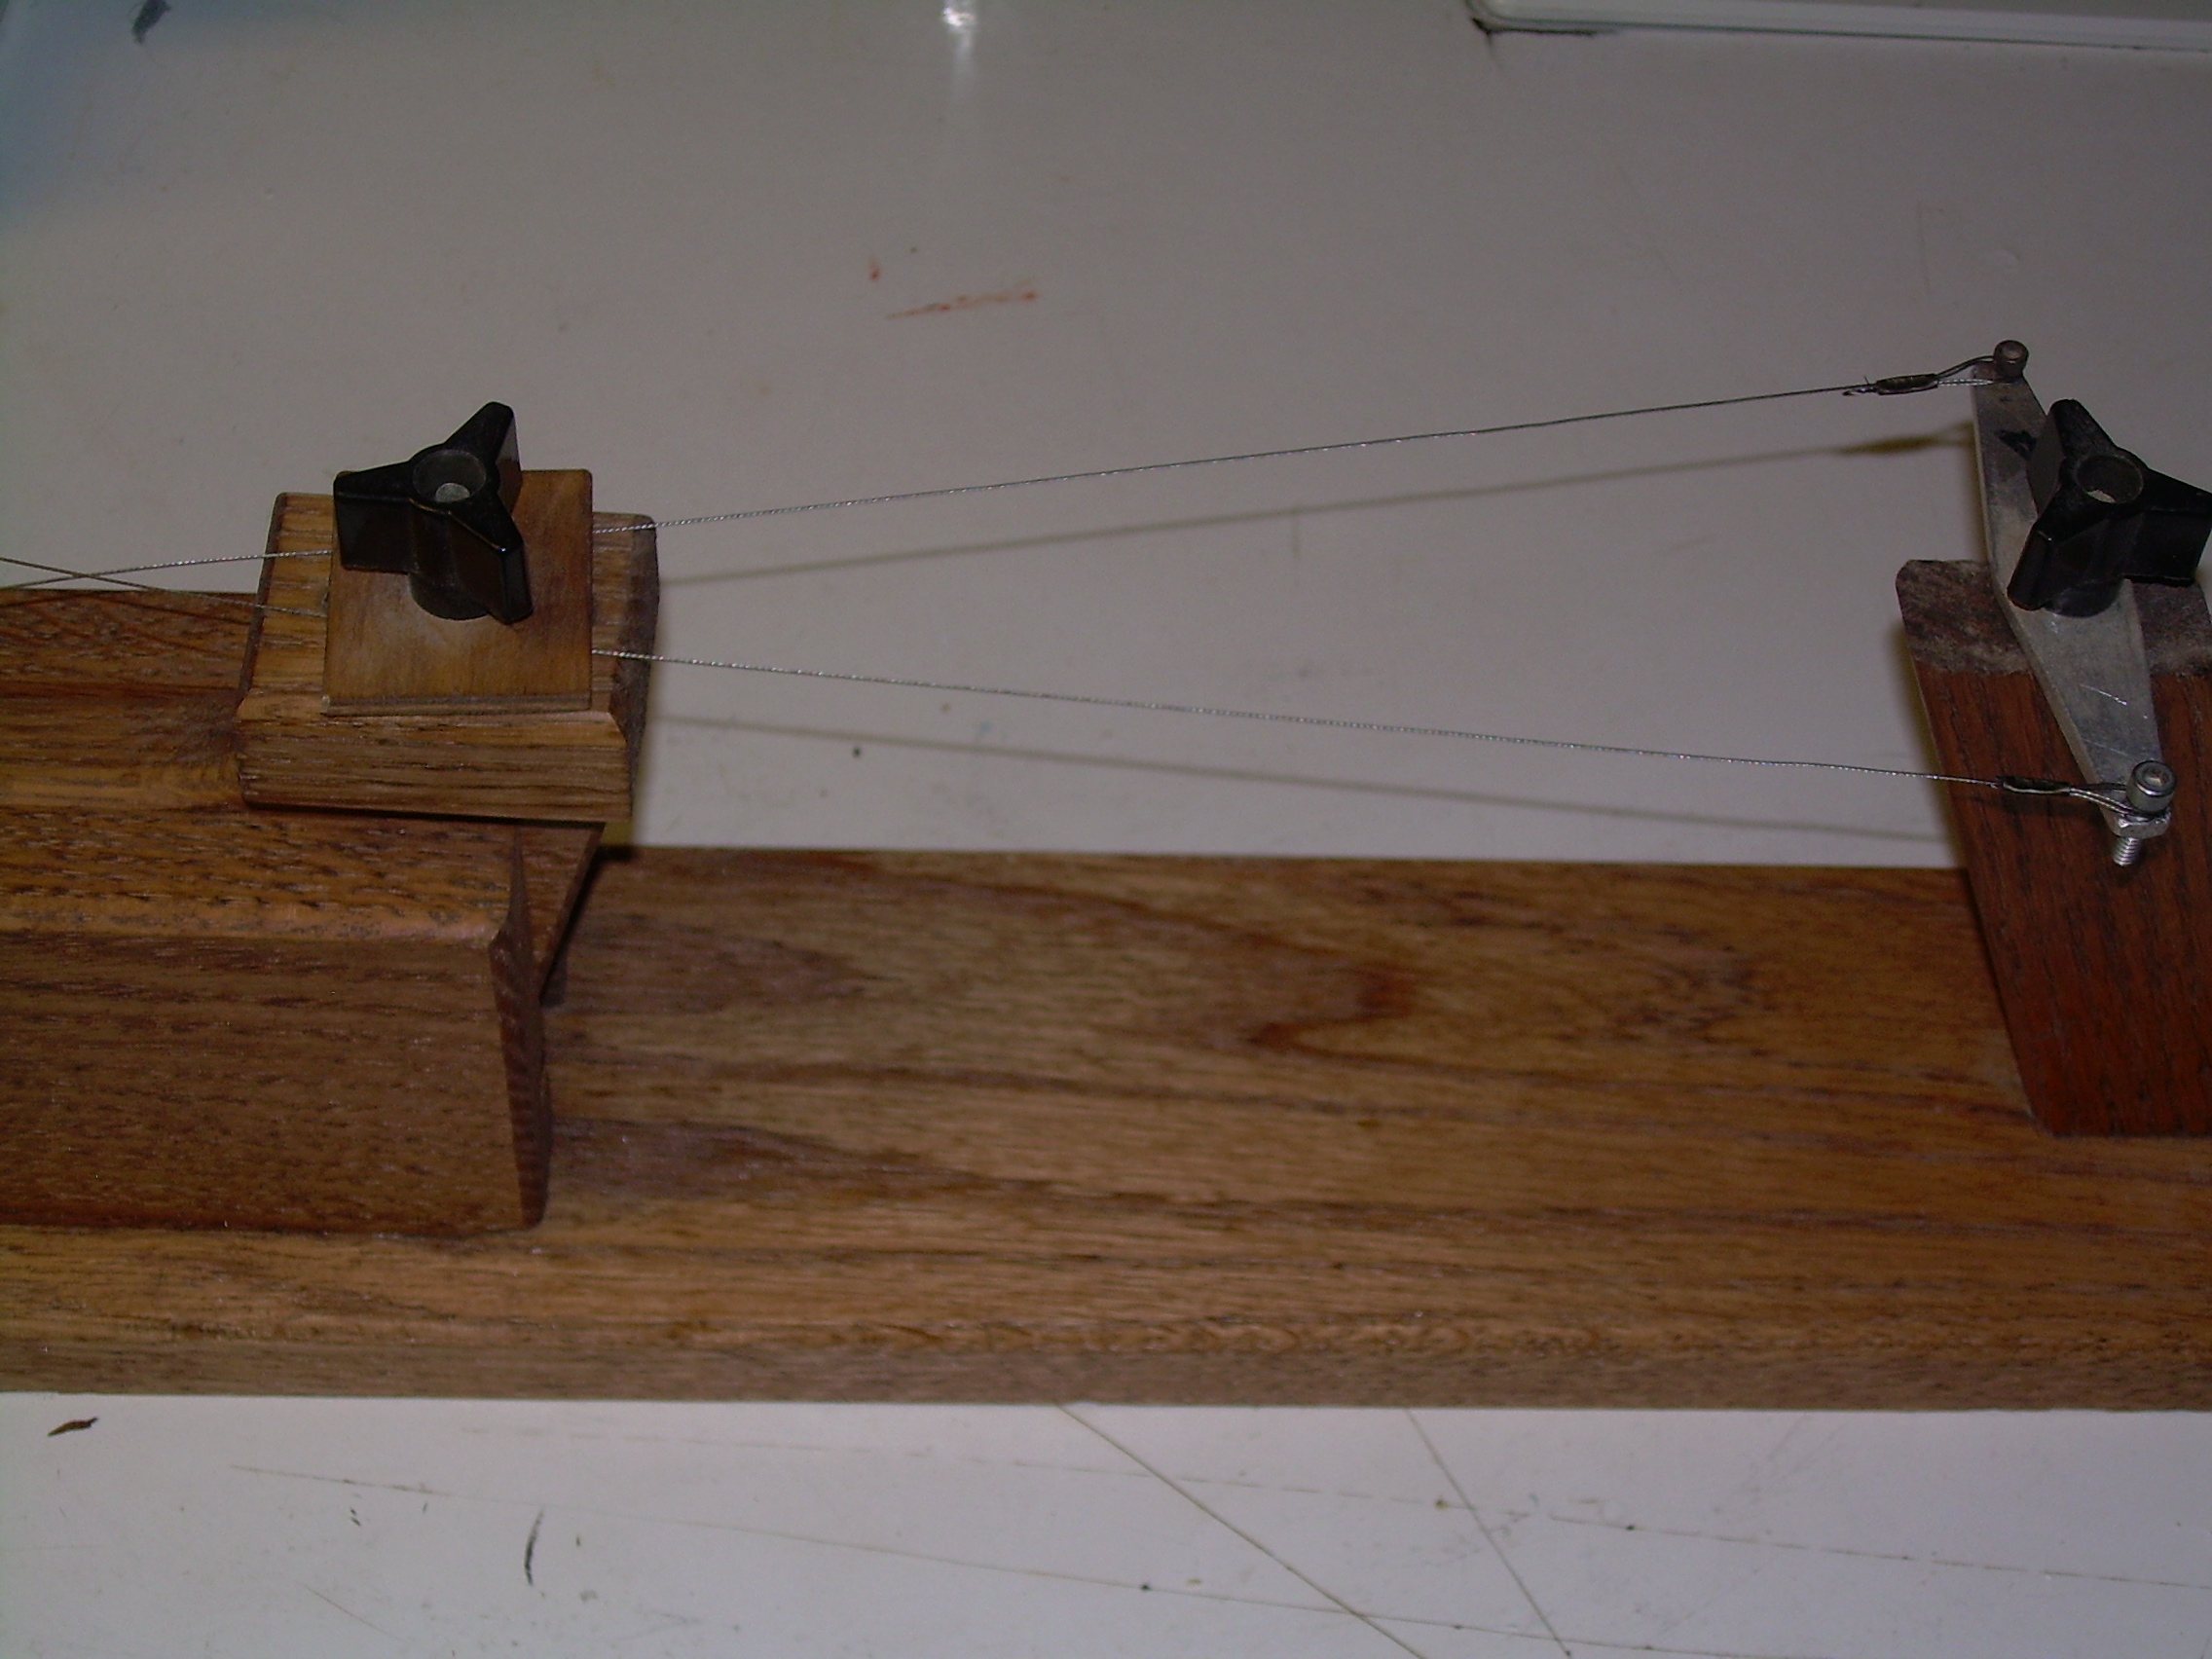
I didn't get the entire jig in the pic. The ends terminate on the bellcrank while the other side is clamped down to the stanchion. On the far left ( Not Shown) is the knob that pulls the lines tight once cinched down. This just absolutely makes life easy when wrapping lines, I utilize it for crimping as well.
When I make my lines for combat, my handle is non adjustable. My son flies with a handle he can adjust in the air during flying. Therefore for me, my line sets have to be spot on and my planes elevator trimmed accordingly. This is very simple and easy to do once you have mastered a systematic way of doing it. My jig utilizes a bellcrank and once I terminate one end of my lines, I stake the other end and run out the entire length and use my jig. I generally do this at our field when I need to do so. I also make several sets during my outing with the jig. Here's a pic of my jig.

I didn't get the entire jig in the pic. The ends terminate on the bellcrank while the other side is clamped down to the stanchion. On the far left ( Not Shown) is the knob that pulls the lines tight once cinched down. This just absolutely makes life easy when wrapping lines, I utilize it for crimping as well.

Ken Cook- Top Poster

- Posts : 5640
Join date : 2012-03-27
Location : pennsylvania
 Re: Making lines...not lead outs. Bring in your favorite methods!
Excuse me if I'm confused here, but if you're using Spiderwire or another braid-type fishing line, surely you don't use crimp tubes? It would just be a matter of tying it off using a reliable knot wouldn't it?

Oldenginerod- Top Poster

- Posts : 4018
Join date : 2012-06-15
Age : 62
Location : Drouin, Victoria
 Re: Making lines...not lead outs. Bring in your favorite methods!
I use knots for Spectra or Spiderwire. However, I have witnessed a lot of the testing that was done prior to the AMA approving it's use for combat. I fly with the individuals who proposed the documents to the AMA. Through contests and regular flying events, I was exposed to all types of knots, line terminations, etc. Once again, those in charge after years of proven and tested materials and knots are now proposing yet another knot to be used. It really is starting to get old as the approved knot has been changed since it's initial approval 2 times. I have seen Spectra done with crimp tubes and eyelets.
What I will say is that more than 75% of the line breaks never occurred at the termination but rather at the lead out guides. The conclusion is that chaffing is more detrimental to the lifespan of Spectra than the knot itself. However, the peanut gallery in charge only seems to recognize the knot's breaking strength as an issue. We have learned to curve this by using ceramic eyelets just like the fishing rod tip guide to prevent this. The other thing that we have also chose to do is to flip flop our lines from the plane end to the handle end to limit chaffing in one centralized area.
What I will say is that more than 75% of the line breaks never occurred at the termination but rather at the lead out guides. The conclusion is that chaffing is more detrimental to the lifespan of Spectra than the knot itself. However, the peanut gallery in charge only seems to recognize the knot's breaking strength as an issue. We have learned to curve this by using ceramic eyelets just like the fishing rod tip guide to prevent this. The other thing that we have also chose to do is to flip flop our lines from the plane end to the handle end to limit chaffing in one centralized area.

Ken Cook- Top Poster

- Posts : 5640
Join date : 2012-03-27
Location : pennsylvania
 Re: Making lines...not lead outs. Bring in your favorite methods!
Oldenginerod wrote:Excuse me if I'm confused here, but if you're using Spiderwire or another braid-type fishing line, surely you don't use crimp tubes? It would just be a matter of tying it off using a reliable knot wouldn't it?
Forgive me, OER!
I can see how I confused things. I want to crimp my steel lines. I used 1/8" OD copper (oil pressure line from FLAPS) on my last set of .008" line. I think the copper is too big, but haven't had a line failure yet. So I got the smaller brass in a pinch. I think Ken hit the "hidden nail" straight on when he described the changes in material...copper>brass>aluminum.
I'll use the 1/8" copper on the .015x50' lines I make next. If I like how the Mosquito flies, I may invest energy in wrapping up a set for more flights. In the mean time, I'll do as Ken says and anneal the smaller brass before using it on my .008" steel. It would probably be best to find a spool of serving line and start wrapping my steel lines. I did that for the leadouts on my earlier Scientific birds...and used some beastly looking picture-hanging wire for that (all I could find locally the day before flying).
The SpiderWire gets tied using the recommended knots.
Ken, I guess you use the bellcrank as a way to proof same-length lines. If the lines differ, then the bellcrank shifts off-center. If so, very clever. I thank you for that nugget!
As I checked around, and near, I noticed my pre-made .015" used 1/8" eyelets. They were a pain to connect to the Mosquito (oh so small). My Hobby-Lobby sourced eyelets as closer to 1/4", and were difficult to connect to any of the planes-really too big, and tend to foul on the line connectors. I'll do a quick search for 3/16" eyelets. I think mail-order may be the answer in this little town!
My last wrapped lines were soldered. I have seen where some guys use epoxy to soften the hardened wrap...what say y'all?

944_Jim- Diamond Member


Posts : 2022
Join date : 2017-02-08
Age : 59
Location : NE MS
 Re: Making lines...not lead outs. Bring in your favorite methods!
Jim, you got it. Years aback I used to solder them as well and that was the accepted method of the time. Two things happen that were discovered later which determined that method unacceptable. The flux can't properly be cleaned from the strands therefore corrosion is always at work. The other is the solder doesn't provide a living joint and it creates a hard spot which is where the cable immediately fails.
Melvin of MBS carries everything needed to construct line sets. Here's his eyelet choices and others . If you call Melvin and order from him, that stuff will be at your doorstep before you even write the check out. Wonderful person and is great to deal with. Just understand, Melvin's is the sole operator of the site and this is a secondary business. He's more than likely preparing for the NATS in the next few weeks so it would be advantageous to call him direct vs e-mail if any of this interests you.
Control Line Wire and Accessories
Line Terminations and Serving Wire
Small Line Sleeves (.039 ID) - 100/pkg 3.50
Medium Line Sleeves (.0525 ID) - 100/pkg 3.50
Large Line Sleeves (.0645 ID) - 100/pkg 3.50
X-Large Line Sleeves (.071 ID) - 100/pkg 4.00
30 gauge copper wire -100' 1.50
28 gauge bare copper wire - 90' 2.00
Line Eyelets (1/8" ID) - 20/pkg 2.00
Line Eyelets (5/32" ID) - 20/pkg 2.00
5-1/2" Line Sleeve Crimping Tool 9.00

Ken Cook- Top Poster

- Posts : 5640
Join date : 2012-03-27
Location : pennsylvania
 Re: Making lines...not lead outs. Bring in your favorite methods!
Ken,
Thanks for the vendor lead. I first contacted Mr. Melvin when I was trying to hook my boys in the hobby. Back then I was thinking two to four planes tops. There was no need to expand a bench stock. Looking back, I know I've wasted more time hunting cheaper, closer-at-hand solutions. Had I known two years ago that I'd be this deep coming back to the hobby, I would have made one purchase for several years worth of line stuffs!
I'm close to placing an order. But I have a few more questions.
What size sleeves for .008" steel lines?
What size sleeves for .012" steel lines?
What size serving wire for both?
I'm guessing the smallest of each component will be fine for the small planes I build.
My largest engine is an AP .09. If my Mosquito bites the dust, then the two NorVel .074s will get recycled into another twin, or more probably a couple of singles.
For now crimped .015x50' lines will do for those. But if I start drifting away from 1/2A, then I'll need only a spool of heavier stuff.
Thanks a bunch!
Last edited by 944_Jim on Sun Jun 10, 2018 2:11 pm; edited 1 time in total (Reason for editing : Fix fat-finger moment)

944_Jim- Diamond Member


Posts : 2022
Join date : 2017-02-08
Age : 59
Location : NE MS
 Similar topics
» Ebay Ringmaster Resto (finishing pics!)
» Another proposed design by Roddie
» P-38 Lightning-Roddie style..
» Line Connectors and Lead-Outs
» Wingtip lead-outs...should have done this sooner.
» Another proposed design by Roddie
» P-38 Lightning-Roddie style..
» Line Connectors and Lead-Outs
» Wingtip lead-outs...should have done this sooner.
Page 1 of 1
Permissions in this forum:
You cannot reply to topics in this forum

 Rules
Rules


