Log in
Search
Latest topics
» Cox films/videos...by Coxfledgling Today at 4:46 am
» Purchased the last of any bult engines from Ken Enya
by Coxfledgling Today at 4:18 am
» My N-1R build log
by roddie Today at 12:32 am
» Happy 77th birthday Andrew!
by akjgardner Today at 12:27 am
» TEE DEE Having issues
by TD ABUSER Yesterday at 9:43 pm
» Landing-gear tips
by roddie Yesterday at 6:17 pm
» Roger Harris revisited
by TD ABUSER Yesterday at 2:13 pm
» Tee Dee .020 combat model
by Ken Cook Yesterday at 1:41 pm
» Retail price mark-up.. how much is enough?
by Ken Cook Yesterday at 1:37 pm
» My latest doodle...
by roddie Yesterday at 10:43 am
» Chocolate chip cookie dough.........
by roddie Fri Nov 22, 2024 1:13 pm
» Free Flight Radio Assist
by rdw777 Fri Nov 22, 2024 9:24 am
Cox Engine of The Month
1960 Scientific P-40 Profile kit
Page 1 of 4
Page 1 of 4 • 1, 2, 3, 4 
 1960 Scientific P-40 Profile kit
Hi all,
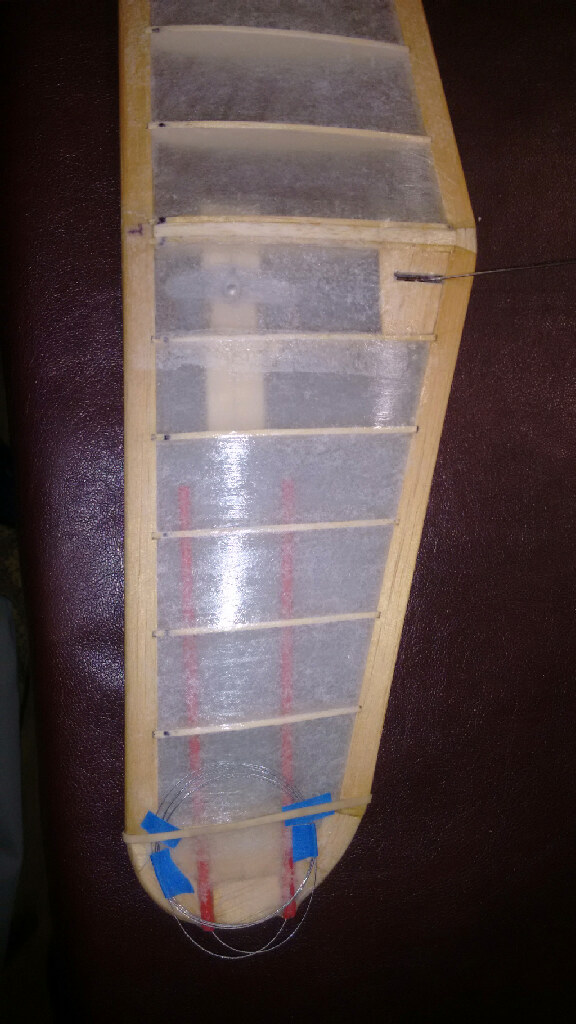
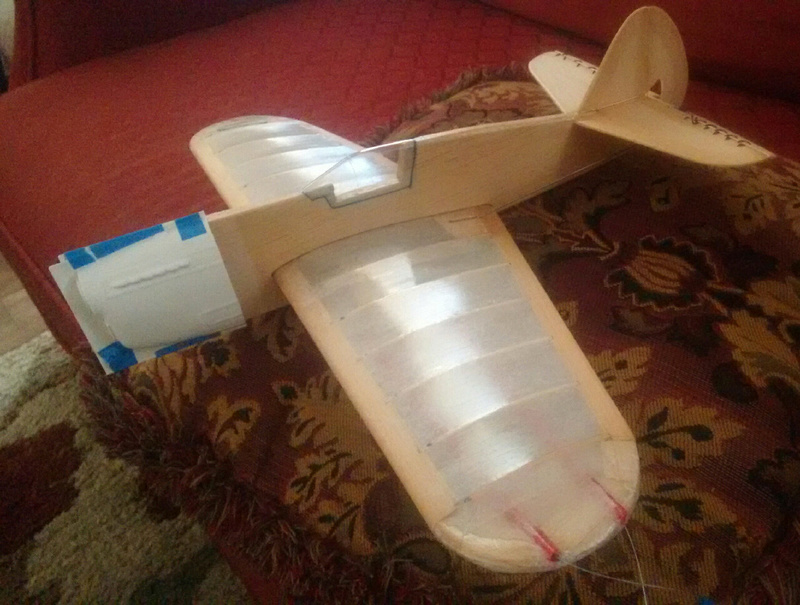
Here is my latest build. It is a survivor kit having come from a collection posted on StuntHanger. This one is unusual in that it is 21-plus inches across, with a symmetrical wing. The plastic cowl hasn't been cut to fit an engine until I know which engine is finally installed.
The plan (build instructions), decal scans, wood scans have gone to Dave Cowell aka DPCModels for reproduction. A buck has been cast from the cowl set, but needs to be mailed to Dave.
All original kit wood was used, except for the firewall and related 1/4" braces. The ply was delaminating, and the 1/4" balsa was not cut square between the firewall and fuse. The original canopy was flat plastic...I molded the one you see using bass wood and a water bottle.
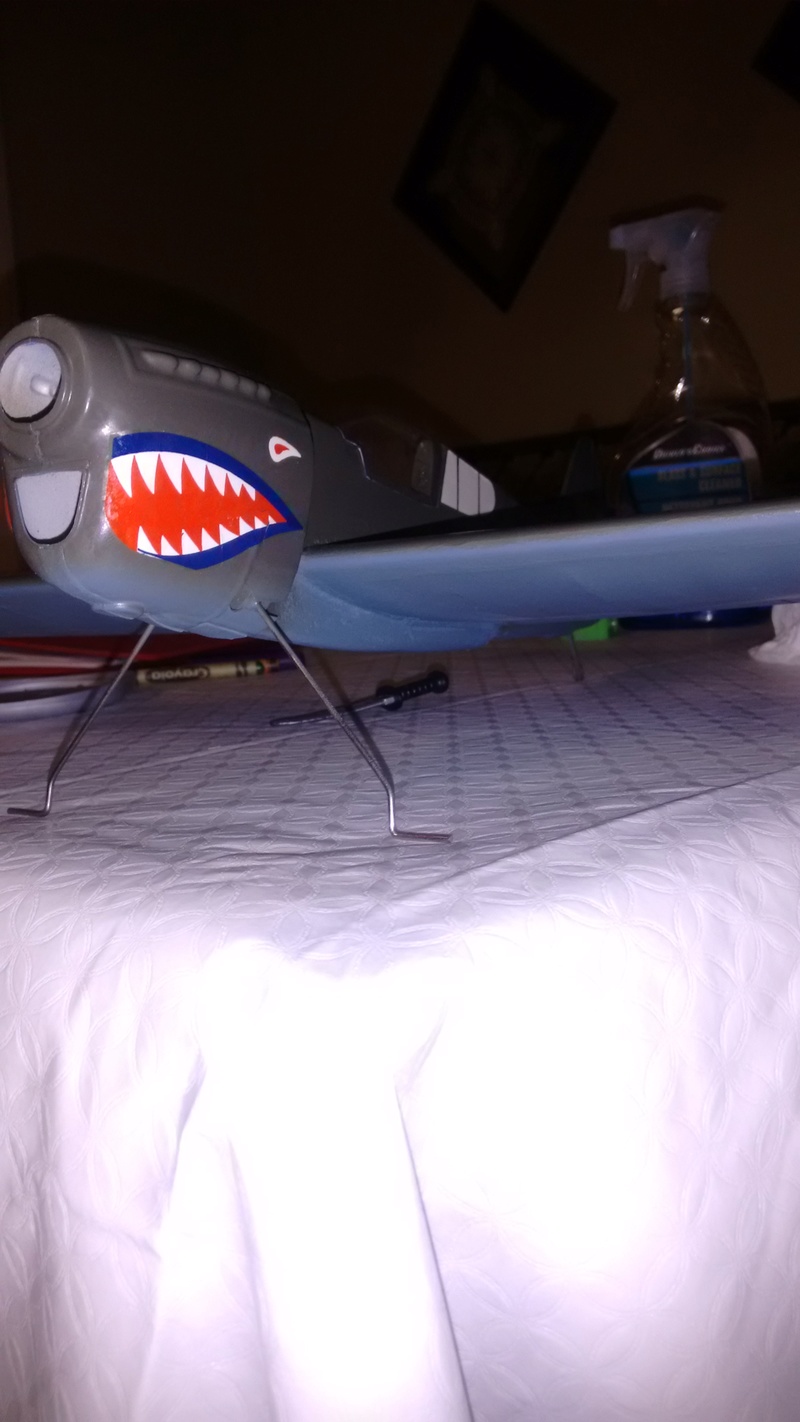
The 57 yo decals were really a bear!
I intended on going with an AP Wasp to the point that the nylon mount was drilled to fit the Golden Bee mounting pattern. First flights will be on the Bee. If it won't do a basic pattern then the AP and tank will get tossed on it.


Last edited by 944_Jim on Mon Nov 27, 2017 3:41 pm; edited 1 time in total (Reason for editing : Couldn't get pics straight)
944_Jim- Diamond Member


Posts : 2022
Join date : 2017-02-08
Age : 59
Location : NE MS
 Re: 1960 Scientific P-40 Profile kit
Great Build. Got to love the Scientific kits !!!

Kim- Top Poster


Posts : 8625
Join date : 2011-09-06
Location : South East Missouri
 Re: 1960 Scientific P-40 Profile kit
She is looking really good there Jim , Decals are Nice and the way you ran the lead out tube further into the wing makes some sense not to saw the ribs. I see you sowed your elv./stb. Nice i like them after doing a few the look has an impression on it .  Hope the Golden Bee works out !


getback- Top Poster


Posts : 10442
Join date : 2013-01-18
Age : 67
Location : julian , NC
 Re: 1960 Scientific P-40 Profile kit
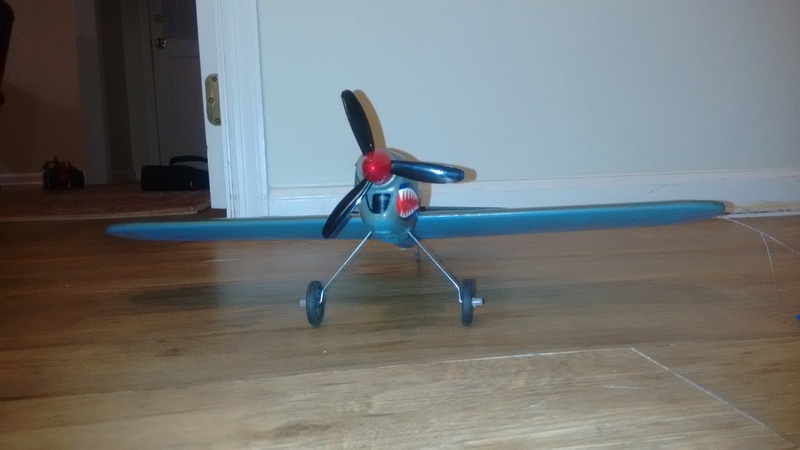
I just had to check the prop and spinner. This is the Golden Bee inverted. The needle hasn't been cut into the plastic.
I don't like the needle topside without a cylinder in front of it for protection.
If I go product engine pushed forward on a mount with a remote tank, then I can go port with the needle, and starboard with the cylinder. For that matter, I can flip-flop between product and AP.
I just had to see the prop and spinner!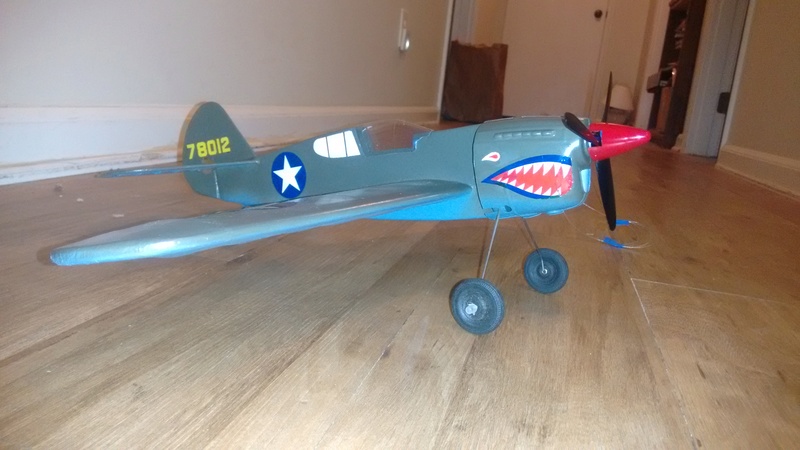


944_Jim- Diamond Member


Posts : 2022
Join date : 2017-02-08
Age : 59
Location : NE MS
 Re: 1960 Scientific P-40 Profile kit
looks good, i think you'd be good with the Golden Bee or Black Widow, less chopping on the plastic cowl and probably better CG than with the ASP with muffler and external fuel tank.
 Re: 1960 Scientific P-40 Profile kit
Thanks Mark,
I did a fingertip check on CG with the Wasp right after this picture. Without muffler and prop I'm about 3/4" behind the leading edge.
I need shorter screws (tomorrow) to really get a handle on the Bee. I think you're right. The CG will probably shift back a smidge...better for loops!
I did a fingertip check on CG with the Wasp right after this picture. Without muffler and prop I'm about 3/4" behind the leading edge.
I need shorter screws (tomorrow) to really get a handle on the Bee. I think you're right. The CG will probably shift back a smidge...better for loops!

944_Jim- Diamond Member


Posts : 2022
Join date : 2017-02-08
Age : 59
Location : NE MS
 Hooray! Successful maiden.
Today the weather was perfect! Sixty eight degrees, three to four mph winds...steady, not gusty.
I have been checking lines, balance point, stooge release and line lengths.
Prop, glow plug tight, lead-outs good!
I walked the flight circle looking for gotchas, paced off the center on the trapeziod-shaped field...second ground check, third wind check. All good!
Then I grabbed a chunk of 3/4" conduit to stab into the grass for my center. A key ring was secured on the top, and my flight lines attached to establish my circumference.
By now all the contractors in the building were watching...probably taking bets in whether I fly or prang the bird.
With center and circumference established, I laid down a few sections of rubber floormat for my runway.
Then I hooked the lines to the plane, and the plane on the stooge.
Having built a new flight box, I connected my glow plug leads and promptly smoked three glow plugs!
Ok...slow down. Double checking shows I plugged the glow plug leads to the starter sockets-doh!
With glow plug number four installed, I ran a quick ground tank to baseline my needle setting.
The first launch attempt had the tail skid come off the stooge and hang up on the rubber mat. The plane nosed over and stalled.
Second launch was perfect! The plane lifted off in 15 feet. Line tension was great for 40 foot lines. The airframe behaved wonderfully! I even managed my first, clumsy, almost-overhead, sort of wing-over (better than 75 degrees off horizontal)!
However, the old Golden Bee struggled after 45 seconds of flight each time for the next six flights. I think I rebuilt the engine with a Babe Bee 5cc tank kit (see my next thread please).
Tomorrow I'll fit an AP .061 engine and 1/2 ounce wedge tank. If the weather holds, I'll try again. Unfortunately, that tank will be quite high on the fuselage...almost above the top edge of it.
I call the plane a success despite the balky Golden Bee.

944_Jim- Diamond Member


Posts : 2022
Join date : 2017-02-08
Age : 59
Location : NE MS
 Re: 1960 Scientific P-40 Profile kit
Sounds like an excellent shake down-flight!

Kim- Top Poster


Posts : 8625
Join date : 2011-09-06
Location : South East Missouri

944_Jim- Diamond Member


Posts : 2022
Join date : 2017-02-08
Age : 59
Location : NE MS
 Re: 1960 Scientific P-40 Profile kit
Congratulations JIM!!!! Greenies for you sir!


1/2A Nut- Top Poster

- Posts : 3538
Join date : 2013-10-20
Age : 61
Location : Brad in Texas
 No flight time with the AP .061
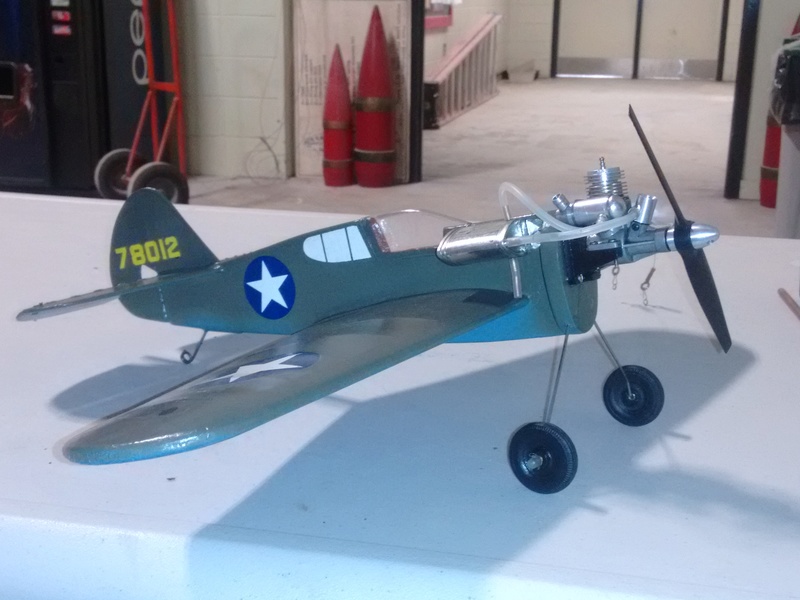
But I did mount the AP .061 with MA 6x3 prop and 1/2 ounce fuel tank. The custom venturi has the spraybar installed at an angle to keep fingers out of the prop, so I can't change the orientation. That means no upside down configuration with the starboard side draw.
Two bench runs were made...one with no pressure, and one with muffler pressure. The pressure run ran for 2:45 mins.
All of this is reversible in case I get the Golden Bee settled, but I think the bigger tank will Trump a hidden engine.
Once a final decision is made on powerplant, the cowl will be fitted. I'm leaning towards the big engine sticking out of the cowl. The idea reminds me of the of "Zingers" plastic models of the '70s, where the engines were scaled twice as large as the vehicles.
More to follow after the next few flights!


944_Jim- Diamond Member


Posts : 2022
Join date : 2017-02-08
Age : 59
Location : NE MS
 Re: 1960 Scientific P-40 Profile kit
That thing should scream with the new engine on it.......good luck........the plane looks good by the way.....

akjgardner- Diamond Member


Posts : 1602
Join date : 2014-12-28
Age : 65
Location : Greensberg Indiana
 Re: 1960 Scientific P-40 Profile kit
Looks familiar to me Jim, right down to the red spinner.

It's Sterling 28" wing bigger brother with Enya .19 power. Flying Tigers version.

My first real stunter however minor. Did my first loops and inverted flights with it. I have "profiled" it here before. Built and flown in the late 60's and 70's and rebuilt a few times.
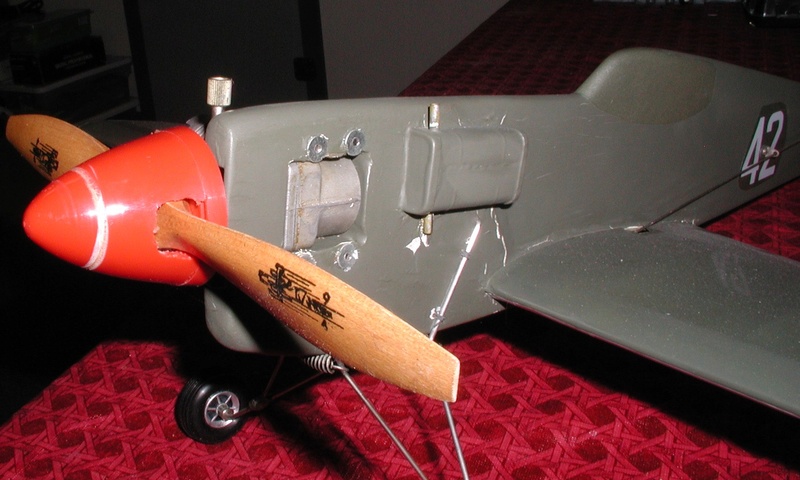

I still like your canopy building methods.
Bob

It's Sterling 28" wing bigger brother with Enya .19 power. Flying Tigers version.

My first real stunter however minor. Did my first loops and inverted flights with it. I have "profiled"


I still like your canopy building methods.
Bob

rsv1cox- Top Poster


Posts : 11250
Join date : 2014-08-18
Location : West Virginia
 Re: 1960 Scientific P-40 Profile kit
@ Mark: When the GB ran right, this thing really felt good. No twitchiness like my Wido Satan. Responsive and smooth. I do want to try to move the CH back a bit. With the GB it was 1/2" behind the leading edge on my finger tips ( I know, not very Scientific).
Once Mississippi weather breaks, I'll fly with the AP and report back. It sure sounded good on the plane tied down to the bench!
@ Bob: Thanks for posting the big brother. You did a fabulous job on the refurbishment!
Any chance you have tracings/templates? Or could this one be on Outerzone/HPA? I have an AP .09 that may haul one around.
Thanks for cheering on my canopies.
If I figure out how to YouTube, I'll post the first flight. It is only 34 seconds...43 Megabytes.

944_Jim- Diamond Member


Posts : 2022
Join date : 2017-02-08
Age : 59
Location : NE MS
 Re: 1960 Scientific P-40 Profile kit
Hi Jim, It's an out of the box Sterling kit.
Bob
Bob

rsv1cox- Top Poster


Posts : 11250
Join date : 2014-08-18
Location : West Virginia
 Re: 1960 Scientific P-40 Profile kit
rsv1cox wrote:Hi Jim, It's an out of the box Sterling kit.
Bob
Hi Bob,
I found references: Sterling kit S7.
Brodak kits it now. Oddly, Brodak want $70. An Italian eBay auction has an original Sterling kit at almost $200 coming stateside.
I'll keep this kit in mind once the dust settles over all.of the other kits in the pipeline.
Thanks!

944_Jim- Diamond Member


Posts : 2022
Join date : 2017-02-08
Age : 59
Location : NE MS
 Re: 1960 Scientific P-40 Profile kit
Jim, where did you get the venturi? Jan Holuszko was making the venturi assemblies about 10 years ago. Norvel was pretty defunct at the time and Cox equipment was not up to par to fly 1/2A stunt. One could not find parts for the Norvel, so Hobby People was offering the AP .061 for under $30. The AP being similar to the Norvel engines at least appearance wise was a bit down on power compared to the Norvel and was basically the only game in town. Brodak's CS version MK1 .049 was the other offering at the time which was a huge turd. Jan used parts from the r/c carb provided with the AP and adapted them to his venturi. I made a adapter that utilized the same thread that the Cox TD venturi uses so I could screw in that assembly. Some just wired open the r/c carb and flew it as is. I believe you have one of Jan's venturi's on your engine and if possible it would be nice to see it up close. This engine was never offered as a control line engine. Eric Rule from RSM was selling those assemblies for more than what the engine cost. Larry Renger was using the AP in his newly designed Skysport with the Jan venturi and it was featured in Flying Models. Larry gave me the article that he copied. I have a few of the AP .061's but found them to have some issues and they now reside in the cabinet. Jan stopped making the assemblies some years back.

Ken Cook- Top Poster

- Posts : 5640
Join date : 2012-03-27
Location : pennsylvania
 Re: 1960 Scientific P-40 Profile kit
How does it fly on the bigger engine? Great! This thing pulls like a small dog on 38' .008 7-strand lines!
I will have to make a longer set.
It takes 4-Mississippi to complete a circle.
Yesterday I performed my first official Wing-over.
Today I got inverted.
The first inverted 1/2 lap turned into a stuck spinner in the dirt (Oops!). The second one was a few laps upside down, but it was late in the flight. The rudder did not get snapped off during the canopy landing. Number three was several laps upside down. However, it was late in the flight. Recovering to right side up came with a flame-out, stall and another spinner dart in the ground. The outboard wing must have flexed, but not broken. Tissue needs to be fixed in the middle of one bay. Hopefully I still have enough of the home-mixed blue so it can blend in. Otherwise, this plane just gets it hard!
I believe I'll keep this engine on it. Then my Wido Satan can have its Golden Bee back.
Time to fit the cowl, and fix the paper. More to follow once I figure out how to make and post a video.
Oh, for Ken Cook. I was going to fly it with a Master Airscrew 6x3. But based on a PM from Ken, I went with a smaller prop. All I had was a Cox 5x3 already drilled for Norvel/AP bench testing. Here is the venturi:


944_Jim- Diamond Member


Posts : 2022
Join date : 2017-02-08
Age : 59
Location : NE MS
 Re: 1960 Scientific P-40 Profile kit
That's just plain wicked looking!!

ticomareado- Account Under Review
- Posts : 1089
Join date : 2013-10-03
Location : NC
 Re: 1960 Scientific P-40 Profile kit
It will probably wind up on 45 to 50 ft. lines before it's over with.

ticomareado- Account Under Review
- Posts : 1089
Join date : 2013-10-03
Location : NC
 Re: 1960 Scientific P-40 Profile kit
Well, I can say I KNOW what happened to the Mosquito....it almost got this one twice tonight! I had been using fiber washers gripping the "bridle" through the handle. The line slipped causing the plane to shoot up! I would up removing the fiber washers and almost crushing the line with the bare screw clamping it.
That and a digital phone with a fully charged battery, and fully packed memory card means we get the late movie from my phone.
Without further adieu, a video of the P-40 flying.
On 38' lines after several earlier flights:
And same flight, landing:
That and a digital phone with a fully charged battery, and fully packed memory card means we get the late movie from my phone.
Without further adieu, a video of the P-40 flying.
On 38' lines after several earlier flights:
And same flight, landing:

944_Jim- Diamond Member


Posts : 2022
Join date : 2017-02-08
Age : 59
Location : NE MS
 Re: 1960 Scientific P-40 Profile kit
WTG Jim! That Norvel engine pulled it great 


1/2A Nut- Top Poster

- Posts : 3538
Join date : 2013-10-20
Age : 61
Location : Brad in Texas
 Re: 1960 Scientific P-40 Profile kit
Wonderful. It's a screamer Jim.
I always love that last couple of seconds lean out just before fuel starvation.
Bob
I always love that last couple of seconds lean out just before fuel starvation.
Bob

rsv1cox- Top Poster


Posts : 11250
Join date : 2014-08-18
Location : West Virginia
Page 1 of 4 • 1, 2, 3, 4 
 Similar topics
» 1960's WD 40 ad.. LOL
» 1960's Cox Olympic .15.
» Ronnie's engines
» 1960 Frog 349 BB RC
» Cox Trainer 1960-1963
» 1960's Cox Olympic .15.
» Ronnie's engines
» 1960 Frog 349 BB RC
» Cox Trainer 1960-1963
Page 1 of 4
Permissions in this forum:
You cannot reply to topics in this forum

 Rules
Rules


