Log in
Search
Latest topics
» Cox films/videos...by Coxfledgling Today at 4:46 am
» Purchased the last of any bult engines from Ken Enya
by Coxfledgling Today at 4:18 am
» My N-1R build log
by roddie Today at 12:32 am
» Happy 77th birthday Andrew!
by akjgardner Today at 12:27 am
» TEE DEE Having issues
by TD ABUSER Yesterday at 9:43 pm
» Landing-gear tips
by roddie Yesterday at 6:17 pm
» Roger Harris revisited
by TD ABUSER Yesterday at 2:13 pm
» Tee Dee .020 combat model
by Ken Cook Yesterday at 1:41 pm
» Retail price mark-up.. how much is enough?
by Ken Cook Yesterday at 1:37 pm
» My latest doodle...
by roddie Yesterday at 10:43 am
» Chocolate chip cookie dough.........
by roddie Fri Nov 22, 2024 1:13 pm
» Free Flight Radio Assist
by rdw777 Fri Nov 22, 2024 9:24 am
Cox Engine of The Month
Roddie's Cox-powered triplane
Page 1 of 1
 Roddie's Cox-powered triplane
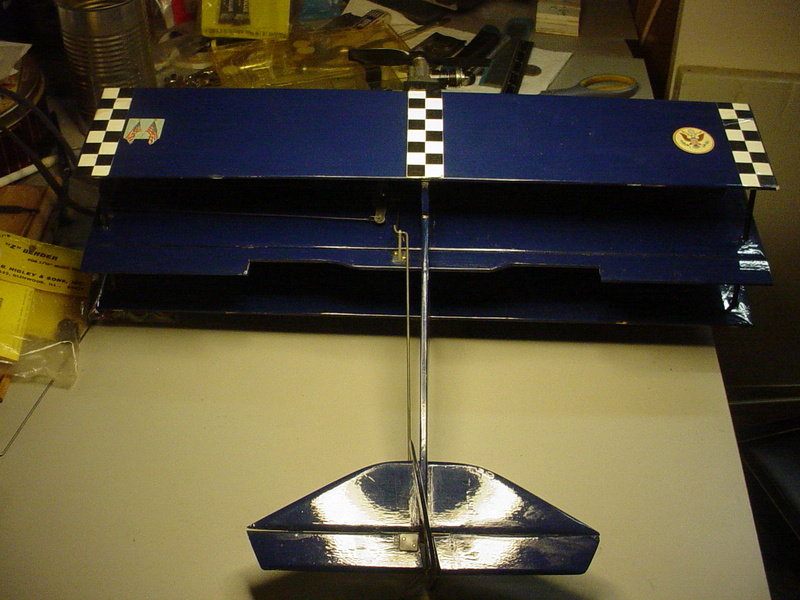
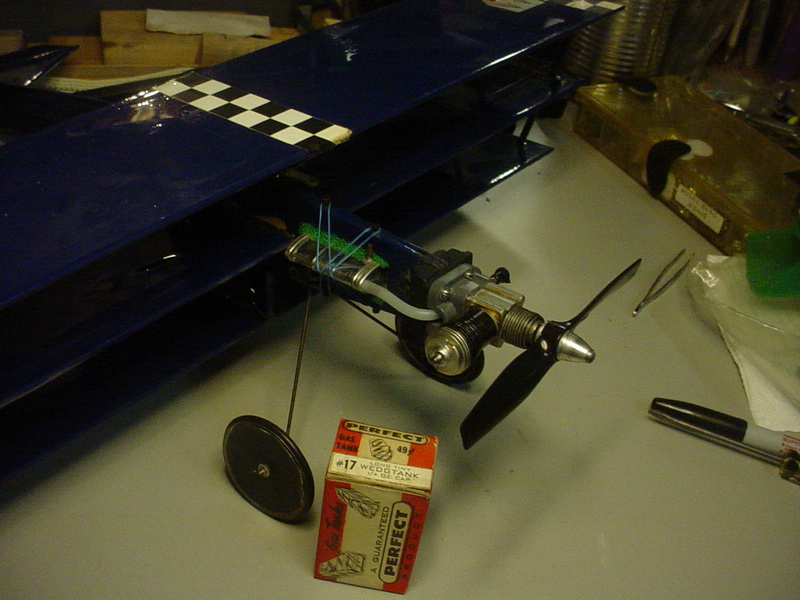
Many of you know about this model, built back in the early 90's.. I've posted some pics.. and wrote a little about it's construction. It was powered by a Cox .049 reed-valve engine with the horseshoe back-plate and a small Perfect wedge-tank. I believe I used a 6" x 3" two-blade "Zinger" wood-prop. running either Cox Super-Fuel.. or Sig Champion 25.

To "summarize".. it's of my own design (I drew-up plans) and uses "built-up" (framed) flat-wing construction.. with "similar" construction applied to the profile-fuse.. covered in Top-Flite's "Mono-Kote" of that current vintage.

All three wings are 80 sq. in. constant 4" chord/20" span. The center-wing has a functional full-span flap of approx. 17 sq. in. area. The top/bottom wings were built with flaps too.. but only at the tips.. 1" x 4" and linked with .025" music-wire. They were never connected to work.. which was dumb.. because I'm sure that they "buffeted" in flight causing drag. All hinging was done with Sig CA hinges.. so these flaps were fairly rigid.

On maiden; the model was a HANDFUL.. and I was committed to trying to fly it.. until it ran out of fuel. It was a frantic 3 minutes of handle-input to control it. Worse than any wind I've flown in. It was tail-heavy.
  I didn't have many options.. and it was questionable where the C of G would be, when building it. I decided to try mounting a "heat-sink" (Cox Sand-Blaster part) clamped to the glow-head for nose-weight. It worked.. and I could now achieve level flight with minimal control-input. I flew the model a few more times.. but retired it, because it just wasn't right. I was losing power from an over-cooled engine... and had excess weight to make it balance.
Fast-forward 25 years.... I decided to cut the flaps off the top/bottom wings. Being Sig "Easy-hinges".. this was easy to do with a razor-blade.

This was done this past Winter.. and set aside. The discarded pieces were saved.. and I ran-across the two .025" music-wire flap-links a few nights ago.. and decided to weigh them up.. along with the flaps I'd cut off.
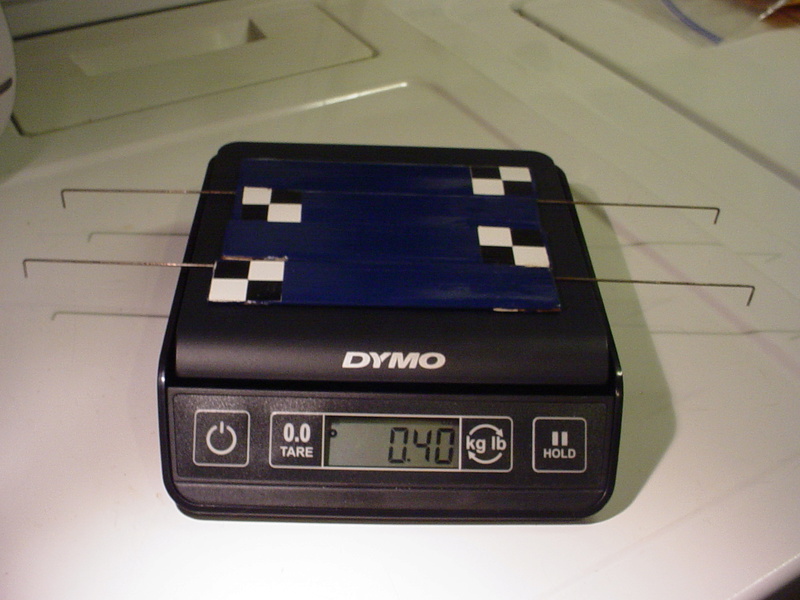
Almost 1/2 oz. of weight there.. X-amount of inches rearward of the C of G.
Should I try to fly it again without the heat-sink attached?... The aforementioned heat-sink weighs .5 oz. but the nose-moment (to the engine's cylinder) is only 4" forward of the center-wing's L/E. The three wing's L/E's are offset 1/2" back from top to bottom. It's basically a "crap-shoot"..
It wasn't a terribly heavy model to start with.. because of its' construction. Weight now (less engine) is under 6 oz.
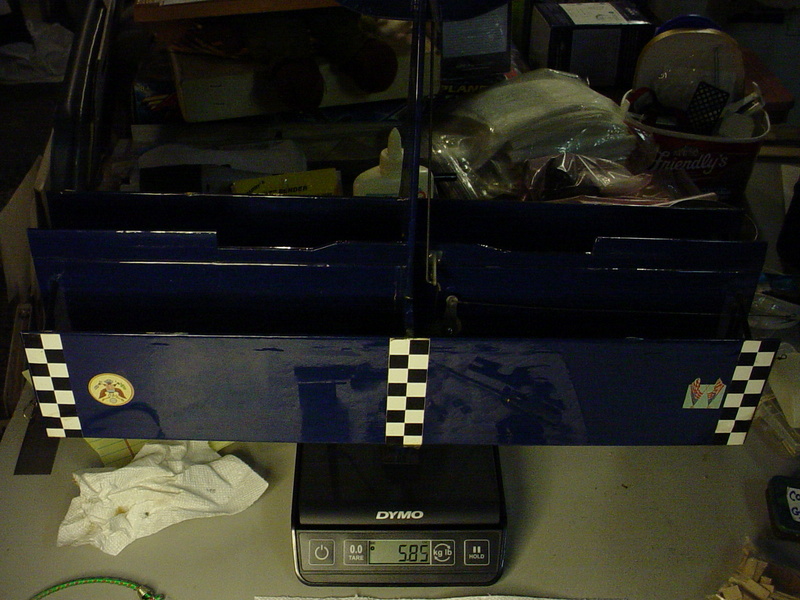
This model is on my "to fly" list.. along with several others. The wing-construction is what I really wanted to share with you. "Flat-wings" don't lend themselves well to stunt.. but there are plenty of little designs that utilize them. Building them as a "frame-work".. does save weight.. as well as building your fuse's tail-section "framed-up".. as opposed to a solid plank of wood. Covering is needed.. but why not give it a try? The two models that I've built this way have stayed dead-straight for almost 30 years.

Here's a backlit framework-shot of the mono-plane, through it's Mono-Kote covering. It's simply 1/8" balsa pieces.. CA-glued together in minutes.

You can incorporate a 1/2" wide piece of 1/8" Spruce as a spar.. if you want.. and still be lighter than a solid 1/8" balsa full-sheet wing.

To "summarize".. it's of my own design (I drew-up plans) and uses "built-up" (framed) flat-wing construction.. with "similar" construction applied to the profile-fuse.. covered in Top-Flite's "Mono-Kote" of that current vintage.

All three wings are 80 sq. in. constant 4" chord/20" span. The center-wing has a functional full-span flap of approx. 17 sq. in. area. The top/bottom wings were built with flaps too.. but only at the tips.. 1" x 4" and linked with .025" music-wire. They were never connected to work.. which was dumb.. because I'm sure that they "buffeted" in flight causing drag. All hinging was done with Sig CA hinges.. so these flaps were fairly rigid.

On maiden; the model was a HANDFUL..
 and I was committed to trying to fly it.. until it ran out of fuel. It was a frantic 3 minutes of handle-input to control it. Worse than any wind I've flown in. It was tail-heavy.
  I didn't have many options.. and it was questionable where the C of G would be, when building it. I decided to try mounting a "heat-sink" (Cox Sand-Blaster part) clamped to the glow-head for nose-weight. It worked.. and I could now achieve level flight with minimal control-input. I flew the model a few more times.. but retired it, because it just wasn't right. I was losing power from an over-cooled engine... and had excess weight to make it balance.
Fast-forward 25 years.... I decided to cut the flaps off the top/bottom wings. Being Sig "Easy-hinges".. this was easy to do with a razor-blade.

This was done this past Winter.. and set aside. The discarded pieces were saved.. and I ran-across the two .025" music-wire flap-links a few nights ago.. and decided to weigh them up.. along with the flaps I'd cut off.

Almost 1/2 oz. of weight there.. X-amount of inches rearward of the C of G.

Should I try to fly it again without the heat-sink attached?... The aforementioned heat-sink weighs .5 oz. but the nose-moment (to the engine's cylinder) is only 4" forward of the center-wing's L/E. The three wing's L/E's are offset 1/2" back from top to bottom. It's basically a "crap-shoot"..
It wasn't a terribly heavy model to start with.. because of its' construction. Weight now (less engine) is under 6 oz.

This model is on my "to fly" list.. along with several others. The wing-construction is what I really wanted to share with you. "Flat-wings" don't lend themselves well to stunt.. but there are plenty of little designs that utilize them. Building them as a "frame-work".. does save weight.. as well as building your fuse's tail-section "framed-up".. as opposed to a solid plank of wood. Covering is needed.. but why not give it a try? The two models that I've built this way have stayed dead-straight for almost 30 years.

Here's a backlit framework-shot of the mono-plane, through it's Mono-Kote covering. It's simply 1/8" balsa pieces.. CA-glued together in minutes.

You can incorporate a 1/2" wide piece of 1/8" Spruce as a spar.. if you want.. and still be lighter than a solid 1/8" balsa full-sheet wing.
 Re: Roddie's Cox-powered triplane
I like your tri-plane, and the design/build of it. Hope the flight goes well for you.

NEW222- Top Poster

- Posts : 3896
Join date : 2011-08-13
Age : 46
Location : oakbank, mb
 Re: Roddie's Cox-powered triplane
Roddie, I think I've seen it before, but this is the closest look I've spent on it. I like it a lot, and would really love to try and fly it. I hope you get to. Don't try to balance it correctly, purposely trim it nose heavy and work backwards from there. And fly it over tall grass. I'd use a powerful engine, maybe a Medallion with a 6x3. Or a hi-perf reedy.
I'll keep an eye out in case you ever post a flight report.
Rusty
I'll keep an eye out in case you ever post a flight report.
Rusty
_________________
Don't Panic!
...and never Ever think about how good you are at something...
while you're doing it!
My Hot Rock & Blues Playlist
...and never Ever think about how good you are at something...
while you're doing it!
My Hot Rock & Blues Playlist

RknRusty- Rest In Peace

- Posts : 10869
Join date : 2011-08-10
Age : 68
Location : South Carolina, USA
 Re: Roddie's Cox-powered triplane
What Rusty said, better nose heavy than not. A powerful engine is a must and a medallion would be a perfect fit, problem is it weighs less than the engine that's in it. Perhaps a good compromise would be a tanked bee engine like a black widow. It's heavier than the product engine that's on it and longer so it would hang out more and help put some weight on that nose.
Ron
Ron

Cribbs74- Moderator


Posts : 11907
Join date : 2011-10-24
Age : 50
Location : Tuttle, OK
 Re: Roddie's Cox-powered triplane
Hope I don't ever get that I would break my hip tring to get a flight in
I'll keep an eye out in case you ever post a flight report.
Rusty

 I would put the CG 1/2 " NO more off the futurist wing forward since I think you said they were staggered (but not inline with another ) And the engine what ever you have that will turn a 5x3P prop for the most area thrust the fastest RPM (( don't know how fast it was before but I see you used a 6x3 ? Personal I wouldn't plan a day to see how many models U can fly ((( fly the ones you know WORK ))) then the ones your working on to perfect > Eric
getback- Top Poster


Posts : 10442
Join date : 2013-01-18
Age : 67
Location : julian , NC
 Re: Roddie's Cox-powered triplane
Thanks much fella's! The only option for more power.. would be to run the "Rear-Bear" configured engine on it. The red-molded "Killer-Bee" back-plate that I bought from Bernie.. with the Tee-Dee ported cylinder and high-compression glow-head. I think that I have a suction-feed worked-out.. for use with a hard-tank.. but it will need further test-running. I've never tried a bladder-feed.. and I honestly can't say why. I guess it's just because I always had success with suction-feeds on my models. I have most of the materials; should I need to run a bladder.
As I've mentioned.... I've found that increasing the inside diameter of the fuel's feed-line... supply's more fuel at the venturi, where a suction-feed "may be" compromised by enlarging the venturi. I will need to prove this.. but it's pretty basic. Most of us run small I.D. fuel-line on our small engines.. because that's usually all that's needed; whether it be a "tried and true" stock-suction set-up.. or a forced-feed bladder arrangement. I'm a fan of "static fuel-feed".. and strive to make it a reliable option for our IC-engine powered models.
I'll post these pics.. for those who haven't seen them. A relatively easy way to decrease the resistance for fuel to flow from a hard-tank.. to your engine's venturi. Use a larger "I.D." fuel-line than you'd "normally" use.. and insert/twist-it into a short 1/4" length ferrule of alloy-tubing.. to decrease your tubings' inner-diameter. This will allow a tight-fit on your NVA.. and fuel-tank feed.
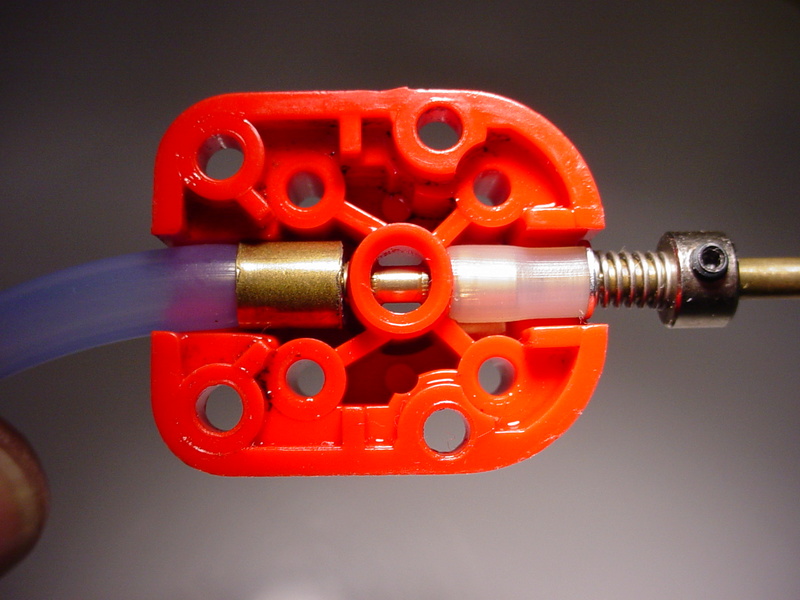

FWIW..
I agree that my tri-plane should be re-flight-tested with some nose weight... I don't want to do that "dance" again.. at my current age.. Thanks again for your input!
As I've mentioned.... I've found that increasing the inside diameter of the fuel's feed-line... supply's more fuel at the venturi, where a suction-feed "may be" compromised by enlarging the venturi. I will need to prove this.. but it's pretty basic. Most of us run small I.D. fuel-line on our small engines.. because that's usually all that's needed; whether it be a "tried and true" stock-suction set-up.. or a forced-feed bladder arrangement. I'm a fan of "static fuel-feed".. and strive to make it a reliable option for our IC-engine powered models.
I'll post these pics.. for those who haven't seen them. A relatively easy way to decrease the resistance for fuel to flow from a hard-tank.. to your engine's venturi. Use a larger "I.D." fuel-line than you'd "normally" use.. and insert/twist-it into a short 1/4" length ferrule of alloy-tubing.. to decrease your tubings' inner-diameter. This will allow a tight-fit on your NVA.. and fuel-tank feed.


FWIW..
I agree that my tri-plane should be re-flight-tested with some nose weight... I don't want to do that "dance" again.. at my current age..
 Re: Roddie's Cox-powered triplane
You could use a pressure tap on the crankcase.
Or go to the home supply store and get some Recdaps for bladder use. Bandit says they'll run with a standard NV.
Rusty
Or go to the home supply store and get some Recdaps for bladder use. Bandit says they'll run with a standard NV.
Rusty
_________________
Don't Panic!
...and never Ever think about how good you are at something...
while you're doing it!
My Hot Rock & Blues Playlist
...and never Ever think about how good you are at something...
while you're doing it!
My Hot Rock & Blues Playlist

RknRusty- Rest In Peace

- Posts : 10869
Join date : 2011-08-10
Age : 68
Location : South Carolina, USA
 Re: Roddie's Cox-powered triplane
The balance of this triplane seems to be "in the ball-park" now. I have no idea where to balance it from; being my own design, but here's a couple of photos of where it balances on the bottom-wing.
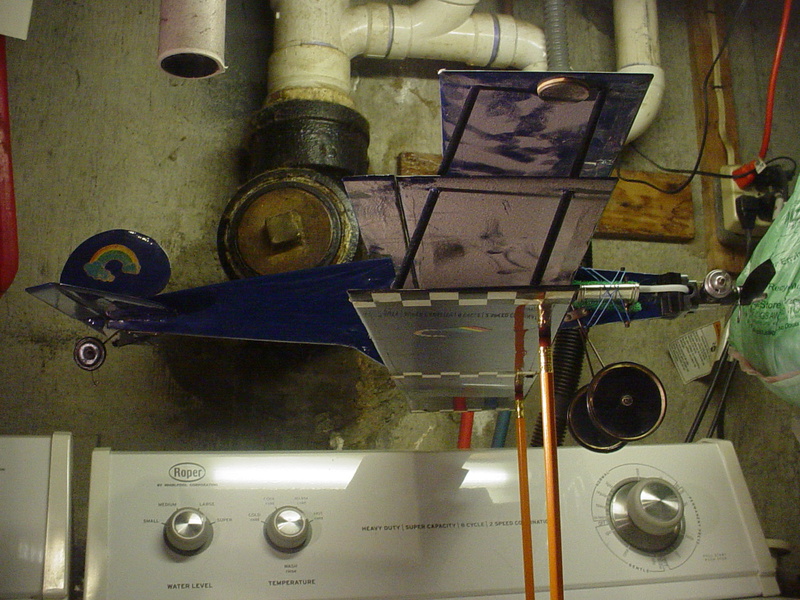
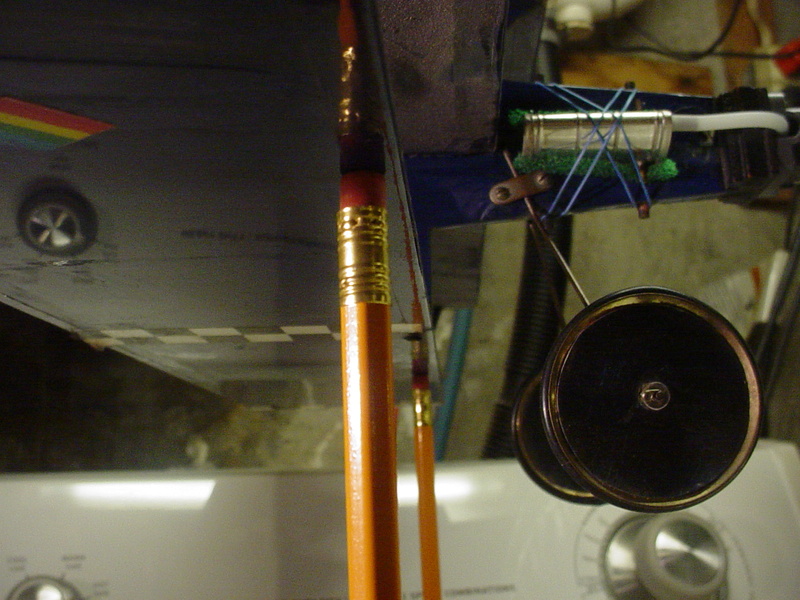
 .... The wings are all 4" constant-chord/20" span and staggered 3/4" between each.. for a theoretical-chord of 5.5". The central-wing has a full-span functional flap.
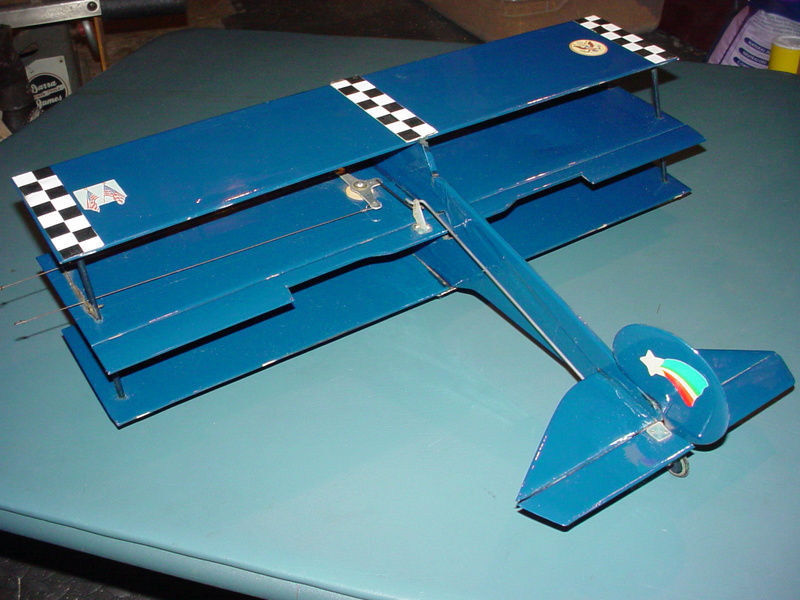
When suspending the central-wing using my fingers.. it balances at approximately 1" back from the L/E.
It had non-functional flaps/joiner-wires on the top/bottom wings. Removing them saved .4 oz.
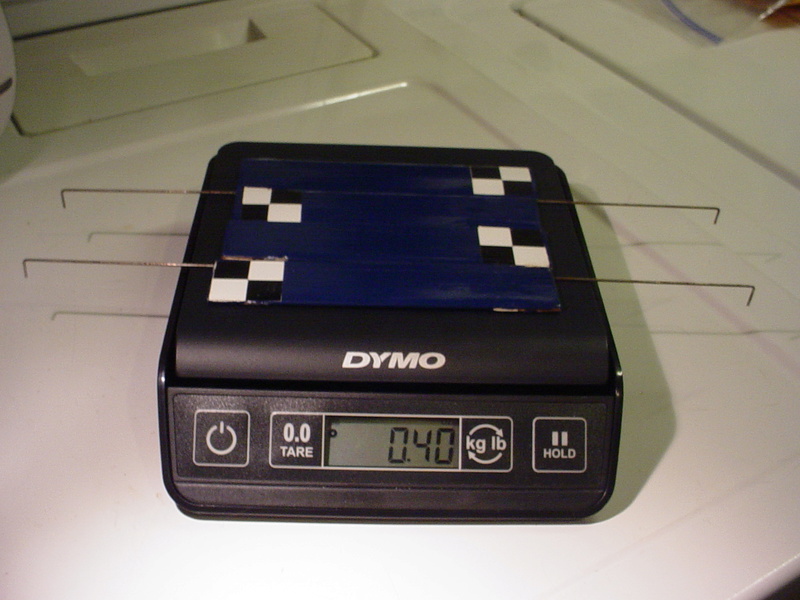
It was a dumb idea to initially build the model that way.. but now that they're removed, I'm hoping that it will fly better.


 .... The wings are all 4" constant-chord/20" span and staggered 3/4" between each.. for a theoretical-chord of 5.5". The central-wing has a full-span functional flap.
When suspending the central-wing using my fingers.. it balances at approximately 1" back from the L/E.
It had non-functional flaps/joiner-wires on the top/bottom wings. Removing them saved .4 oz.

It was a dumb idea to initially build the model that way.. but now that they're removed, I'm hoping that it will fly better.
Last edited by roddie on Sat Jul 15, 2017 10:04 am; edited 1 time in total
 Re: Roddie's Cox-powered triplane
Throw your new Black Lynx on that bad boy Roddie. That should fly it good. I think there might be too much drag for a bee?

akjgardner- Diamond Member


Posts : 1602
Join date : 2014-12-28
Age : 65
Location : Greensberg Indiana
 Re: Roddie's Cox-powered triplane
akjgardner wrote:Throw your new Black Lynx on that bad boy Roddie. That should fly it good. I think there might be too much drag for a bee?
You may be right Joe..
 If that proves true, I could also put my tach-race engine on it. My first few flights of all my models are going to be with stock reedies.. until I get used to flying again.
This triplane's first flight back in the early 1990's was a classic lesson of how an excessively tail-heavy model fly's..
 I had short (25-foot) lines on it.. and a full 8+cc wedge-tank of fuel. When I released it from the pin-stooge, it taxied about 1/4 circle and climbed-out steeply.. almost going "over the top"..
  Down-elevator resulted in a steep-dive..
  I couldn't maintain anything close to level-flight. That continued for about two laps before I crashed-it. Luckily there was minimal damage. I would fly it just one more time soon after that, with heavier wheels and nose-weight in the form of a Cox heat-sink (Sand-Blaster type) on its product-engine. That flight was lack-luster. Although controllable; I think the engine was then being over-cooled.. and wasn't producing enough power.
 At the time.. I was also in the habit of running 6" diameter props on my stock reed-valve engines.. and I have a LOT of them in my stock as a result. I much-later learned that I was slightly over-propping those engines when I'd run 6 x 3's and especially 6 x 4's. They may have been ok on a 5-6oz. model.. but most of my designs were closer to 7-8oz.
 Re: Roddie's Cox-powered triplane
I especially like this model roddie. I'm a sucker for bi's maybe more-so for tries. But I have always admired the way that you do your fuel lines, and I think you have alluded to your method before.
Do you cut the collars out of brass stock then use oil to help slide them on or are you finding them in a size specific to that fuel line which is? The installation is so neat and clean.
I am always dissatisfied with the fuel lines that I buy on ebay, too thick, too thin, not the right diameters etc.. Maybe I should check out what SIG and Brodack have to offer.
Bob

rsv1cox- Top Poster


Posts : 11250
Join date : 2014-08-18
Location : West Virginia
 Re: Roddie's Cox-powered triplane
rsv1cox wrote:I especially like this model roddie. I'm a sucker for bi's maybe more-so for tries. But I have always admired the way that you do your fuel lines, and I think you have alluded to your method before.
Do you cut the collars out of brass stock then use oil to help slide them on or are you finding them in a size specific to that fuel line which is? The installation is so neat and clean.
I am always dissatisfied with the fuel lines that I buy on ebay, too thick, too thin, not the right diameters etc.. Maybe I should check out what SIG and Brodack have to offer.
Bob
First off.. "Thanks Bob"! Over the years, I've amassed a lot of different-size/type of fuel line... as well as small K & S alloy-tubing. I like to check-out the silicone-line on spools at various hobby-shops. I need to buy some more.. because my stock is getting low.
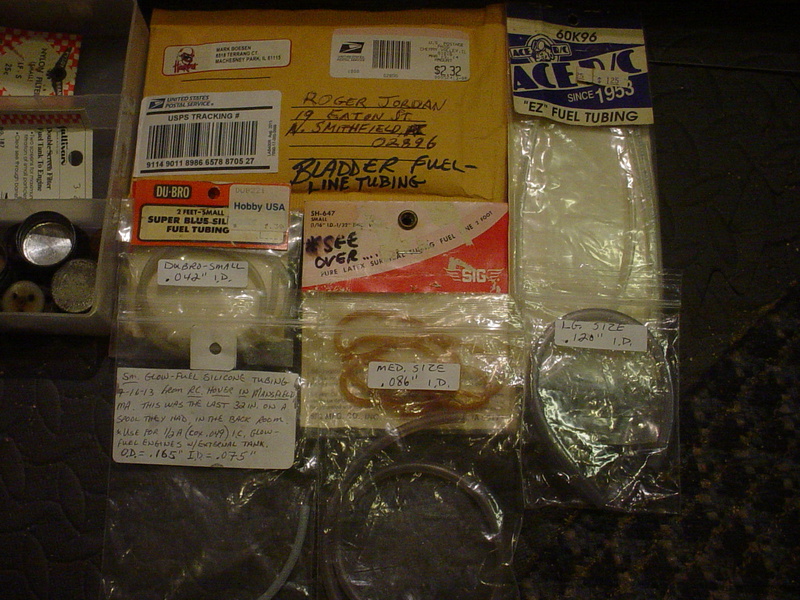
It's interesting that "small-size" line can vary quite a bit in ID. Dubro sm. line is really small at .042" although I used to use it exclusively for my Cox .049 reed-valve engines. Then there's generic/hobby-shop small-size line that has an ID size of .075" which seems to grip the nipple on my Cox horseshoe backplates adequately.. still requiring the use of tweezers to force it over the barb. The .042" ID Dubro line MUST be installed with tweezers.
"quote"; Do you cut the collars out of brass stock then use oil to help slide them on or are you finding them in a size specific to that fuel line which is?
I try to match the fuel-line's OD to the alloy-tubing's ID. If the fit is a little "tight".. I'll apply some petroleum-jelly so that the "collar" will slide. It depends on how much the fuel-line "expands" when it's attached to a nipple/fitting. The collar can either "slide-over".. forming a compression-fit on a nipple.. or it can be used on the end of a fuel-line to decrease its ID.
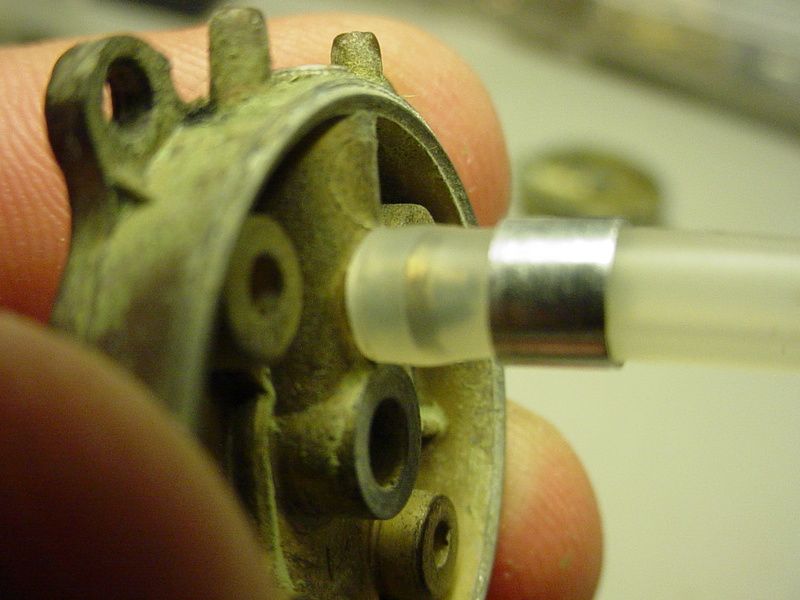

The alloy "collars" can be cut easily with a razor-saw. I use my X-Acto miter-box when I need to cut alloy-tubing. Then I de-burr using a #11 blade.
Tower Hobbies sells K & S tubing. I bought a couple bags of assorted "cut-offs" (mixed brass, aluminum and copper) that they were stocking. VERY handy to have.. and cheap.
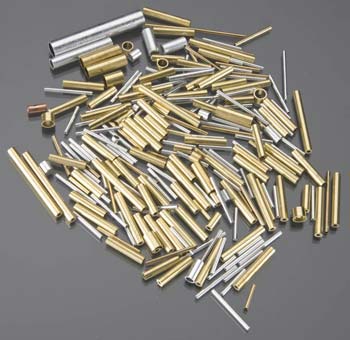
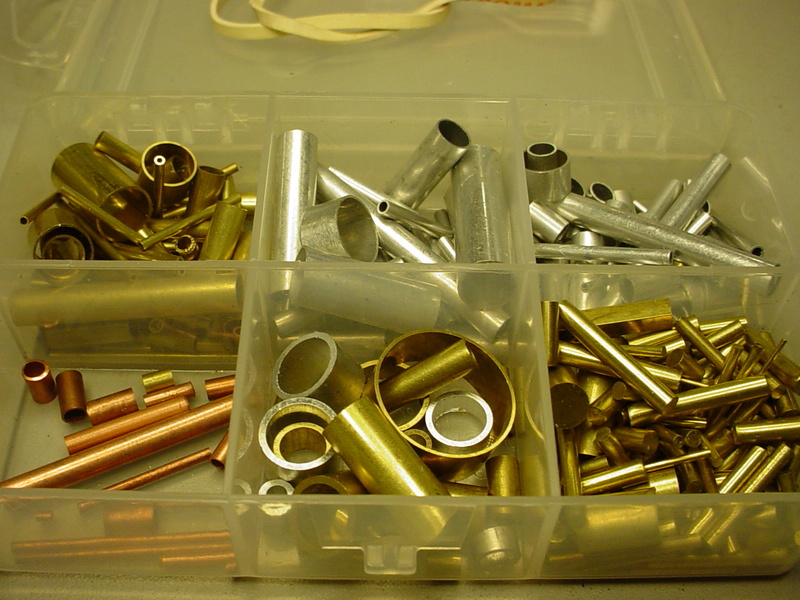
There's also solid-rod cut-offs in the assortment., as well as thin and thick-wall tubing. I've used pieces from this assortment numerous times.
 Similar topics
» Roddie's Tee Dee .09
» Looking at roddies home-built custom muffler
» Proof of concept, testing roddies postage stamp mount idea
» Cox DR Triplane
» Cox .010 Triplane finished
» Looking at roddies home-built custom muffler
» Proof of concept, testing roddies postage stamp mount idea
» Cox DR Triplane
» Cox .010 Triplane finished
Page 1 of 1
Permissions in this forum:
You cannot reply to topics in this forum

 Rules
Rules


