Log in
Search
Latest topics
» My N-1R build logby roddie Today at 12:32 am
» Happy 77th birthday Andrew!
by akjgardner Today at 12:27 am
» TEE DEE Having issues
by TD ABUSER Yesterday at 9:43 pm
» Landing-gear tips
by roddie Yesterday at 6:17 pm
» Roger Harris revisited
by TD ABUSER Yesterday at 2:13 pm
» Tee Dee .020 combat model
by Ken Cook Yesterday at 1:41 pm
» Retail price mark-up.. how much is enough?
by Ken Cook Yesterday at 1:37 pm
» My latest doodle...
by roddie Yesterday at 10:43 am
» Chocolate chip cookie dough.........
by roddie Fri Nov 22, 2024 1:13 pm
» Purchased the last of any bult engines from Ken Enya
by sosam117 Fri Nov 22, 2024 11:32 am
» Free Flight Radio Assist
by rdw777 Fri Nov 22, 2024 9:24 am
» Funny what you find when you go looking
by rsv1cox Wed Nov 20, 2024 3:21 pm
Cox Engine of The Month
My new Canary
Page 1 of 1
 My new Canary
Hi everyone
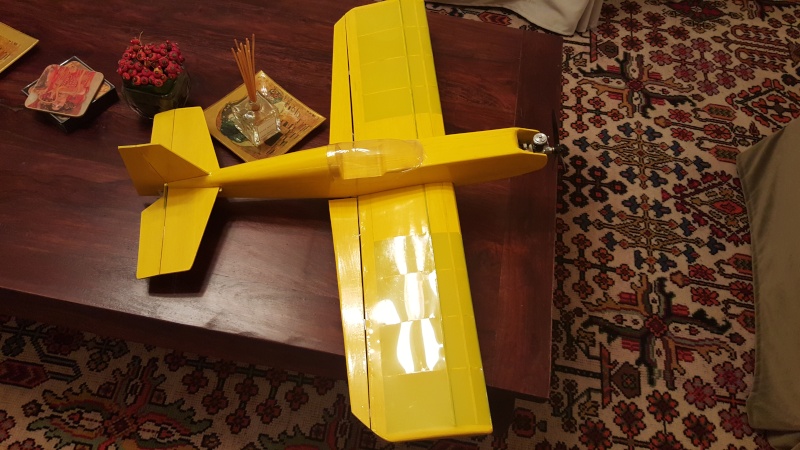
Just completed my Canary project out of a Selextra platform that I bought from Selecthobbies a few weeks ago. I made it basically for 049 reedies but the firewall is made to accommodate TD049 or TD051 engines as well.
An RC bird with rudder elevator and aileron controls
Soon I will add one more servo for throttle control as well.
Weighs around 14oz with the tank dry. Hope to give it the maiden flight this weekend. If deserves it will get COX decals afterwards.
url=https://servimg.com/view/17754239/153] [/url]
Just completed my Canary project out of a Selextra platform that I bought from Selecthobbies a few weeks ago. I made it basically for 049 reedies but the firewall is made to accommodate TD049 or TD051 engines as well.
An RC bird with rudder elevator and aileron controls
Soon I will add one more servo for throttle control as well.
Weighs around 14oz with the tank dry. Hope to give it the maiden flight this weekend. If deserves it will get COX decals afterwards.
url=https://servimg.com/view/17754239/153]
 [/url]
balogh- Top Poster


Posts : 4958
Join date : 2011-11-06
Age : 66
Location : Budapest Hungary
 Re: My new Canary
Looks great. I look forward to hearing how it flies.

fit90- Diamond Member

- Posts : 1341
Join date : 2011-08-11
Location : Naples, Florida
 Re: My new Canary
That is a very nice build.
What did you use to stick the canopy down?
I have ended up with frosty canopy seams, bubbles, spoiled finish............... I find trimming canopies to fit a process that often exceeds my patience but when I mess it up sticking it down - my lack of patience turns to annoyance!
Ian
What did you use to stick the canopy down?
I have ended up with frosty canopy seams, bubbles, spoiled finish............... I find trimming canopies to fit a process that often exceeds my patience but when I mess it up sticking it down - my lack of patience turns to annoyance!
Ian

ian1954- Diamond Member

- Posts : 2688
Join date : 2011-11-16
Age : 70
Location : England
 Re: My new Canary
Nice Build balogh and you got it done in a few weeks ? I didn't think anyone here but Mark could build that fast  Looks good I like the yellow , stands out . getback

getback- Top Poster


Posts : 10442
Join date : 2013-01-18
Age : 67
Location : julian , NC
 Re: My new Canary
getback wrote:Nice Build balogh and you got it done in a few weeks ? I didn't think anyone here but Mark could build that fastLooks good I like the yellow , stands out . getback

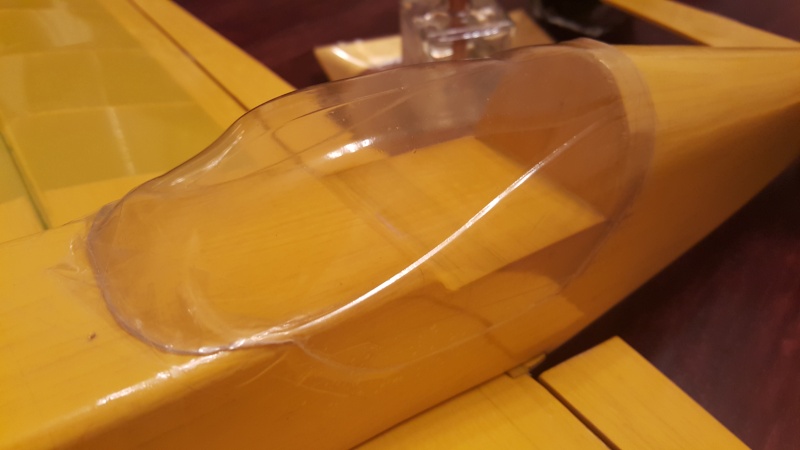
Thanks getback it did not actually take weeks but maybe 30 hours altogether. It builds fast, it is actually an ARF, but a few items were missing from the kit that I had to invent. The canopy was one, I tailored it from the shoulder of a rinsing fluid bottle, a flexible plastic that can be shaped to the fuselage with a hairdryer set hot.

balogh- Top Poster


Posts : 4958
Join date : 2011-11-06
Age : 66
Location : Budapest Hungary
 Re: My new Canary
ian1954 wrote:That is a very nice build.
What did you use to stick the canopy down?
I have ended up with frosty canopy seams, bubbles, spoiled finish............... I find trimming canopies to fit a process that often exceeds my patience but when I mess it up sticking it down - my lack of patience turns to annoyance!
Ian
Thanks ian 1954. As replied to getback, the canopy was cut from the shoulder of an empty rinsing fluid bottle whose cross section was nearly the same as that of the fuselage.. Its is very durable and not so stiff and brittle as plexi (I was also trying soda bottles but these are too thin and brittle) so it molds and shapes easily with the careful use of a hairdrier. I keep it in place with the good old scotch tapes which, though not as elegant as a glued canopy, will not cause frost and is replacable time-to-time when the castor softens it up.

balogh- Top Poster


Posts : 4958
Join date : 2011-11-06
Age : 66
Location : Budapest Hungary
 Re: My new Canary
balogh wrote:ian1954 wrote:That is a very nice build.
What did you use to stick the canopy down?
I have ended up with frosty canopy seams, bubbles, spoiled finish............... I find trimming canopies to fit a process that often exceeds my patience but when I mess it up sticking it down - my lack of patience turns to annoyance!
Ian
Thanks ian 1954. As replied to getback, the canopy was cut from the shoulder of an empty rinsing fuel bottle whose cross section was nearly the same as that of the fuselage.. Its is very durable and not so stiff and brittle as plexi (I was also trying soda bottles but these are too thin and brittle) so it molds and shapes easily with the careful use of a hairdrier. I keep it in place with the good old scotch tapes which, though not as elegant as a glued canopy, will not cause frost and is replacable time-to-time when the castor softens it up.
Thanks. I will have to practice this.

ian1954- Diamond Member

- Posts : 2688
Join date : 2011-11-16
Age : 70
Location : England
 Re: My new Canary
That looks really good . I'm sure you'll be stickin the stickers on it soon.

akjgardner- Diamond Member


Posts : 1602
Join date : 2014-12-28
Age : 65
Location : Greensberg Indiana
 Re: My new Canary
akjgardner wrote:That looks really good . I'm sure you'll be stickin the stickers on it soon.
Thanks I will maiden it tomorrow weather permitting..

balogh- Top Poster


Posts : 4958
Join date : 2011-11-06
Age : 66
Location : Budapest Hungary
 Re: My new Canary
I like it! You'll see that okay!

ARUP- Gold Member

- Posts : 179
Join date : 2015-09-13
Location : Kentucky
 Re: My new Canary
I have read about people using vinyl pin striping tape to excellent results. I have not tried this method myself.
There are adhesive choices to consider for a glue down. A nice brush-on contact cement might be a pretty good answer. On the old celluloid canopies good ole Testors cement was the answer, but modern plastics are a different story.
Phil
There are adhesive choices to consider for a glue down. A nice brush-on contact cement might be a pretty good answer. On the old celluloid canopies good ole Testors cement was the answer, but modern plastics are a different story.
Phil

pkrankow- Top Poster

- Posts : 3025
Join date : 2012-10-02
Location : Ohio
 Re: My new Canary
I used to use Z-56 I think it was called. Now seems to be Pacer Formula 560 Canopy Glue.
Then added an edging of the Foremost canopy trim glued on with thin CA.
Then added an edging of the Foremost canopy trim glued on with thin CA.

SKALIWAG- New Member

- Posts : 3
Join date : 2015-12-19
 Re: My new Canary
Welcome to CEF, Skaliwag, glad you found us.
Rusty
Rusty
_________________
Don't Panic!
...and never Ever think about how good you are at something...
while you're doing it!
My Hot Rock & Blues Playlist
...and never Ever think about how good you are at something...
while you're doing it!
My Hot Rock & Blues Playlist

RknRusty- Rest In Peace

- Posts : 10869
Join date : 2011-08-10
Age : 68
Location : South Carolina, USA
 Re: My new Canary
akjgardner wrote:That looks really good . I'm sure you'll be stickin the stickers on it soon.
Well folks, the Canary has succesfully completed its maiden flight today. It flies like a ball - I have underestimated the power of this COX 049 reedie from the 1970-s, with stepped wall cylinder - and reacts very cooperatively. Weighs 15 oz when filled with about 1 oz fuel, it stays in the air for 6-8 minutes and does all the aerobatics an amateur like I dare doing...

balogh- Top Poster


Posts : 4958
Join date : 2011-11-06
Age : 66
Location : Budapest Hungary
 Re: My new Canary
Congrats Andras, a well built plane that flies very nicely!! I like the video. 


OVERLORD- Diamond Member

- Posts : 1807
Join date : 2013-03-19
Age : 58
Location : Normandy, France
 Re: My new Canary
Nice Maiden Andres , that reedie was carrying the payload with no problem what prop were you using ? Did you burn your finger at the end I couldn't tell or just a castor slime . Glad to see it worked out now for some trim. getback 


getback- Top Poster


Posts : 10442
Join date : 2013-01-18
Age : 67
Location : julian , NC
 Re: My new Canary
Many Congrats Andres. As always you present us us with a wonderfully built airplane.
The Cox seems to pull this bird nicely, even on a slightly rich setting.
What parts besides the canopy would you have liked in the Kit?
Did you find any thing on the plan that isn't quite right? Change anything to make it easier or simpler to build?
When you get her really dialed in I would like to know the throws you settle for.
Skaliwag

SKALIWAG- New Member

- Posts : 3
Join date : 2015-12-19
 Re: My new Canary
getback, I think what you saw was the dreaded 'castor cringe' with his hand. It goes away once the slime on the model is removed.  That was one flyin' and singin' canary!

ARUP- Gold Member

- Posts : 179
Join date : 2015-09-13
Location : Kentucky
 Re: My new Canary
Skaliwag, Getback, Overloard,
thank you for the nice words I am happy if you like the bird and honored with your feedbacks.
Getback, the prop is a 3-bladed 5x3..I chose this because the reedies generate their max power around 15k and the 3-bladed just lets the engine max out at this rpm. I could have used say, a 6x3 prop as well but I have always found them a bit on the large side for reedies. A 5" dia prop with 4" pitch could do the same thing as the 3-bladed, but I like the appearance of the 3-bladed more.
It was castor slime on my fingers that I did not want to touch the remote control of the headcam. Reedies are not hotties especially when the ambient temp is around 4C. I would not want to touch the cylinder of a TD after landing, though...
Skaliwag, the design is just good as it is. The ailerons are wonderfully driving the plane into spirals. The throws have not yet been set, currently all are around 1,5" (elevator, rudder, and ailerons too). I am not so particular about the throws, these should be "just enough but not too much" so that the plane should react whenever I want a quick turn, spiral or wingover, but should not overreact.
The kit needs a canopy. As said, I morphed the shoulder part a rinsing bottle into one. The material is strong yet shapes well when cautiously heated with a hairdrier. And also has a nice embossed design on it (where our wives hold it when pouring rinser into the washing machine)
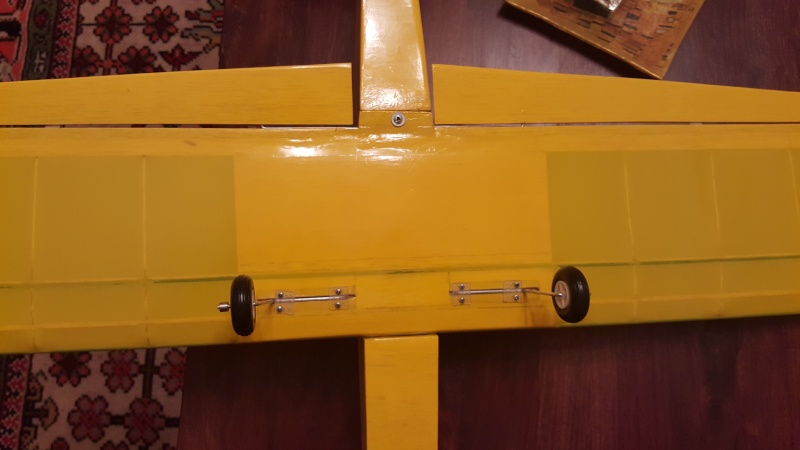
I have replaced the kit-included balsa leading edges and bottom (shown below) and top spars with 6mm dia and 3x3mm round and square carbon fibre rods. Not much heavier than balsa but much more forgiving when landing over a rough terrain (especially if landing is unplanned) where, as you saw on the vid, I usually fly my planes.
I add some CA to the blocks accommodating the undercarriage because of the same rough terrain landing reasons. This will nicely harden the wooden block where it contacts the landing gear rod and will not loosen up after a few touch-downs. I let it cure and push in the landing gear rods only afterwards so they remain removable just in case..
I also connect the 2 elevator halves with square carbon rod .
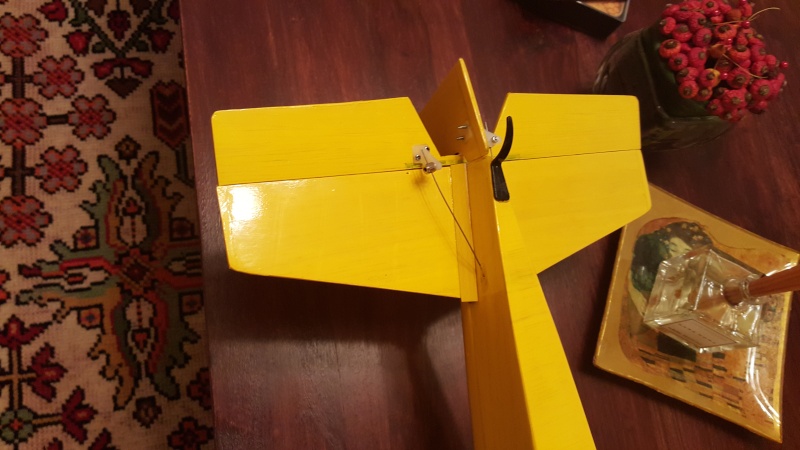
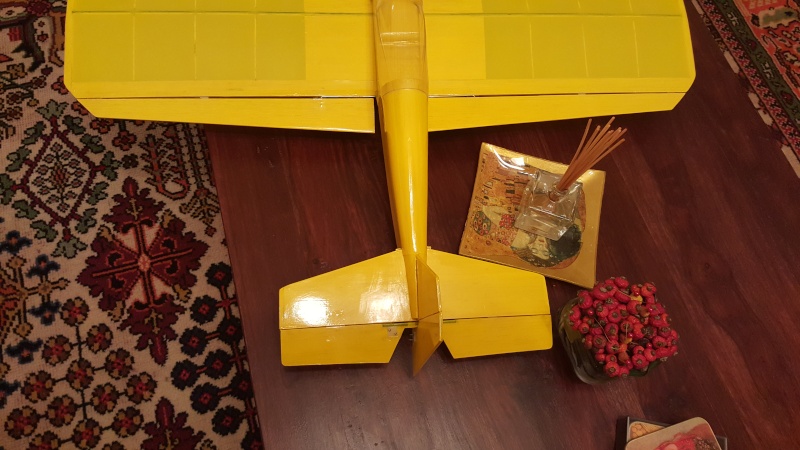
I do not stick the hinges for the elevator, rudder and ailerons into the balsa frame of the wing. Just cut the slot with an exacto knife, push the fibre reinforced textile hinges into the balsa frame, and apply scotch tape over the hinges to keep the horizontal stab and elevator etc. together. This will keep the flaps in place but allows non-destructive replacement in case anything happens, so to say...I am always building my planes with some skepticism but luckily re-kit them less and less frequently.
Sorry for the lengthy building detail account...
thank you for the nice words I am happy if you like the bird and honored with your feedbacks.
Getback, the prop is a 3-bladed 5x3..I chose this because the reedies generate their max power around 15k and the 3-bladed just lets the engine max out at this rpm. I could have used say, a 6x3 prop as well but I have always found them a bit on the large side for reedies. A 5" dia prop with 4" pitch could do the same thing as the 3-bladed, but I like the appearance of the 3-bladed more.

It was castor slime on my fingers that I did not want to touch the remote control of the headcam. Reedies are not hotties especially when the ambient temp is around 4C. I would not want to touch the cylinder of a TD after landing, though...
Skaliwag, the design is just good as it is. The ailerons are wonderfully driving the plane into spirals. The throws have not yet been set, currently all are around 1,5" (elevator, rudder, and ailerons too). I am not so particular about the throws, these should be "just enough but not too much" so that the plane should react whenever I want a quick turn, spiral or wingover, but should not overreact.
The kit needs a canopy. As said, I morphed the shoulder part a rinsing bottle into one. The material is strong yet shapes well when cautiously heated with a hairdrier. And also has a nice embossed design on it (where our wives hold it when pouring rinser into the washing machine)

I have replaced the kit-included balsa leading edges and bottom (shown below) and top spars with 6mm dia and 3x3mm round and square carbon fibre rods. Not much heavier than balsa but much more forgiving when landing over a rough terrain (especially if landing is unplanned) where, as you saw on the vid, I usually fly my planes.
I add some CA to the blocks accommodating the undercarriage because of the same rough terrain landing reasons. This will nicely harden the wooden block where it contacts the landing gear rod and will not loosen up after a few touch-downs. I let it cure and push in the landing gear rods only afterwards so they remain removable just in case..

I also connect the 2 elevator halves with square carbon rod .


I do not stick the hinges for the elevator, rudder and ailerons into the balsa frame of the wing. Just cut the slot with an exacto knife, push the fibre reinforced textile hinges into the balsa frame, and apply scotch tape over the hinges to keep the horizontal stab and elevator etc. together. This will keep the flaps in place but allows non-destructive replacement in case anything happens, so to say...I am always building my planes with some skepticism but luckily re-kit them less and less frequently.
Sorry for the lengthy building detail account...

balogh- Top Poster


Posts : 4958
Join date : 2011-11-06
Age : 66
Location : Budapest Hungary
 Re: My new Canary
Hi Andras, I'm impressed as usual! I love that field you fly in, watching you start the engine and grab the Tx out of the trunk is just classic! What a nice launch! Were you using a balloon tank? I was looking for clues on the table in this photo..
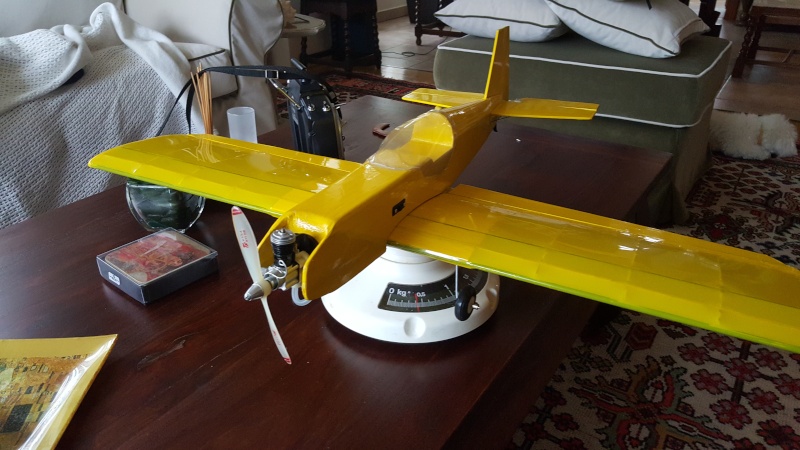
I saw the tube sitting behind your transmitter.. and thought it might be used to encapsulate a balloon.. and the box under the wing having spare balloons in it? Does that back-plate have a fine-thread needle?

I saw the tube sitting behind your transmitter.. and thought it might be used to encapsulate a balloon.. and the box under the wing having spare balloons in it? Does that back-plate have a fine-thread needle?
 Re: My new Canary
roddie wrote:Hi Andras, I'm impressed as usual! I love that field you fly in, watching you start the engine and grab the Tx out of the trunk is just classic! What a nice launch! Were you using a balloon tank? I was looking for clues on the table in this photo..
I saw the tube sitting behind your transmitter.. and thought it might be used to encapsulate a balloon.. and the box under the wing having spare balloons in it? Does that back-plate have a fine-thread needle?
Roddie thank you...the field I fly on is really beautiful especially in spring with a lot of wild flowers blossoming...though an outskirt area of Budapest, with a large supermarket behind the trees, you can often see there foxes and deers too. A bit spartan conditions for flying RC planes, no runway or table to place your gear on....just the trunk of the car.
The plane, like all my recent buids, has a ballon tank in it. I will probably never use metal or plastic tank as these need heavy clunks and cannot occupy the space in the nose of the plane so well as a balloon.
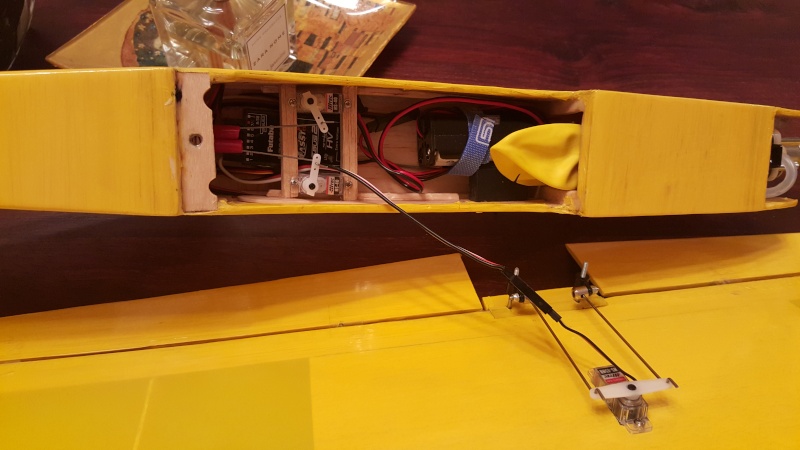
With so much stuff in the stomach I am still wondering where to place the 4th servo for the throttle.
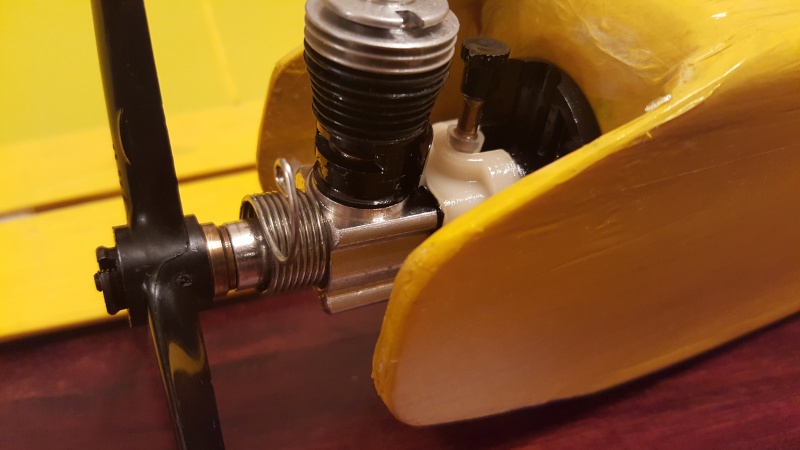
The engine came from Bernie of COX Int'l a couple of weeks ago. A genuine reedie from the 70'-s, it has the white horseshoe backplate and probably a fine threaded needle. The plastic knob on the needle was already added by me for a better grab as was the silicone tube at the needle valve stem to provide a perfect seal...I want to avoid lean runs as much as I can.
PS: the stuff on the table on the very first photo is just a still life of a lazy Saturday afternoon....with table glass pads in the box and a frosty liquor glass left there by mistake...and my little Bishon Havanese having a nap at the corner of the armchair.

balogh- Top Poster


Posts : 4958
Join date : 2011-11-06
Age : 66
Location : Budapest Hungary
 Re: My new Canary
Ah yes.. I missed the pup there.. resting on the carpet. That's a beautiful carpet too! My wife and I adopted/rescued 3 black cats (feral siblings) when they were 2 months old. They're 2 years old now.. and are wonderful pets.
I found your commentary on the Cox props that you use on your Bee's very interesting. I have some of those Cox 5"d/3-blade props with that style hub.. but I don't think I ever ran them. The square-tipped 3-blade props in the photo below are 5 x 3.5 L.H. and the round-tipped and 2-bladed are 5 x 3 R.H. They're in the process of being balanced.. but I'm not really sure how to go about it with these flexible black ones. Do you apply some clear lacquer to the light blade(s)? I don't think sanding these would work very well.
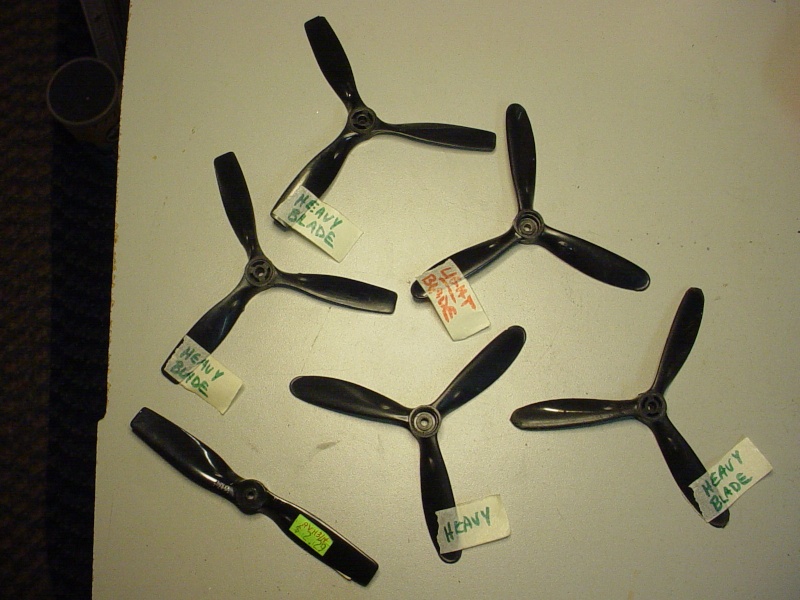
I always ran 6" 2-blade props on my reedies.. Mostly Cox grey 6 x 3 and 6 x 4's.. and Zinger woodies in those same sizes. I actually didn't break too many when I was actively flying.. I recently bought four Cox black 6 x 2 L.H. props "cheap".. from a hobby shop that was closing. They're the stock prop on the PT19 Flight Trainer.
Congrats again on the "Canary"! It's a nice flying little airplane!
I found your commentary on the Cox props that you use on your Bee's very interesting. I have some of those Cox 5"d/3-blade props with that style hub.. but I don't think I ever ran them. The square-tipped 3-blade props in the photo below are 5 x 3.5 L.H. and the round-tipped and 2-bladed are 5 x 3 R.H. They're in the process of being balanced..

I always ran 6" 2-blade props on my reedies.. Mostly Cox grey 6 x 3 and 6 x 4's.. and Zinger woodies in those same sizes. I actually didn't break too many when I was actively flying..
Congrats again on the "Canary"! It's a nice flying little airplane!
 Re: My new Canary
Roddie
There are many links on youtube how to balance a 3 bladed propellers. Some folks are sanding the heavier blades. Some are adding scotch tape to lighter blades. Just browse YouTube for 3 bladed propellers balancing.
There are many links on youtube how to balance a 3 bladed propellers. Some folks are sanding the heavier blades. Some are adding scotch tape to lighter blades. Just browse YouTube for 3 bladed propellers balancing.

balogh- Top Poster


Posts : 4958
Join date : 2011-11-06
Age : 66
Location : Budapest Hungary
Page 1 of 1
Permissions in this forum:
You cannot reply to topics in this forum

 Rules
Rules


