Log in
Search
Latest topics
» Landing-gear tipsby roddie Today at 6:17 pm
» Roger Harris revisited
by TD ABUSER Today at 2:13 pm
» Tee Dee .020 combat model
by Ken Cook Today at 1:41 pm
» Retail price mark-up.. how much is enough?
by Ken Cook Today at 1:37 pm
» Happy 77th birthday Andrew!
by getback Today at 11:52 am
» My latest doodle...
by roddie Today at 10:43 am
» My N-1R build log
by GallopingGhostler Yesterday at 3:04 pm
» Chocolate chip cookie dough.........
by roddie Yesterday at 1:13 pm
» Purchased the last of any bult engines from Ken Enya
by sosam117 Yesterday at 11:32 am
» Free Flight Radio Assist
by rdw777 Yesterday at 9:24 am
» Funny what you find when you go looking
by rsv1cox Wed Nov 20, 2024 3:21 pm
» Cox NaBOO - Just in time for Halloween
by rsv1cox Tue Nov 19, 2024 6:35 pm
Cox Engine of The Month
The Three Stooges
Page 1 of 2
Page 1 of 2 • 1, 2 
 The Three Stooges
Or, "How Jim launches planes."
This one will be presented in installments. Be prepared to wait out each picture session.
First up is my oldie, but goodie. This one works just fine releasing planes. Of course, I built it particularly for the 1/2A stuff I typically fly. It was cut from 1/2" plywood and polyurethaned for longevity. I used small screw eyes for making the "breech," but I wouldn't want to fly big guys from it.
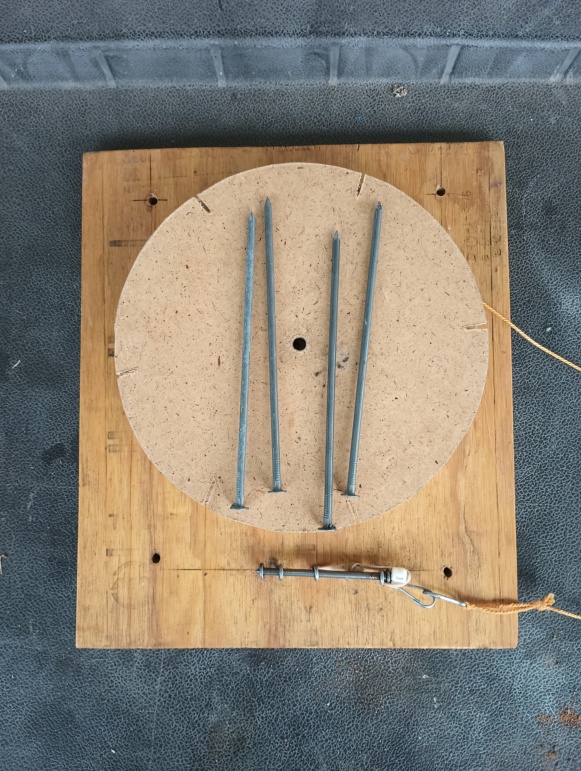
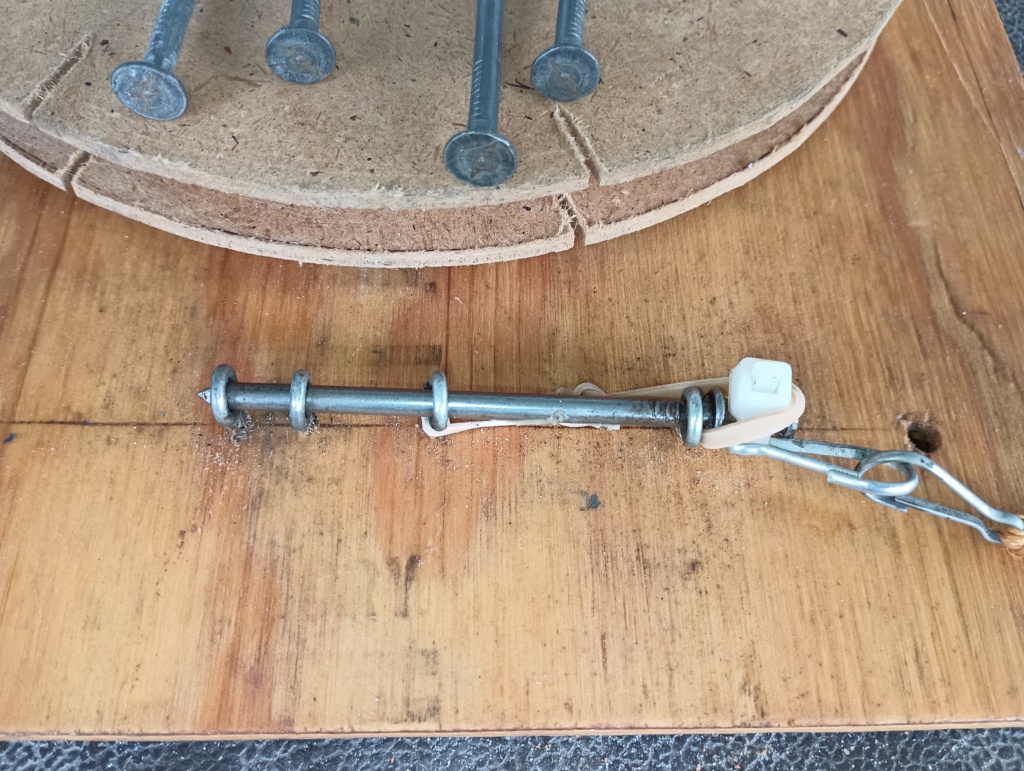
The disk holds the release line (orange engineers twine). The four nails work quite well holding the plate on grass. However, those nails can't be used on concrete. Well, what does Jim typically fly from? Concrete...yeah, facepalm. The square plate is that large so I could stack a cinder block on it at which point the stooge works admirably holding/releasing planes even on concrete. The release line is kept on the particle board reel and stored with a wingnut and screw on the center of the plate. This stooge is on the tangent in most of my earlier videos. I wanted to improve or replace the stooge.
So "what is so horrible Jim needs a different stooge," you ask?
Well, the cinder block is mildly cumbersome to carry/deploy. But that isn't the worst detail! However, given the size of US made cinder blocks, this is the biggest impediment to this stooge.
Resetting a small plane is difficult if my tail skid/release loop is directly under the tail (and this is true of all my 1/2A stuff). Visibility becomes an issue, so I have to bend down and get my eyes where I can see how I'm doing threading the release pin (another nail) through the tail skid loop. Also, the rubber band return mechanism is prone to requiring a rebuild every few outings...not too difficult, however less than practical from a repeatability angle.
Then there is a tactile issue. It is very hard to recognize how hard to pull the release cord without over-pulling the nail from the eye-screws. This means reloading a plane is always a fight with the stooge until the plane is mounted even if I don't pull the pin out of the breech. But this is really obnoxious when the pin pulls completely free.
The piece I want most to fix is the pull-cord. I want a remote controller that fits in the palm of my non-flying hand so I no longer have to bend over to pick up and pull the cord.
More to follow as I stage Stooge #2
This one will be presented in installments. Be prepared to wait out each picture session.
First up is my oldie, but goodie. This one works just fine releasing planes. Of course, I built it particularly for the 1/2A stuff I typically fly. It was cut from 1/2" plywood and polyurethaned for longevity. I used small screw eyes for making the "breech," but I wouldn't want to fly big guys from it.


The disk holds the release line (orange engineers twine). The four nails work quite well holding the plate on grass. However, those nails can't be used on concrete. Well, what does Jim typically fly from? Concrete...yeah, facepalm. The square plate is that large so I could stack a cinder block on it at which point the stooge works admirably holding/releasing planes even on concrete. The release line is kept on the particle board reel and stored with a wingnut and screw on the center of the plate. This stooge is on the tangent in most of my earlier videos. I wanted to improve or replace the stooge.
So "what is so horrible Jim needs a different stooge," you ask?
Well, the cinder block is mildly cumbersome to carry/deploy. But that isn't the worst detail! However, given the size of US made cinder blocks, this is the biggest impediment to this stooge.
Resetting a small plane is difficult if my tail skid/release loop is directly under the tail (and this is true of all my 1/2A stuff). Visibility becomes an issue, so I have to bend down and get my eyes where I can see how I'm doing threading the release pin (another nail) through the tail skid loop. Also, the rubber band return mechanism is prone to requiring a rebuild every few outings...not too difficult, however less than practical from a repeatability angle.
Then there is a tactile issue. It is very hard to recognize how hard to pull the release cord without over-pulling the nail from the eye-screws. This means reloading a plane is always a fight with the stooge until the plane is mounted even if I don't pull the pin out of the breech. But this is really obnoxious when the pin pulls completely free.
The piece I want most to fix is the pull-cord. I want a remote controller that fits in the palm of my non-flying hand so I no longer have to bend over to pick up and pull the cord.
More to follow as I stage Stooge #2
Last edited by 944_Jim on Tue Sep 12, 2023 6:57 pm; edited 1 time in total
_________________
Never enough time to build them all...always enough time to smash them all!
944_Jim- Diamond Member


Posts : 2022
Join date : 2017-02-08
Age : 59
Location : NE MS
 Re: The Three Stooges
I kept Stooge #1 present tense as I do plan on making upgrades to the "trigger mechanism" with details I learned from Stooge #1.
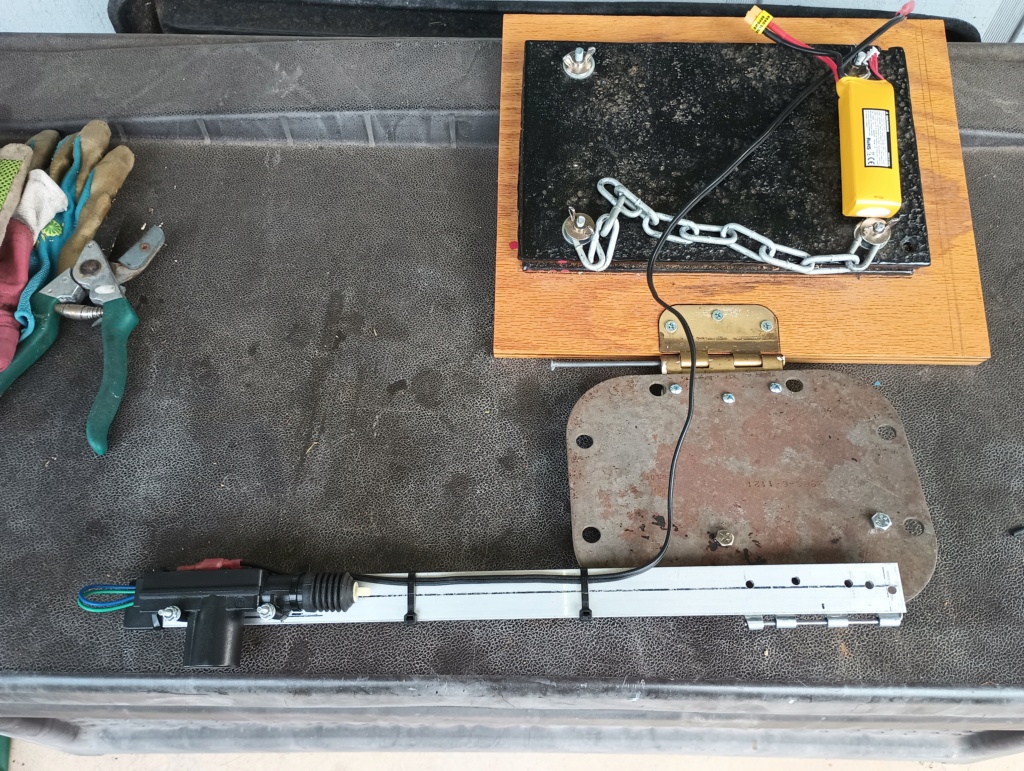
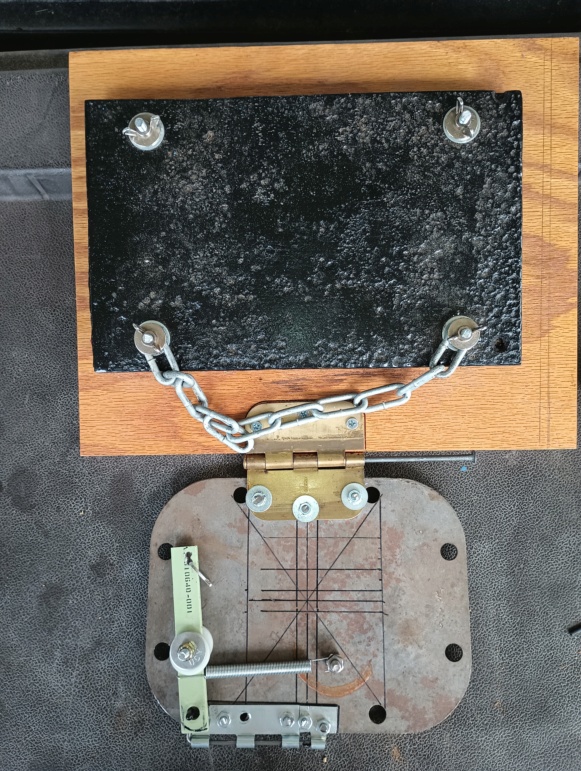
This one uses an anchor made of a plywood base to carry four 1/4" steel plates. The corner screws and wingnuts allow for removing plates for smaller planes, or adding them back on for larger planes. The chain is there as a handle which makes picking up this anchor so much easier than a cinder block. I chose to hinge the release plate from the anchor so I had smaller and easier pieces to move about. Flipping the anchor so the screws go down in the grass will also facilitate flying larger planes from it. It took a long time to figure out how to package the remote trigger and pin. The power door actuator pulls a pin clear of the "sear" allowing the plane to launch.The original receiver/solenoid and battery were to be kept in a small snap-on- lid plastic box on top of the anchor plates and out of the way of engine starting gear. I couldn't find the remote trigger box for this staged photo-op, but believe me, this looked quite capable. In fact, once I had the whole thing completed, I was excited about how well it worked...within ONLY one yard of the box! With no range, this one is a bust. I'll reconfigure like this if/when I find a Tx/Rx combo with a transmitter that fits in my pocket. I want to fly planes,.so this one is temporarily set aside. Except for the remote being "not so remote," I really liked how this one turned out. Sigh...
This one uses an anchor made of a plywood base to carry four 1/4" steel plates. The corner screws and wingnuts allow for removing plates for smaller planes, or adding them back on for larger planes. The chain is there as a handle which makes picking up this anchor so much easier than a cinder block. I chose to hinge the release plate from the anchor so I had smaller and easier pieces to move about. Flipping the anchor so the screws go down in the grass will also facilitate flying larger planes from it. It took a long time to figure out how to package the remote trigger and pin. The power door actuator pulls a pin clear of the "sear" allowing the plane to launch.The original receiver/solenoid and battery were to be kept in a small snap-on- lid plastic box on top of the anchor plates and out of the way of engine starting gear. I couldn't find the remote trigger box for this staged photo-op, but believe me, this looked quite capable. In fact, once I had the whole thing completed, I was excited about how well it worked...within ONLY one yard of the box! With no range, this one is a bust. I'll reconfigure like this if/when I find a Tx/Rx combo with a transmitter that fits in my pocket. I want to fly planes,.so this one is temporarily set aside. Except for the remote being "not so remote," I really liked how this one turned out. Sigh...

_________________
Never enough time to build them all...always enough time to smash them all!

944_Jim- Diamond Member


Posts : 2022
Join date : 2017-02-08
Age : 59
Location : NE MS
 Re: The Three Stooges
Ok,.so with Stooge number two officially no longer remotely operated, I had to reconsider my trigger/sear. While a pull cord is not very convenient, it is a functionally superior mechanism with range limited only by cord length. So I'm presently going to "Yank and Fly!" A bellcrank with "offset leg differential" is employed so I can make a sizable pull against a release rod whose limits are fully closed to fully open with about a three inch pull. The release pin travels about 3/4". Basic geometry sets the wide open limit with the pull pin lacking travel as the bellcrank begins more sideways action versus pulling action (at the extreme open angle). The end-stop while opening/releasing is a firm but non-violent stop. The spring returns the bellcrank and pin to closed with no effort on my part. While I may need to look under the small planes to observe a good catch/latch, at least I don't need to concern myself with "the catch" going through all transit points. I still plan on using this one on my smalls, so I'll drill four holes in the release plate for the same nails used in Stooge #1. That way I won't need the anchor plate over grass for any small planes. However, I won't trust dirt anchor pins for say, a Ukie .35, or similarly large plane.
Now if the weather cooperates, I have a Ukie .35 to fly!
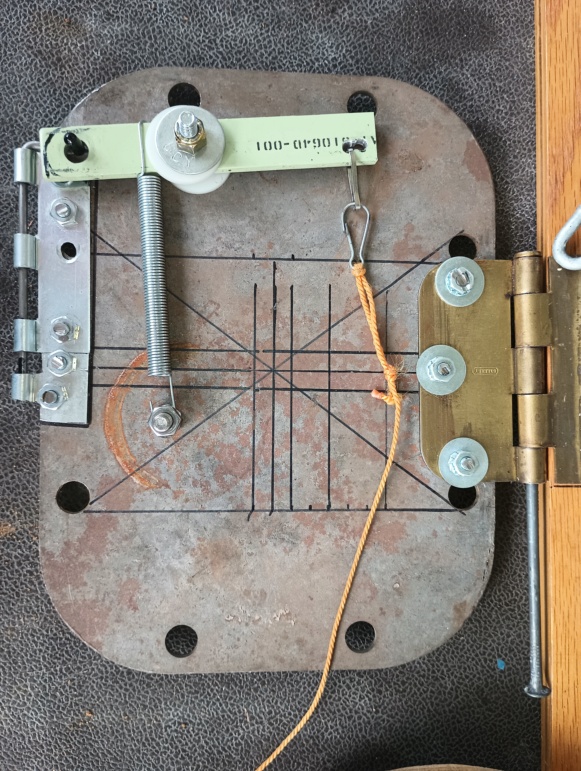
Now if the weather cooperates, I have a Ukie .35 to fly!


_________________
Never enough time to build them all...always enough time to smash them all!

944_Jim- Diamond Member


Posts : 2022
Join date : 2017-02-08
Age : 59
Location : NE MS
 Re: The Three Stooges
I have an old brake rotor that is thinking of being used for ballast on pavement. I only can dream of a paved circle though. I found that my little planes point directly at me when taking off when using a stooge. I tried three BBQ skewers, worked OK too. The string pops out though.

aspeed- Platinum Member

- Posts : 796
Join date : 2013-01-18
Location : Leamington Ont. Can.
 Re: The Three Stooges
ASpeed, I thought you are primarily an RC pilot. I wish I had access to a dedicated paved circle too. I have a concrete parking lot (usually), or vacant soccer fields (not as often).
Watching "less-than-stellar" video showed me I was also occasionally leaving the control lines a bit too loose as I pulled the release. This causes the control lines to catch on grass, this also turning the plane in. It really became an issue of learning the "right dance moves" while balancing the tension on all the lines in both hands.
That "roll-in" happened a few times on Stooge #1 for me too. I found I needed to:
A) definitely stage the plane's centerline pointing out of the circle (not on the tangent)...it only takes a bit of an outward bias to prevent the plane from shortcutting the desired arc.
B) keep the lines clear of ground obstructions (grass), and step back firmly against the plane/lines after a good yank on the stooge release.
C) try to pull the control lines to only just a bit of swag as I pull the slack off the release cord...this is hard for me because bending over and standing up quickly will cause me to lose my balance!
D) a crisp release without worrying about snatching out the release pin...hopefully the spring and release pin on Stooge #3 will provide good feedback so I can launch with confidence.
Good luck with your brake drum stooge!
Last edited by 944_Jim on Wed Sep 13, 2023 9:42 pm; edited 1 time in total (Reason for editing : Spelling, syntax)
_________________
Never enough time to build them all...always enough time to smash them all!

944_Jim- Diamond Member


Posts : 2022
Join date : 2017-02-08
Age : 59
Location : NE MS
 Re: The Three Stooges
Yea Jim.... you know this is one of my favorite subjects to talk about.. and I made a new stooge a few years ago. First.. I want to suggest a possible mod that you can make to the pin-links on your 1/2A fleet. I've had the same issue with an airplane's link being "blind" below the tailplane... and fumbling to set the pin. My Rare Bear has a link-extension because of that issue. It's made from a short length of light guage music-wire with loops formed on each end. One end is captive to the airplane.. but that's never been an operational problem.
Pics below-

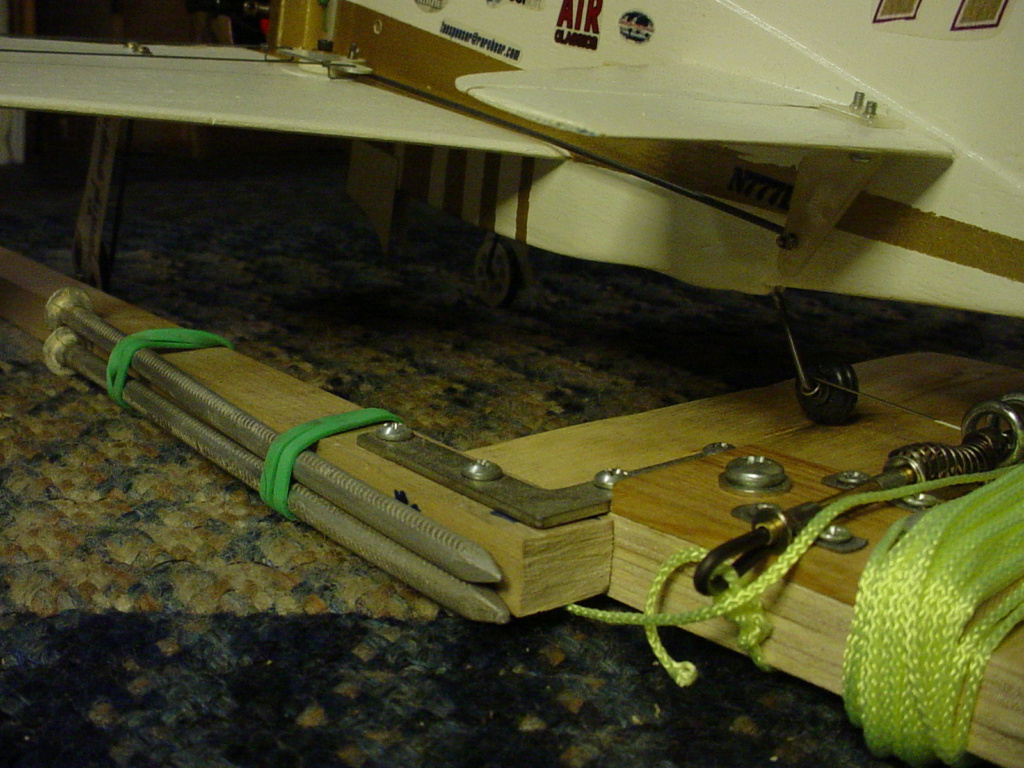
There's other ways to accomplish the same thing; such tying a string.. using a "twisty-tie" ..... I like the permanence as well as the strength of metal. If you're used to making-up SS stranded line-sets; then making a 2-3 inch length of .008" with a loop on one end and a line-connector on the other.. would allow swapping it from one model to another. Making-up a few would be my idea of a fun project.
Pics below-


There's other ways to accomplish the same thing; such tying a string.. using a "twisty-tie"
Last edited by roddie on Wed Sep 13, 2023 6:40 pm; edited 1 time in total (Reason for editing : added pic)
 Re: The Three Stooges
Ya, Roddie, I use braided wire like that on the back of my models. In the Mexican virus days we used a stooge at the control line field (Beanfield). To stop the plane from pulling in, I noticed this year there is a 1" x 1" stick stuck into the takeoff mat so the wheels don't steer into the circle. I also have a stooge for the FAI F2D planes. It is just a yoga mat folded over, and you pull it out slowly. Has to be on a table or raised platform. I like combat planes but just fly on my own. Yes Jim I like control line better than RC but fly both. The control line field is an hour and a half away so I don't go as often as I like, and it is just grass. Very smooth grass though. My avatar name is Aspeed because that was my favourite speed class, as well as FAI F2A speed. I quit flying that around 1980 and the mid 1990s for the nitro classes. Just could not run around the pylon that fast, and then the paved circle problem. Don't do any flying too seriously any more. Just for fun, whether I like it or not.

aspeed- Platinum Member

- Posts : 796
Join date : 2013-01-18
Location : Leamington Ont. Can.
 Re: The Three Stooges
Hi Jim. I mentioned having built a new stooge a few years ago. It's a bit different in the way it holds/releases the model; in that it uses an upright "fork" or "goalpost-shaped" bracket which cradles the models fuse; forward of the tailplane. It's still a "pin-release" mechanism.. but there's no fumbling with a link to the model.
Pics below-
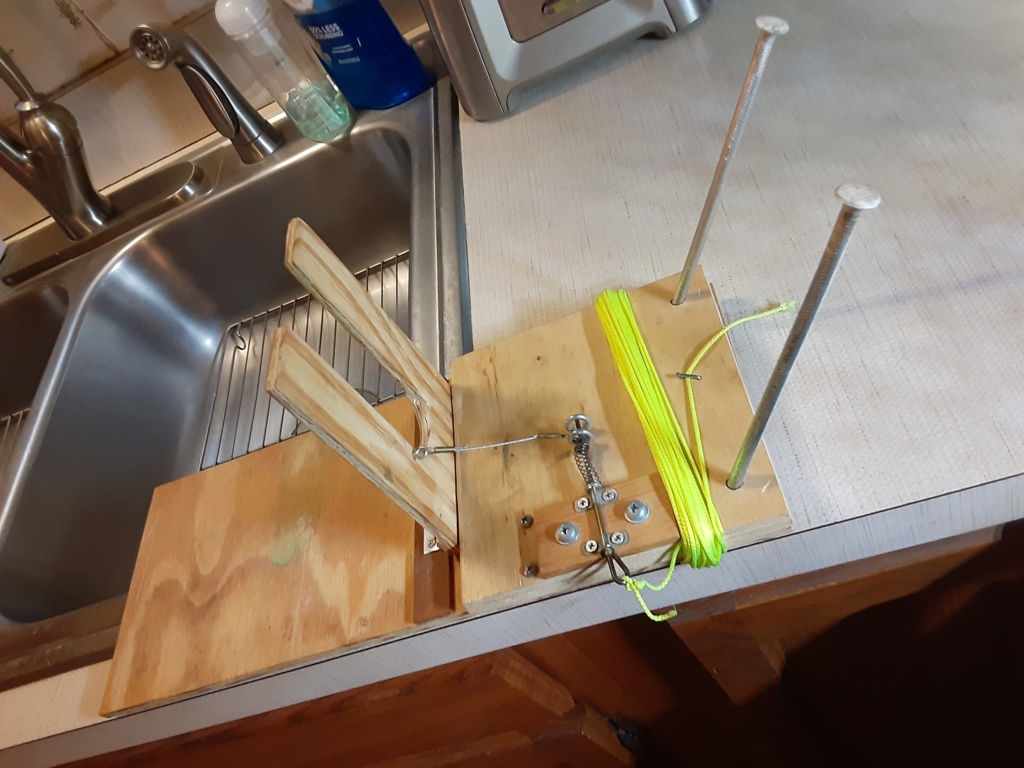
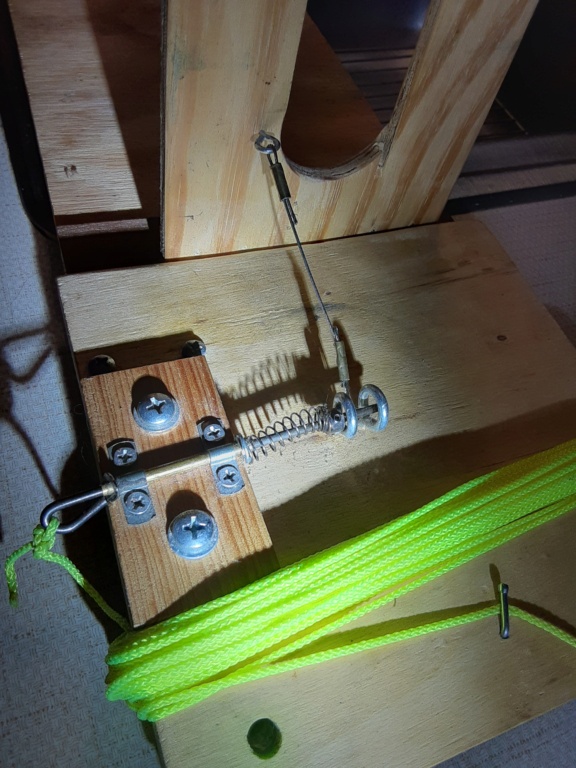
This one's at a "proof of concept" stage currently; it definitely needs a stronger screw-eye for the cable.
Pics below-


This one's at a "proof of concept" stage currently; it definitely needs a stronger screw-eye for the cable.
 Re: The Three Stooges
I made one similar to the one roddie shows , can't find a pic right now but i think the eyelet on the release is going to catch the stabilizer when dropped ? Jim there are a few people on here that have made the automated release ur looking for maybe a search https://www.coxengineforum.com/search?search_keywords=stooge pic one  I am sure you can find one that will work for you .
 I am sure you can find one that will work for you .

getback- Top Poster


Posts : 10442
Join date : 2013-01-18
Age : 67
Location : julian , NC
 Re: The Three Stooges
getback wrote:Jim there are a few people on here that have made the automated release ur looking for maybe a search https://www.coxengineforum.com/search?search_keywords=stooge pic oneI am sure you can find one that will work for you .

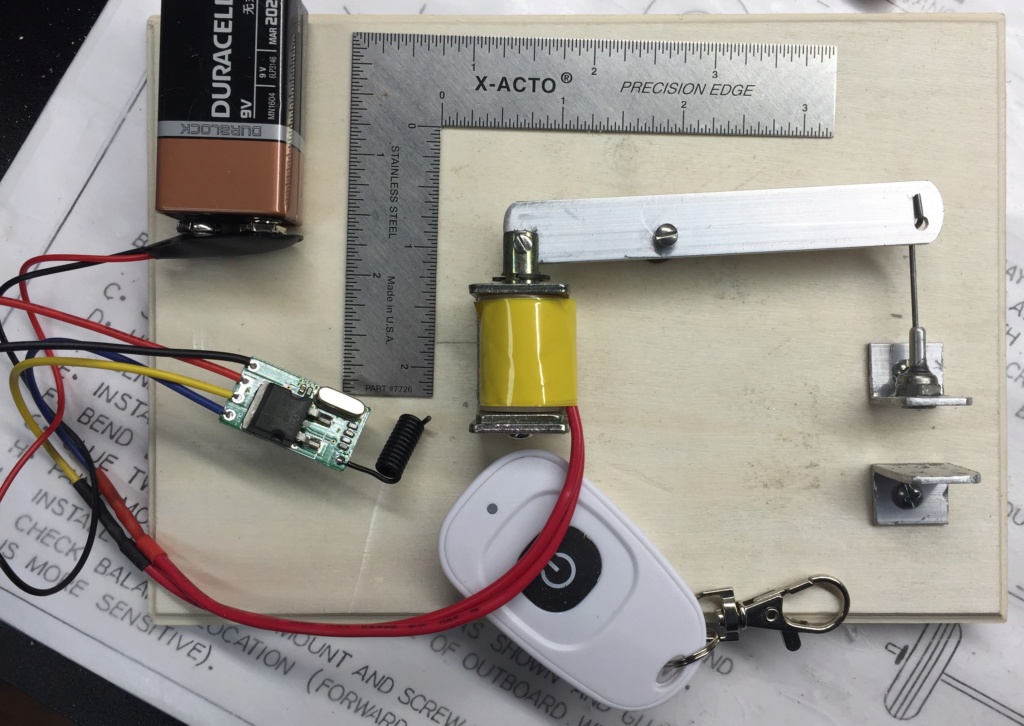
Yes Eric, Here's one that I saved photos of. It's pretty slick.. if you've got some electronics skills. CEF member Slick049 (Rick) gets the credit.. and here's his thread: push-button stooge
(X3 images below)
the components-
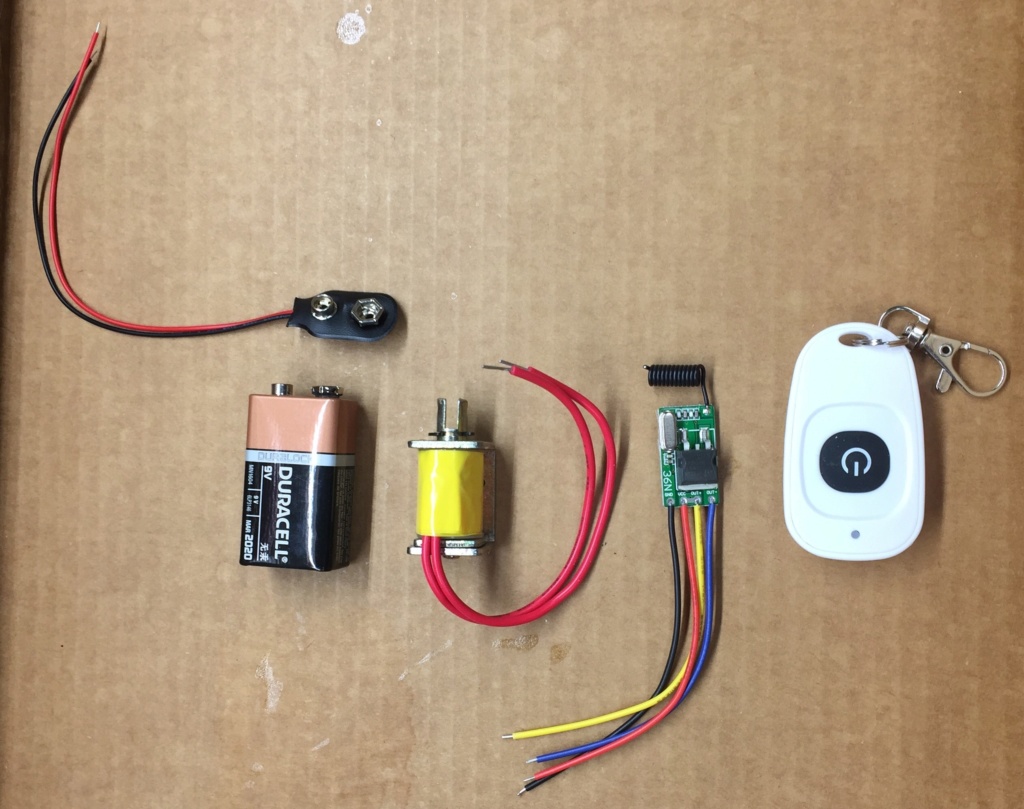
pin "secured" (hold)

pin "open" (launch)
 Re: The Three Stooges
Thanks gents!
I re-read Slick Rick's thread and chuckled. I made a few suggestions to Rick in his thread...his is quite possibly where I got the idea to make mine. Once I find my box, you guys will see just how closely related my receiver is to his. Rick, please let me know if yours is successful/working.
Unfortunately the Amazon link to the receiver/remote fob is no longer valid. I also didn't see if Rick successfully stooge-launched. What I did see is Rick's receiver is NOT in a small "factory package." I suspect he removed his to minimize the overall size of his controller set up. I did the same...removed the receiver and left it loose in the bigger "battery/receiver box." I'll try to find my box so y'all can see it. One of the ideas I had was to mount my box on a wooden platform away from the stack of steel plates. The other was to extend the antenna to see if it improves the range at ground level. I really believe this is about poor RF reception just inches off the ground.
Roddie, I call your swinging retention piece a tail yoke...as in "beast of burden pull point on old farm equipment and stage coaches." It would take very little effort for me to make my stooge convertible for either pin or yoke. Adding a yoke will make trike gear and twins an A LOT easier to launch!
You mention an extension link...yup! I will incorporate it in my future builds, but my current small fleet will just use the same tail skid already in place. I wound a loop on the end of each of the little guys' skids for my original stooge anyway. I did read on another forum that using a tail skid as the link is bad. But the guys were talking much larger planes (as in, the big stuff on StuntHangar...not 1/2A."toys").
ASpeed, you are showing your age!
I actually thought you were several years younger, but I guess I just read that idea into your messages on RCG (1/2A and CL forums). Your yoga mat stooge is what I call a "bar stool and carpet stooge." The late RKNRusty has several videos on YouTube showcasing his (with either a Lil Satan, Combat Kitten or Baby Flight Streak. I seem to remember one of his videos had a streamer on the plane too. Now I wonder if his YT channel got shut down after his death. I seem to remember he flew in the backyard of a blonde brick building and I always assumed it was a grass yard with trees along one side and a church building on the adjacent side. Those stooges work well for combat planes. But I don't see a small 60-70 square inch plane having enough lift to launch at slower speeds before planting into the ground at the base of the stool.
Eric, you bring up a valid idea...I'll search here, RCG and SH.
For everyone else...if you ARE using a key fob remote successfully, I'd love the manufacturer and part number for your set. It would take only a few minutes to re-attach the door lock solenoid and mount the receiver/battery box. Now, if I could only remember where I put the box...I want to try the remote again after stretching out the antenna.

_________________
Never enough time to build them all...always enough time to smash them all!

944_Jim- Diamond Member


Posts : 2022
Join date : 2017-02-08
Age : 59
Location : NE MS
 Re: The Three Stooges
Yes the bar stool carpet stooge has it's limitations. The Fora powered combat planes leap right out. I tried one of the combat planes with a fairly weak .15, and it dropped a bit before flying away. Not sure how a weak reedy and a mouse racer would take off. I watched a lot of Rusty's videos. I figured they would stay up on Utube forever. The wife mentioned Rusty yesterday.

aspeed- Platinum Member

- Posts : 796
Join date : 2013-01-18
Location : Leamington Ont. Can.
 Re: The Three Stooges
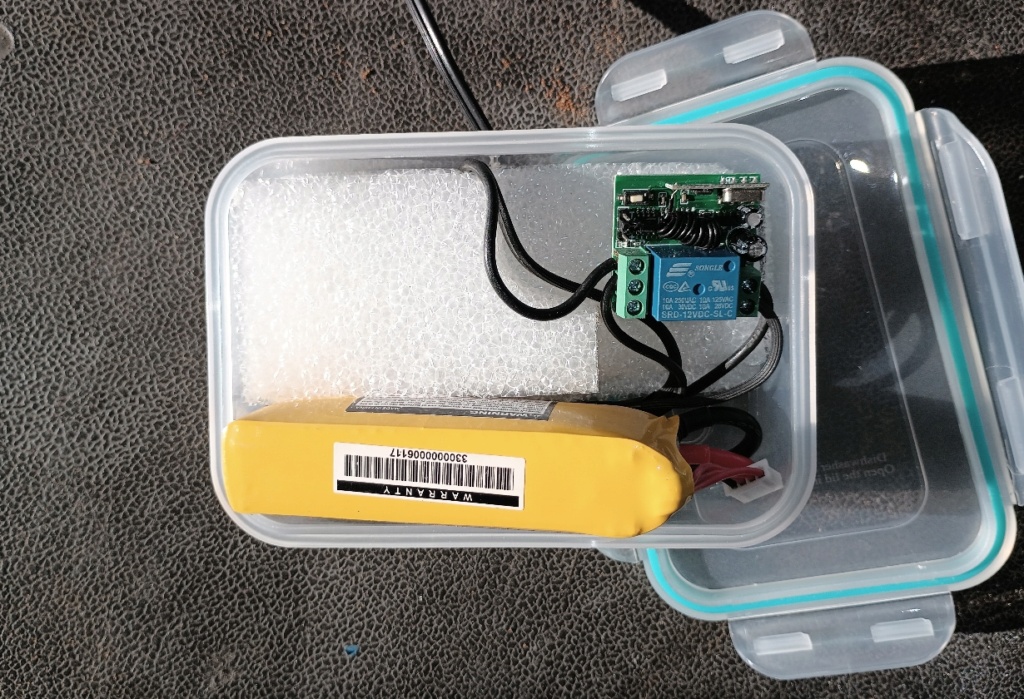
Ok...so I did find the box.
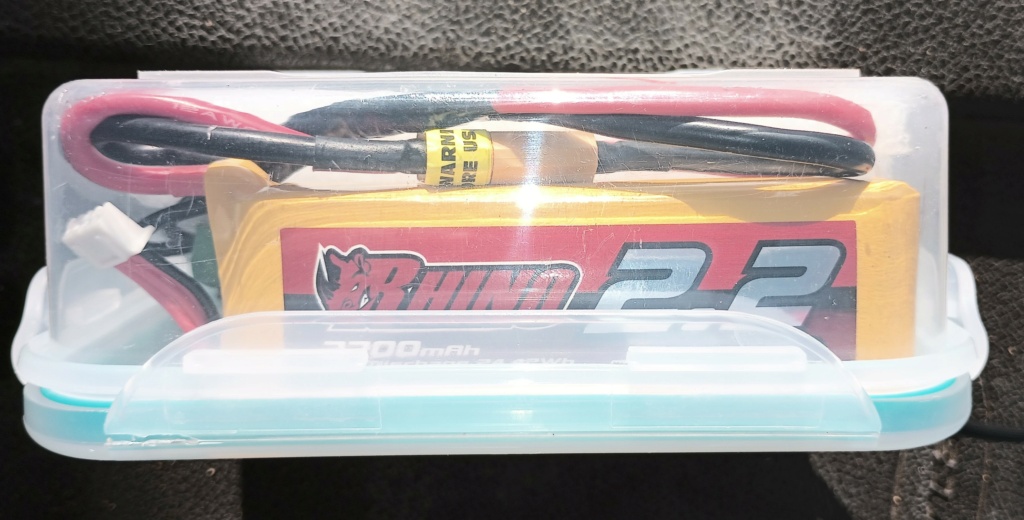
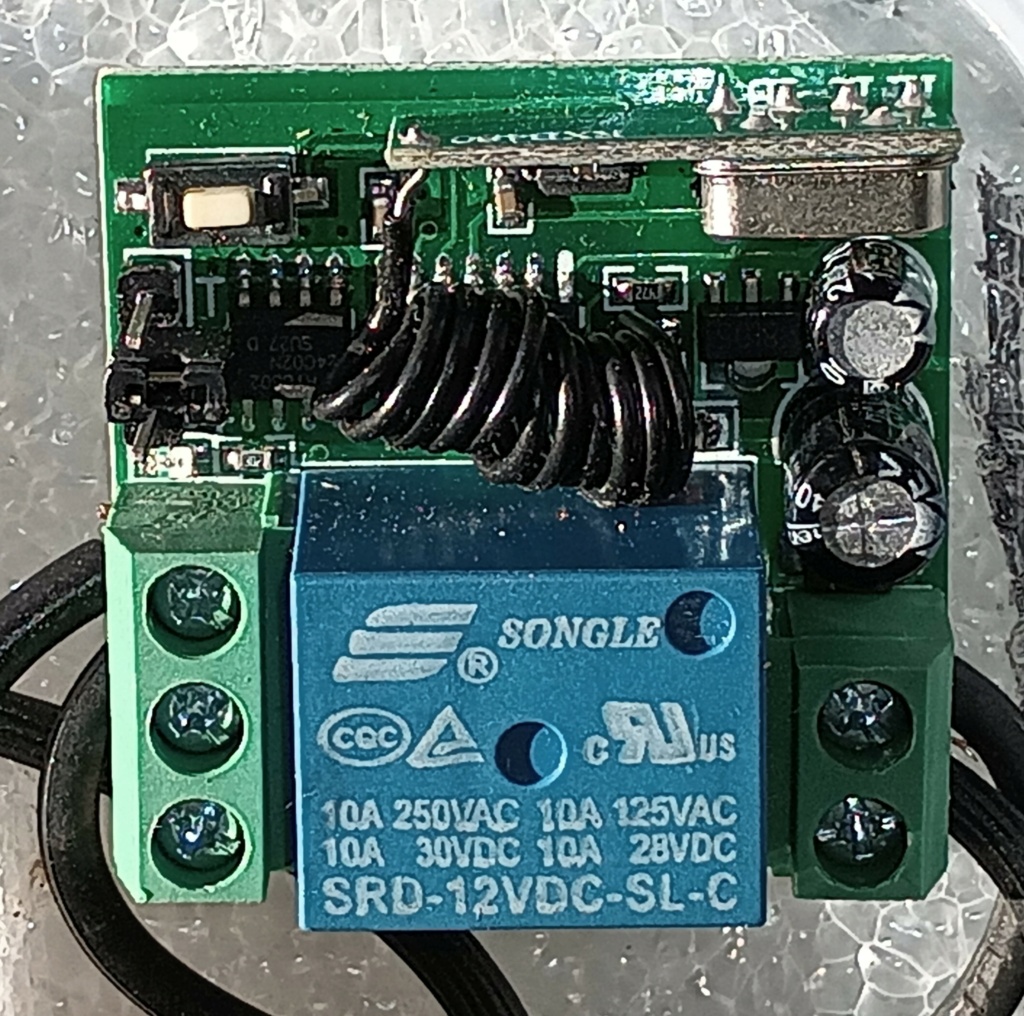
I unwound and stood the antenna up out of the box...all eight inches sticking straight up. I arranged a hand signal with my wife so I'd know when the relay triggered (or not). She sat on the ground right next to it and I started backing up while toggling the remote.
Eureka! I got about 70-80 feet away. The range is plenty for the lines/planes I fly. So I'll carry the stooge line just in case, but it'll probably stay in the trunk while I fly. I don't like how exposed the receiver antenna will be, but I'll hot glue the soldered end so it can't pull loose and poke a hole in the lid so it sticks straight up. Hopefully prop blast won't cause it to flop over and lose range.
My camera is charged and I have fresh methanol. I'll mix fuel and check the weather for first thing tomorrow. Hopefully I'll get to fly the Ukie .35 and a Keil Kraft Radian tomorrow...if I get good running tonight after dinner. If so, I'll have video tomorrow afternoon.


Last edited by 944_Jim on Fri Sep 15, 2023 6:01 pm; edited 1 time in total (Reason for editing : More/new details)
_________________
Never enough time to build them all...always enough time to smash them all!

944_Jim- Diamond Member


Posts : 2022
Join date : 2017-02-08
Age : 59
Location : NE MS
 Stooge-link extensions
I'm enjoying this thread! It's been a catalyst for me to do some fabricating. Not a big deal... but a few worthwhile changes that I've wanted to make with my particular stooge designs.
Stooge-link extensions for one. I made mine from some robust stranded cable and ferrules to suit. They're short.... but they're strong. They only need to clear the tail-feathers by a couple of inches.
The cable I used was .030". That's what I had on hand.. along with some "crimp-ferrules" designed to work together to secure the cable.
Here are the extensions that I made this afternoon.
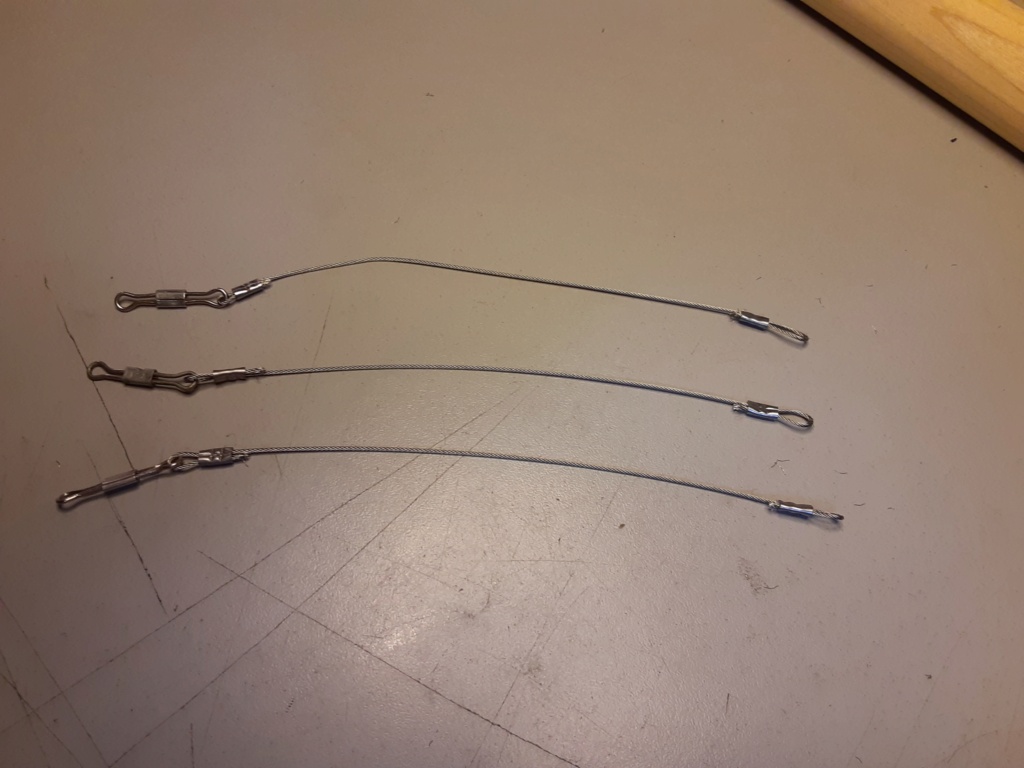
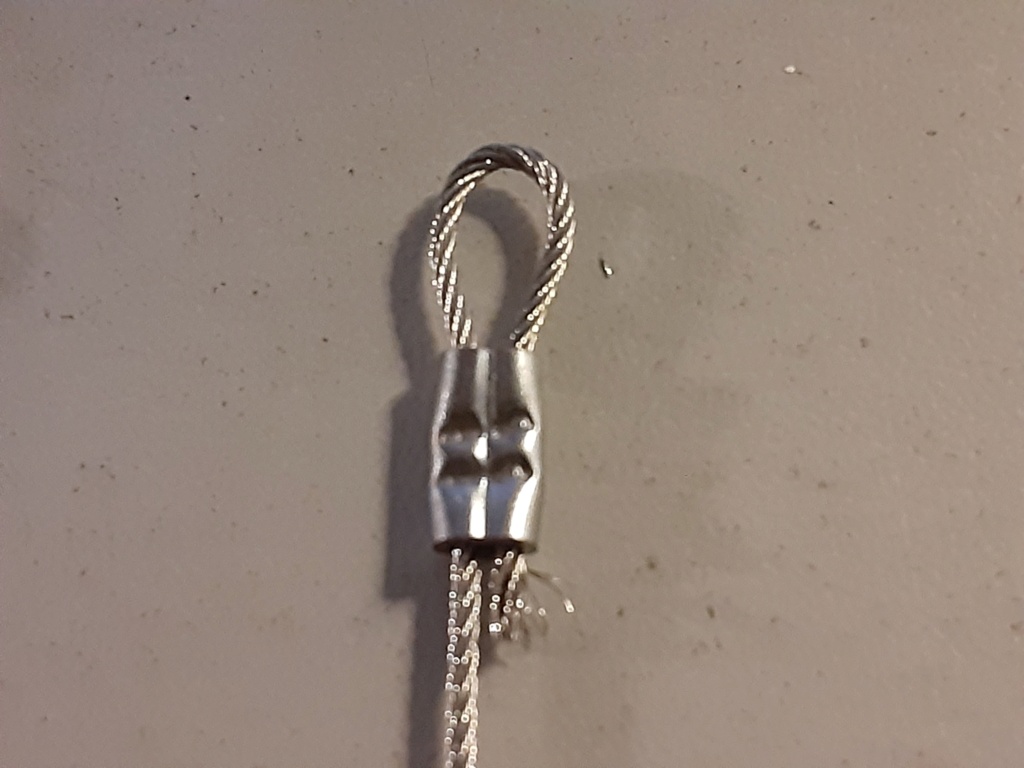

They don't look like much...... but they can make a BIG difference in how well your airplane gets off the ground.
Stooge-link extensions for one. I made mine from some robust stranded cable and ferrules to suit. They're short.... but they're strong. They only need to clear the tail-feathers by a couple of inches.
The cable I used was .030". That's what I had on hand.. along with some "crimp-ferrules" designed to work together to secure the cable.
Here are the extensions that I made this afternoon.


They don't look like much...... but they can make a BIG difference in how well your airplane gets off the ground.
 Re: The Three Stooges
Glad the receiver is able to work for you so you can get out there and fly ! ! Roddie are you going to put that on your plane ??

getback- Top Poster


Posts : 10442
Join date : 2013-01-18
Age : 67
Location : julian , NC
 Re: The Three Stooges
getback wrote:Glad the receiver is able to work for you so you can get out there and fly ! ! Roddie are you going to put that on your plane ??
They're overkill (like everything else I do...) as can be seen here in this photo- actually an exaggeration of the concept.

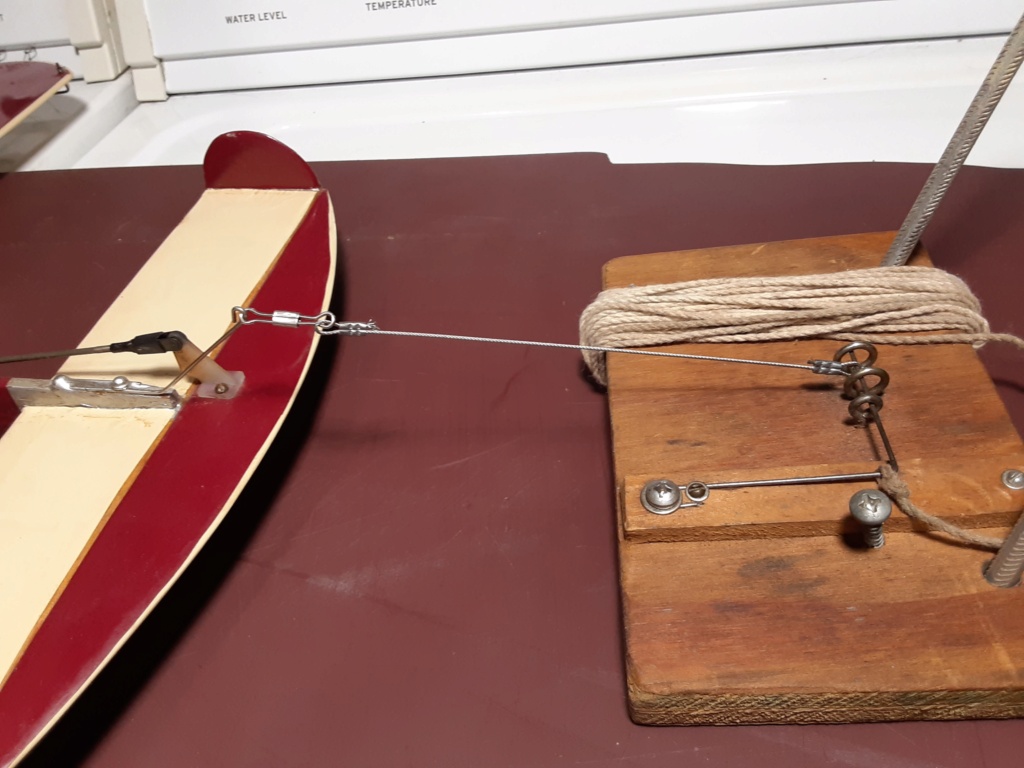
That's my only taildragger that actually has a "skid" of music-wire, with a loop formed on the end. A quick link for a line-connector.
 Re: The Three Stooges
hey Roddie @roddie I really like the way the release pin is done on your stooge using a piece of bent and fixed music wire. 
 so simple to make and it will operate so much better than a spring loaded sliding type pin. your design should be such that you just pull till the plane releases and the pin just returns into place and doesnt pull right out and need resetting up all the time. no springs or tubber bands. really nice elegant solution.


Yabby- Platinum Member


Posts : 712
Join date : 2021-06-08
Location : Yorke Peninsula South Australia
 Re: The Three Stooges
I usually use the string for a plumb bob its light and just tie a loop in the stooge end . Did you re-ck. the CG on it roddie ?

getback- Top Poster


Posts : 10442
Join date : 2013-01-18
Age : 67
Location : julian , NC
 Re: The Three Stooges
Well guys,
I got to fly yesterday. The air was favorable; wind was non-existent; temps in the low 70's, dew was light on the grass. Perfect weather!
I laid out the rubber runway (rubber mats 2'x3'), set up stooge #3 and lined up Mr. Matthew's KK Radian. The stooge worked flawlessly as built (pull cord), the plane flew stable, yet could turn on a dime (hard climbs and pulls, close to wing-over), but the engine was running at about 85%. I got three back to back flights in. Originally I couldn't trust the fuel system (early 2020). But with each outing, I keep ramping up the nitro (10% first flights, 15% second flights, 20% today).
When this engine is hot and lean, the plane is a rocket!
Since today went so well (crash-less repetition), next time I'll add head shims and try 20% again. I'll go up on nitro if I have to...but I will need to be ready for "THAT" flight!

944_Jim- Diamond Member


Posts : 2022
Join date : 2017-02-08
Age : 59
Location : NE MS
 Re: The Three Stooges
Tease !  what happened to the video ? Congratulations on a flight in 10 yrs. been a while .
 what happened to the video ? Congratulations on a flight in 10 yrs. been a while .
getback- Top Poster


Posts : 10442
Join date : 2013-01-18
Age : 67
Location : julian , NC
 Re: The Three Stooges
Hahaha Eric,
I wondered if anyone watched! Yes, I meant to tease.
I thought I had taken care of everything. Camera set to "movie, no auto-off"...yup. Flight box battery charged...yup. Flight lines checked...yup. Fresh fuel.mixed...yup. Airframe checked closely...yup. Engine clean/NVA flushed clear...yup! Stooge acceptably loose in action...yup. Camera charged...yup. Tripod in car...yup. Perfect short grass...yup!
Sun and light breeze to my back at launch...yup! A couple of run-up short tanks...yup. Things are looking good so far!
Final fill before first flight...yup!
Set camera for appropriate field of vision...yup.
Press record...yup.
Have a wonderful and exciting flight...Definitely!
Camera memory checked...nope-DOH!
Well, I wasn't wasting the morning. So the three flights got ripped back to back in rapid succession. The stooge works well. I like the spring action and the flawless reload, and the added bonus is I'm learning proper care and feeding of a Cox Medallion .051 on a well-cradfted airframe. Confidence is soaring. This plane is quite capable as it is flapped, so I'm patiently suffering through getting the engine dialed in.
_________________
Never enough time to build them all...always enough time to smash them all!

944_Jim- Diamond Member


Posts : 2022
Join date : 2017-02-08
Age : 59
Location : NE MS
 Re: The Three Stooges
Well , maybe next time , I believe you Jim since you did have a short of the fling field  Glad you get some successful flights in

getback- Top Poster


Posts : 10442
Join date : 2013-01-18
Age : 67
Location : julian , NC
 Re: The Three Stooges
Glad that you had a good outing at the field Jim! There will be plenty of times when you can get a full-length flight vid done. It's much more important to flight-check as you did. Good work!
 Re: The Three Stooges
Time for a re-cap. My last visit to this subject showed an aerial antenna is required at the receiver. So I removed the rx from its little plastic box and mounted it inside a conduit box. The antenna goes up into the pipe, where it is protected from damage. The battery sits on top where it will be easy to connect/disconnect and charge. The whole remote is on five feet of cord from the door actuator so it will be relatively removed at the outside of the circle away from exhaust residue.
One facet or feature I didn't expect was the self-return to "closed" caused by the return spring. I really didn't think it had the required pull against the actuator's internal resistance. This will make it easy to mount an airplane on it.
As long as this works as in the early test phase, I believe this is the last iteration. Sure, I'll improve it as I discover inadequacies, but I'd call this 95% developed.

_________________
Never enough time to build them all...always enough time to smash them all!

944_Jim- Diamond Member


Posts : 2022
Join date : 2017-02-08
Age : 59
Location : NE MS
 Re: The Three Stooges
Nice Jim, I like gadget kind of projects…. Also, repurposing parts to make it do what we want… Good stuff… Looks like it will work great in practical use…. 

rdw777- Diamond Member


Posts : 1718
Join date : 2021-03-11
Location : West Texas
Page 1 of 2 • 1, 2 
Page 1 of 2
Permissions in this forum:
You cannot reply to topics in this forum

 Rules
Rules


