Log in
Search
Latest topics
» Free Flight Radio Assist by MauricioB Today at 9:33 pm
» Roger Harris revisited
by MauricioB Today at 9:30 pm
» A Little 400 Mile Hop for Some Memory Lane Stuff, and to Hit a Swap Meet.
by MauricioB Today at 9:20 pm
» Duende V model from RC Model magazine 1983.
by MauricioB Today at 9:03 pm
» Happy 77th birthday Andrew!
by Kim Yesterday at 9:18 am
» Promote the forum with flyers!
by Admin Yesterday at 1:35 am
» Engine choice
by GallopingGhostler Mon Nov 25, 2024 4:03 pm
» My N-1R build log
by roddie Mon Nov 25, 2024 9:19 am
» Night flying at Walters RC park
by 1975 control line guy Sun Nov 24, 2024 7:29 pm
» Cox films/videos...
by GallopingGhostler Sun Nov 24, 2024 7:07 pm
» Cox 020 PeeWee rebuild questions
by LooseSpinner99 Sun Nov 24, 2024 6:13 pm
» Did you spot the Cox engine in this NASA research video?
by balogh Sun Nov 24, 2024 5:08 pm
Cox Engine of The Month
Dick Russ' 1/2A Streaker, my build project
Page 1 of 2
Page 1 of 2 • 1, 2 
 Dick Russ' 1/2A Streaker, my build project
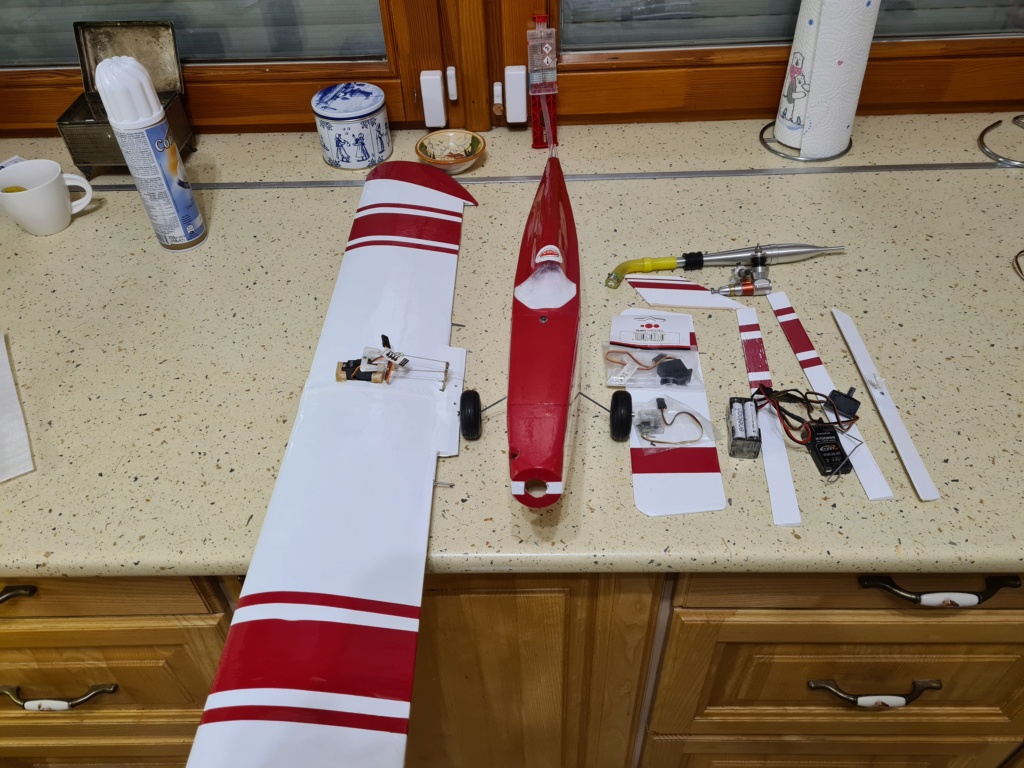
It took more than 6 weeks for the well packed Streaker kit to make it from Oklahoma City to Budapest. Dick and I were concerned the package was lost en route, but lo and behold, I finally received it.
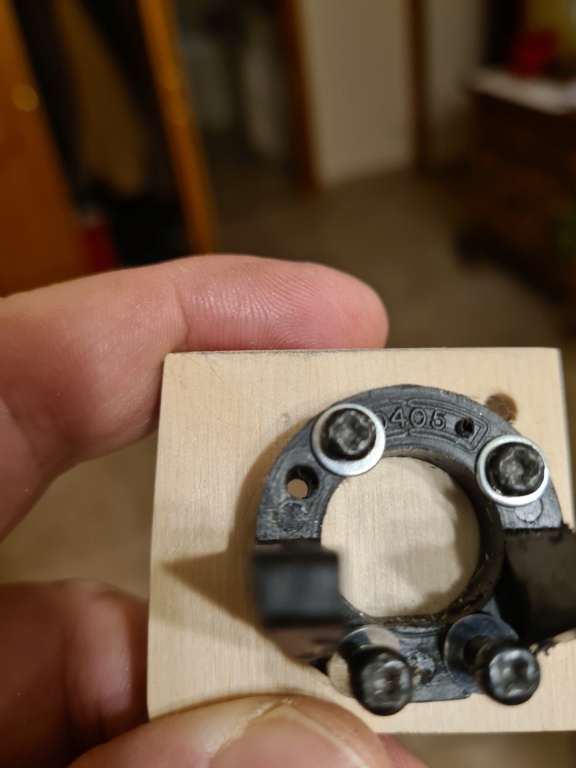
Dick packed everything neatly and provided photo-aided instructions. I started with the TeeDee firewall. I am re- purposing the upper left mounting hole of the Dave Brown TeeDee mount for the exhaust throttle pushrod leadout, but re-drill a 5th hole so that all 4 mounting screws should find their place. (Space around the TeeDee in the engine cowl of this slender plane is limited, and the mounting hole lends itself for the pushrod lead out with good access to the circlip on the exhaust throttle.) I drilled another hole on the firewall for the fuel line.
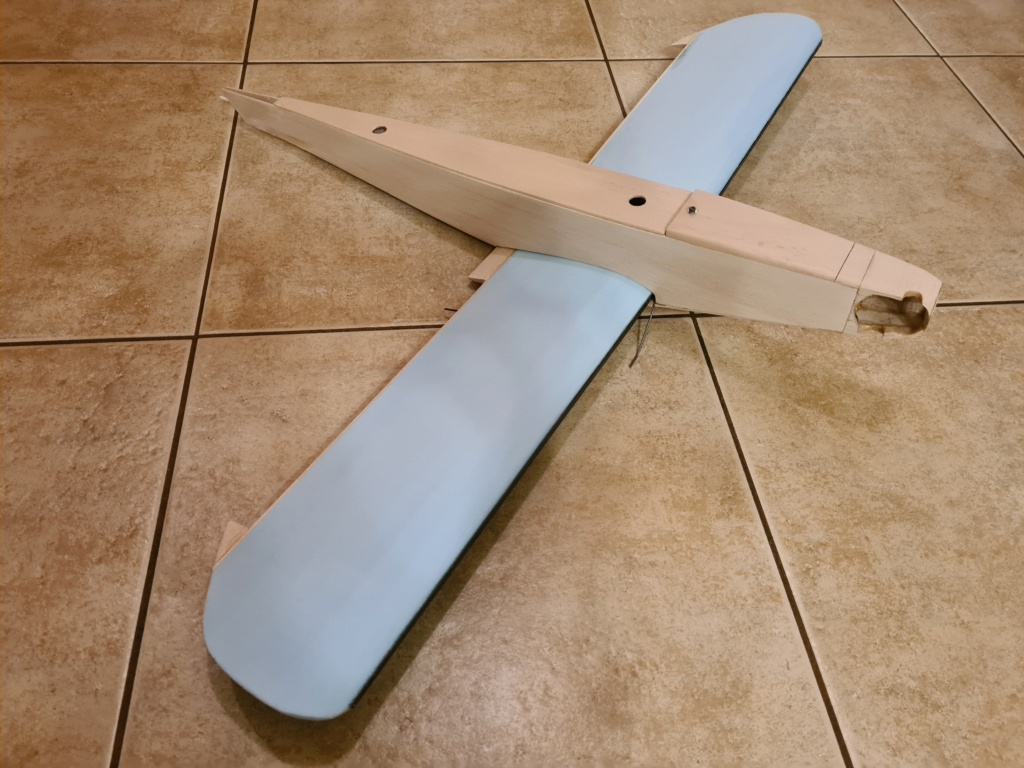
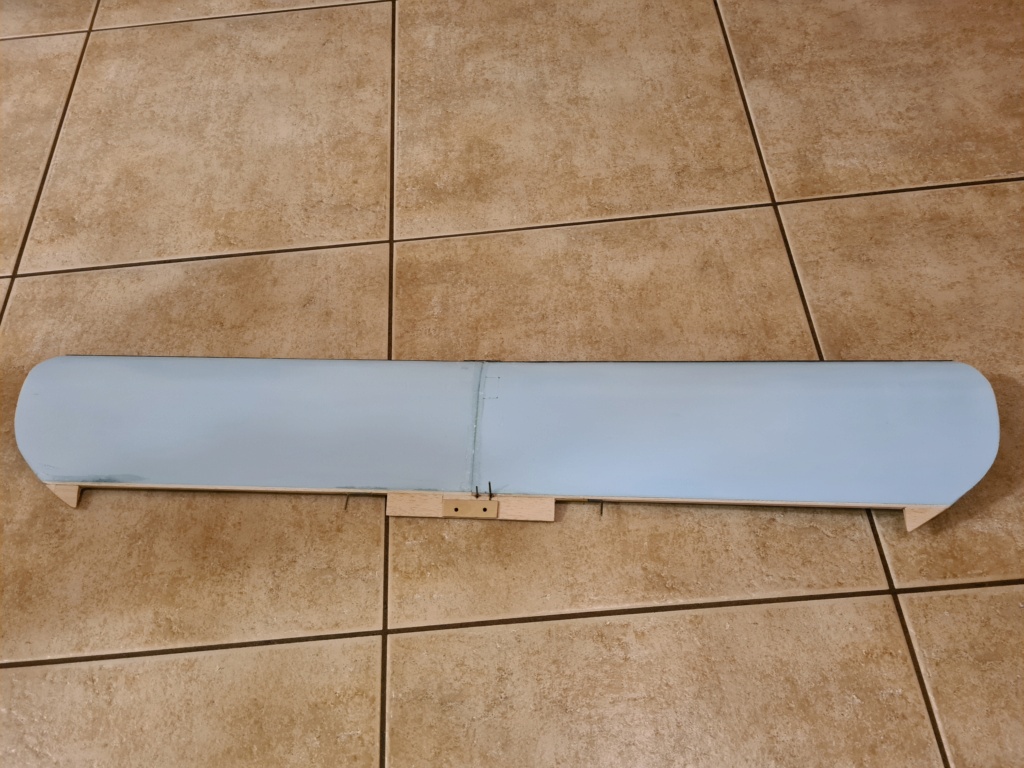
Then I continued with sanding the wings to shape and setting the dehidral.
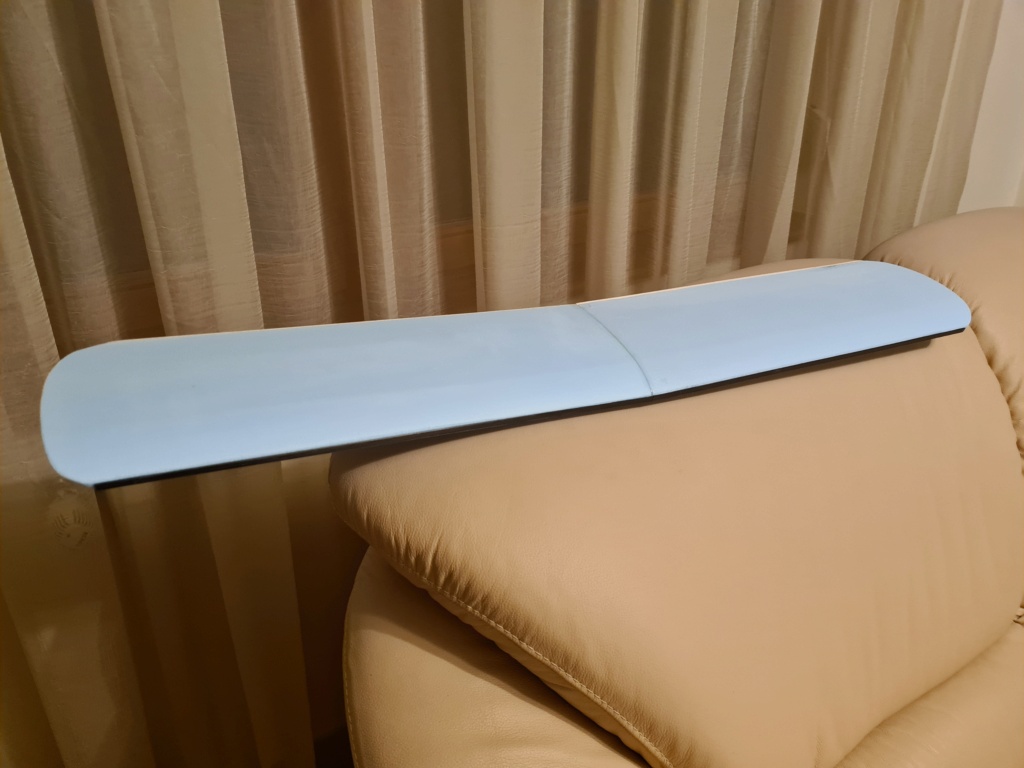
As my go to solution for my rough terrain flights, carbon strips are added to the leading edges to protect the foam wing when landing in deep grass or weed:
This being my first foam wing build project, I was not sure if the epoxy glue I have will provide the needed bond. So I gave Dick a call and he provided fantastic guidance on the phone...Dick, my apologies for calling you on Saturday, it was good talking and I hope I did not disturb..
I will continue the build and add further photos later. Spring is around the corner (?) and I cannot wait to maiden this very sporty and sleek bird.
Dick packed everything neatly and provided photo-aided instructions. I started with the TeeDee firewall. I am re- purposing the upper left mounting hole of the Dave Brown TeeDee mount for the exhaust throttle pushrod leadout, but re-drill a 5th hole so that all 4 mounting screws should find their place. (Space around the TeeDee in the engine cowl of this slender plane is limited, and the mounting hole lends itself for the pushrod lead out with good access to the circlip on the exhaust throttle.) I drilled another hole on the firewall for the fuel line.

Then I continued with sanding the wings to shape and setting the dehidral.
As my go to solution for my rough terrain flights, carbon strips are added to the leading edges to protect the foam wing when landing in deep grass or weed:

This being my first foam wing build project, I was not sure if the epoxy glue I have will provide the needed bond. So I gave Dick a call and he provided fantastic guidance on the phone...Dick, my apologies for calling you on Saturday, it was good talking and I hope I did not disturb..
I will continue the build and add further photos later. Spring is around the corner (?) and I cannot wait to maiden this very sporty and sleek bird.

balogh- Top Poster


Posts : 4961
Join date : 2011-11-06
Age : 66
Location : Budapest Hungary
 New Streaker in work
Well my Hungarian friend I was raelly thrilled you finally received the kit. TYhe Postal service must have hired an Okie from Muskogee to use a row boat to paddle it to Hungary but at least you got it. Tomorrow I will be taking my Streaker to our site to hopefully take a video of it flying since so many want to see it fly; so stay tuned in for what I hope will be a good show.
Regarding bothering me on Saturday. I will be happy to visit with any of our modling friends so if you have any questions regarding building the Streaker or any other project. Please feel free to give me a call or send me an email to dickathometwo@yahoo.com
Regarding bothering me on Saturday. I will be happy to visit with any of our modling friends so if you have any questions regarding building the Streaker or any other project. Please feel free to give me a call or send me an email to dickathometwo@yahoo.com

Dick Russ- Silver Member


Posts : 78
Join date : 2021-11-23
Age : 86
Location : Oklahoma City, OK
 Re: Dick Russ' 1/2A Streaker, my build project


getback- Top Poster


Posts : 10448
Join date : 2013-01-18
Age : 67
Location : julian , NC
 Re: Dick Russ' 1/2A Streaker, my build project
Thank you Eric, I will continue posting.

balogh- Top Poster


Posts : 4961
Join date : 2011-11-06
Age : 66
Location : Budapest Hungary
 Re: Dick Russ' 1/2A Streaker, my build project
Slowly by slowly the project advances. My decision to use a 3rd channel for the Tarno carb control, and the tuned pipe necessitated some mods in the narrow engine cowl, but I have managed it.
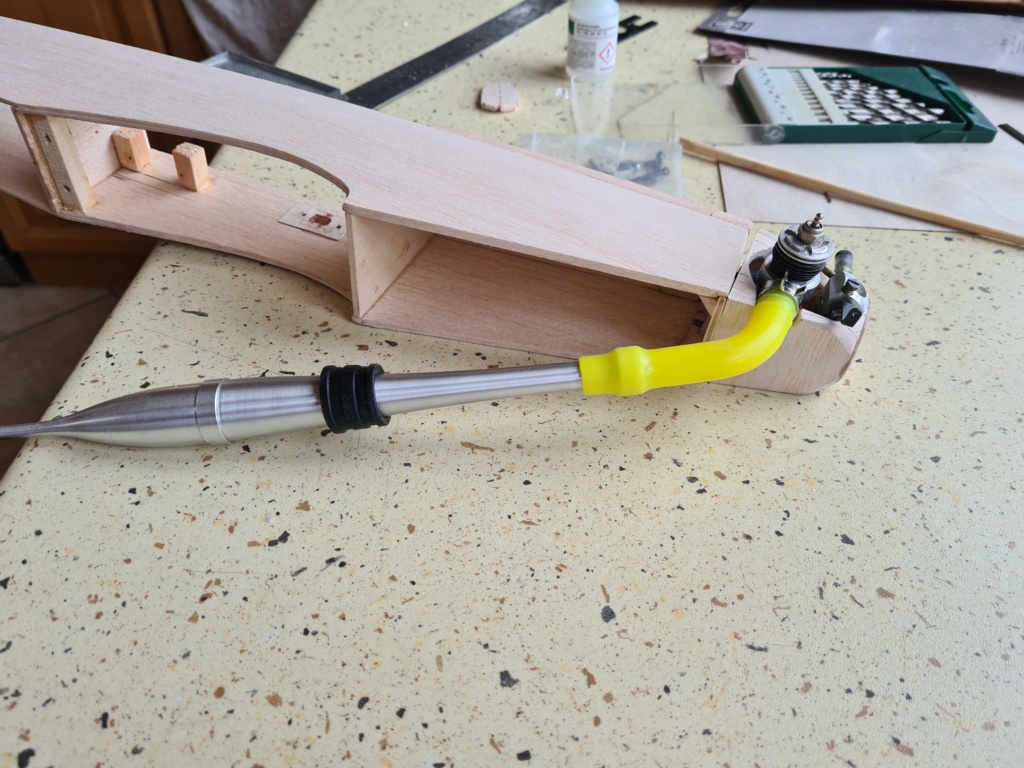
Brad aka 1/2A Nut provided valuable advice on the tuned pipe. I bench tested the TeeDee and measured 21.2 k rpm that I expect to jump to above 23k when unloading in the air...my TeeDe-s easily unload at above 23k even without the tuned pipe, that,however helps in the goo control and reduces the noise a bit, too, while ensures the unmuffled rpm
Further details to come soon.

balogh- Top Poster


Posts : 4961
Join date : 2011-11-06
Age : 66
Location : Budapest Hungary
 Re: Dick Russ' 1/2A Streaker, my build project
Fuselage and wing are ready. Before covering, I will fuel proof the engine cowl and the nose section and wing areas including the wing saddles, areas where castor likes to collect and soften the balsa.
Strengthened some load bearing parts like the trailing edge connection to the fuselage
...and the fuse where the leading edge will rest
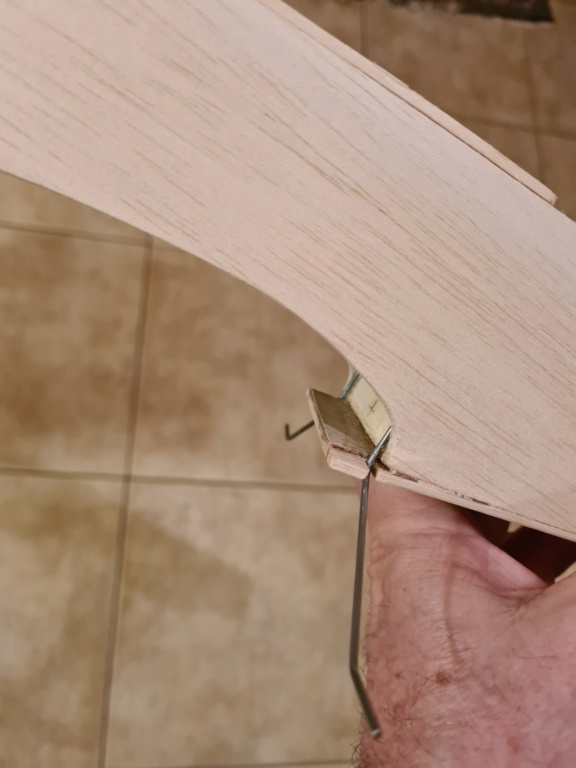
Dick's design is perfect...but the rough terrain over which I fly then land it deep grass necessitates these additions because rather than landing on wheels and taxiing, the plane will be stopped when landing by the grass that will stress all wing joints...hence my precautions..more to come soon..

Strengthened some load bearing parts like the trailing edge connection to the fuselage

...and the fuse where the leading edge will rest

Dick's design is perfect...but the rough terrain over which I fly then land it deep grass necessitates these additions because rather than landing on wheels and taxiing, the plane will be stopped when landing by the grass that will stress all wing joints...hence my precautions..more to come soon..

balogh- Top Poster


Posts : 4961
Join date : 2011-11-06
Age : 66
Location : Budapest Hungary
 Re: Dick Russ' 1/2A Streaker, my build project
Thats coming together pretty fast , good work and looks good too LOL 


getback- Top Poster


Posts : 10448
Join date : 2013-01-18
Age : 67
Location : julian , NC
 Re: Dick Russ' 1/2A Streaker, my build project
Thank you, Eric, the longest phase of the work so far was sculpturing the engine cowl into the fuselage nose. To accommodate a TeeDee051 with a Tarno R/C carb in that tight tight space required the carving of balsa in each corner of the cowl, and the engine with the throttle pushrod on it can only be inserted with a shoe horn...even the David Brown engine mount underwent an aesthetic surgery otherwise the engine backplate would have been stuck halfway when pushing/tilting it into its position on the mount.....but it was worth it.
Now I am applying a polyurethane spray in several layers on the fuse and the cowl in particular, to prevent castor from seeping into the balsa...

Now I am applying a polyurethane spray in several layers on the fuse and the cowl in particular, to prevent castor from seeping into the balsa...


balogh- Top Poster


Posts : 4961
Join date : 2011-11-06
Age : 66
Location : Budapest Hungary

1/2A Nut- Top Poster

- Posts : 3542
Join date : 2013-10-20
Age : 61
Location : Brad in Texas
 Re: Dick Russ' 1/2A Streaker, my build project
Thank you Brad! Except the canopy, the fuselage coverage went quite well. I will continue with the tail feathers tomorrow. Chances are I will have it completed by the weekend.

balogh- Top Poster


Posts : 4961
Join date : 2011-11-06
Age : 66
Location : Budapest Hungary
 Re: Dick Russ' 1/2A Streaker, my build project
Looking Good Andres even with the changes of the engine compartment witch are in sink with the contour of the body 

getback- Top Poster


Posts : 10448
Join date : 2013-01-18
Age : 67
Location : julian , NC
 Your Streaker building
Hello my friend. This is not to criticize your construction tecnique but I noticed in your pictures that the canopy and insert were not installed together. As a reminder, I recommended that you install the canopy insert into the canopy to form the top of the fuselage. Regarding flying off of a sod field. I fly my streaker almost daily (when we have a decent day) like in the 60's and 10-15 mph winds and all of my flying is on a heavy grass field. The streaker needs at least 2 inch diameter wheels and as wide as possible for grass fields. The Du-Bro 2" Super Lite Wheels (cat. 200SL) work wonderful on grass. Also be sure to set your elevator to 1/4 inch up and down. I find that 1/8 up and down on the ailerons works great for me. Due to our grass field I use full up elevator for my release. Regarding landing; on the grass with the 2 inch wheels I have not been able to make one decent landing it always tips over on it's nose when it comes to a stop. Doesn't hurt the plane but sure looks like bad piloting. recently I was asking a friend to do a video of the plane using my camera. While in the air I was reaching in my pocket for the camers and not watching the Streaker and lost site of it. It crashed in the farmers field under full power straight down ( I guess) and the only damage was a broken plastic prop. The plane is one strong airplane to crash under full power and only damage was a broken prop. Remarkably, The Streaker can do all the standard pattern manuevers and I have a ball flying it and only use 1 ounce of fuel for the 6 minute flight. I don't even take my 60 Pattern plane out anymore
Keep us posted on your progress pecially pictures.
Dick
Keep us posted on your progress pecially pictures.
Dick

Dick Russ- Silver Member


Posts : 78
Join date : 2021-11-23
Age : 86
Location : Oklahoma City, OK
 Re: Dick Russ' 1/2A Streaker, my build project
Thanks Dick,
You have good eyes to discover my breach from your build instructions, I indeed installed the fuse top and the turtle back separately. It was just simpler for me to make the turtleback edge flush with the fuse side this way.
At the end they fit well, and it is the cover film that is a bit frayed, I could not accurately heat shrink the film on the twice curved lines of the back.

I indeed have put the largest wheels on it, these are proven to allow landing without tipping over at the rough field.
Sorry to read of your unplanned landing and happy to learn the plane made it with only the prop broken.
I am progressing well and have the wing left as last item to cover. I need to figure out how best to cover with minimum wrinkles at the wing tip where a wash out was sanded to the tip underside, and the aileron area.
Will continue posting.
You have good eyes to discover my breach from your build instructions, I indeed installed the fuse top and the turtle back separately.
At the end they fit well, and it is the cover film that is a bit frayed, I could not accurately heat shrink the film on the twice curved lines of the back.

I indeed have put the largest wheels on it, these are proven to allow landing without tipping over at the rough field.
Sorry to read of your unplanned landing and happy to learn the plane made it with only the prop broken.
I am progressing well and have the wing left as last item to cover. I need to figure out how best to cover with minimum wrinkles at the wing tip where a wash out was sanded to the tip underside, and the aileron area.
Will continue posting.

balogh- Top Poster


Posts : 4961
Join date : 2011-11-06
Age : 66
Location : Budapest Hungary
 New Streaker in work
That is why I wasn't being critical of your assembly. Regarding the wing tips. I like to cover just the tips by them selves. That way you can stretch the film around the edges and have a smooth finish. Be sure you have a cloth shoe over your iron when irioning on the foam. I know it is to late since you are so near being finished but I have decided it is far better to find some paint (spray can) that will match the film and paint the canopy and use the film on the balsa. I'm heading out to fly the Streaker this afternoon. Where can you have so much fun on an ounce of fuel.

Dick Russ- Silver Member


Posts : 78
Join date : 2021-11-23
Age : 86
Location : Oklahoma City, OK
 Re: Dick Russ' 1/2A Streaker, my build project
Looks like all the primary parts, what's the empty weight looking like for the plane thus far?


1/2A Nut- Top Poster

- Posts : 3542
Join date : 2013-10-20
Age : 61
Location : Brad in Texas
 Re: Dick Russ' 1/2A Streaker, my build project
Last edited by balogh on Fri Feb 11, 2022 1:29 pm; edited 1 time in total

balogh- Top Poster


Posts : 4961
Join date : 2011-11-06
Age : 66
Location : Budapest Hungary
 New Streaker in work
I totally agree. yesterdays flying the streaker was a nightmare. Got to the field, fueled the plane for takeoff. Now let me say this. The day before I got in 4 great flights. Took the plane home and put the charger on the TX and Rec.. Did nothing else to the plane or change any engine settings. Now the rest of the story.
Engine started right up and sounded great. Carried it out the strip, set it down and let it go with full elevator and the takeoff was as expected. Just past the end of the field and the engine quit. Forced landing in the farmers plowed field. No damage. Came back and refueled. Shook he plane to make sure the fuel pickup clunk was ok. Started the engine, carried it back to my takeoff spot and let it go again. Climbed to about 100 feet and it quit again. Barely made it back to the field-no damage. One of the locals said it sure sounded like the engine was missing before it quit. Refueled again. Same senario; ran great on the ground and after takeoff a little longer this time it quit again- Nice glide back to the field. Rather embarassing with everyone watching. Enough is enouigh! I removed the top tank cover and removed the fuel tank. Held it up to the sunlight where I could see through the little 1 ounce tank and sure enough; the pickup tube and clunk was jammed up on top of the front tank rubber stopper. So as long as the tank was full the engine could still draw fuel, but once airborne the fuel level would drop below the stuck clunk and no fuel supply. I could have sworn I could hear the clunk rattling around in the tank before my first fueling. Anyway, shook the tank and the clunk became free. Then all I needed to do is reinstall the fuel feed line through the firewall and proceed. Not so fast! couldnt get the supply line through the firewall hole no matter what I did. It seems I made the hole the same size as the fuel line and when I pulled the line through apparently some fuel caused the hole to swell a little. Finally after forcing a phillips screw driver through the hole I was able to install the fuel line. Refueled the tank and the TD fired right up and ran beautifully. Back to the runway and let her go. Smooth takeoff and and a great 6 minute (plus) flight. It was screaming past me in a level flight when it ran out of fuel so I imediatelly climbed and rolled over into split s and headed back for landing which for the first time it was beautiful even though I used nearly all of our 500 foot runway. Long walk but the end of a fun afternood of flying.
Engine started right up and sounded great. Carried it out the strip, set it down and let it go with full elevator and the takeoff was as expected. Just past the end of the field and the engine quit. Forced landing in the farmers plowed field. No damage. Came back and refueled. Shook he plane to make sure the fuel pickup clunk was ok. Started the engine, carried it back to my takeoff spot and let it go again. Climbed to about 100 feet and it quit again. Barely made it back to the field-no damage. One of the locals said it sure sounded like the engine was missing before it quit. Refueled again. Same senario; ran great on the ground and after takeoff a little longer this time it quit again- Nice glide back to the field. Rather embarassing with everyone watching. Enough is enouigh! I removed the top tank cover and removed the fuel tank. Held it up to the sunlight where I could see through the little 1 ounce tank and sure enough; the pickup tube and clunk was jammed up on top of the front tank rubber stopper. So as long as the tank was full the engine could still draw fuel, but once airborne the fuel level would drop below the stuck clunk and no fuel supply. I could have sworn I could hear the clunk rattling around in the tank before my first fueling. Anyway, shook the tank and the clunk became free. Then all I needed to do is reinstall the fuel feed line through the firewall and proceed. Not so fast! couldnt get the supply line through the firewall hole no matter what I did. It seems I made the hole the same size as the fuel line and when I pulled the line through apparently some fuel caused the hole to swell a little. Finally after forcing a phillips screw driver through the hole I was able to install the fuel line. Refueled the tank and the TD fired right up and ran beautifully. Back to the runway and let her go. Smooth takeoff and and a great 6 minute (plus) flight. It was screaming past me in a level flight when it ran out of fuel so I imediatelly climbed and rolled over into split s and headed back for landing which for the first time it was beautiful even though I used nearly all of our 500 foot runway. Long walk but the end of a fun afternood of flying.

Dick Russ- Silver Member


Posts : 78
Join date : 2021-11-23
Age : 86
Location : Oklahoma City, OK
 Re: Dick Russ' 1/2A Streaker, my build project
Been there, seen that, done that Dick, before I gave up using solid tanks with heavy clunks.
Ever since I use party balloons for tank with only 1 fuel line, one filling line, I have no fuel supply problems no matter in what position the plane flies.
Glad you gave finally doctored the tank and eventually enjoyed the flights...can't wait to see a video of your Streaker on duty...mine will take some more days before I maiden it with a tuned pipe and RC carb..

balogh- Top Poster


Posts : 4961
Join date : 2011-11-06
Age : 66
Location : Budapest Hungary
 New Streaker in work
Hello Andras, You mentioned you use a party balloon. If you fill the balloon with fuel that means the Balloon is pressurized. If it is pressurized how do you keep the engine from flooding and another thought, how do you stop the fuel from leaking from the engine carburetor when you connect the fuel line to the carburetor. Don't forget I'm from the old school. Using a pressurized balloon is new to me.
Dick
Dick

Dick Russ- Silver Member


Posts : 78
Join date : 2021-11-23
Age : 86
Location : Oklahoma City, OK
 Re: Dick Russ' 1/2A Streaker, my build project
Dick the point is it is big enough to hold 2oz fuel without pressurization.
The one I just put together for the Streaker is herebelow:
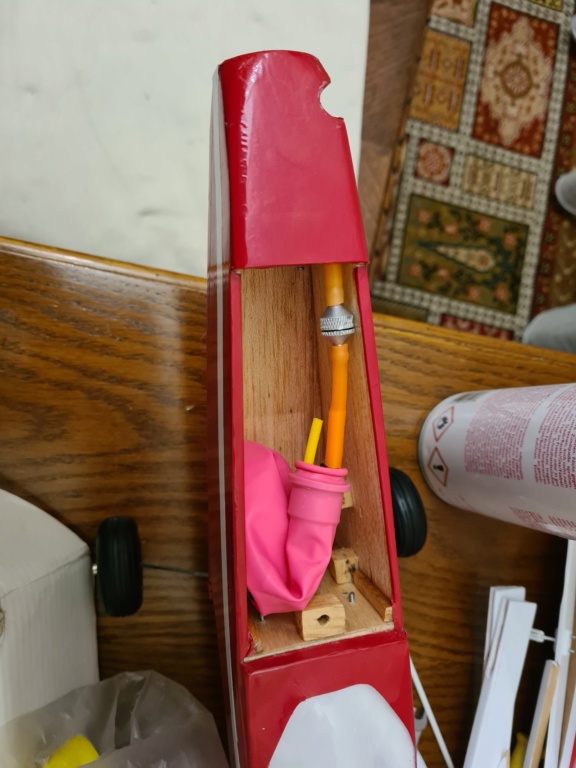
The fuel line length is yet to be set. The filling line will be led out through the fuselage wall and a small plug will be added. The supply line inside the balloon is perforated along its length to prevent the soft tank wall from being sucked to the line end.
Of course the landing gear screw ends will be covered so that they should not puncture the tank.
These tanks hold fuel for 10+ minutes flights, allow any aerobatics without a clunk, prevent foaming of fuel, ultra light and cheap
The one I just put together for the Streaker is herebelow:

The fuel line length is yet to be set. The filling line will be led out through the fuselage wall and a small plug will be added. The supply line inside the balloon is perforated along its length to prevent the soft tank wall from being sucked to the line end.
Of course the landing gear screw ends will be covered so that they should not puncture the tank.
These tanks hold fuel for 10+ minutes flights, allow any aerobatics without a clunk, prevent foaming of fuel, ultra light and cheap

balogh- Top Poster


Posts : 4961
Join date : 2011-11-06
Age : 66
Location : Budapest Hungary
 Re: Dick Russ' 1/2A Streaker, my build project
19oz copy that 
Do you recall the empty weight of just the plane before all the hardware / gear choices?


Do you recall the empty weight of just the plane before all the hardware / gear choices?


1/2A Nut- Top Poster

- Posts : 3542
Join date : 2013-10-20
Age : 61
Location : Brad in Texas
 Re: Dick Russ' 1/2A Streaker, my build project
1/2A Nut wrote:19oz copy that
Do you recall the empty weight of just the plane before all the hardware / gear choices?


It was in the range of near 300 grams I.e. 10 o, rír so. I only weighed the fuselage alone that was meat 200 grams.

balogh- Top Poster


Posts : 4961
Join date : 2011-11-06
Age : 66
Location : Budapest Hungary
 New Streaker in work
Good morning Andras (if it is morning at your home). regarding the balloon tank. (1) Do you fold it over as shown in your picture? (2) What did you make the stopper from? (3) What kind of fuel line inside the Balloon and if possible please show a picture of the line perforated.(4) When you fill the balloon how much fuel do you add to the balloon and how do you know how much you have added? Do you take the cover off at each filling? May I assume that the Balloons you use are fuel proof and last does the Balloon just lie limp in the plane. I think all of our group would be interested in the Balloon tank installation (at least I sure am since I have never heard of the procedure and I would like to suggest it in the Streaker instructions after I have had a chance to test it ( not questioning your expertise but want to try it before I offer it as alternate fuel tank).
Plane is looking great especially with the clear front canopy. Back in 75 my canopies were solid opaque so it couldn't be done like yours.
Dick
Plane is looking great especially with the clear front canopy. Back in 75 my canopies were solid opaque so it couldn't be done like yours.
Dick

Dick Russ- Silver Member


Posts : 78
Join date : 2021-11-23
Age : 86
Location : Oklahoma City, OK
 Re: Dick Russ' 1/2A Streaker, my build project
Dick Russ wrote:Good morning Andras (if it is morning at your home). regarding the balloon tank. (1) Do you fold it over as shown in your picture? (2) What did you make the stopper from? (3) What kind of fuel line inside the Balloon and if possible please show a picture of the line perforated.(4) When you fill the balloon how much fuel do you add to the balloon and how do you know how much you have added? Do you take the cover off at each filling? May I assume that the Balloons you use are fuel proof and last does the Balloon just lie limp in the plane. I think all of our group would be interested in the Balloon tank installation (at least I sure am since I have never heard of the procedure and I would like to suggest it in the Streaker instructions after I have had a chance to test it ( not questioning your expertise but want to try it before I offer it as alternate fuel tank).
Plane is looking great especially with the clear front canopy. Back in 75 my canopies were solid opaque so it couldn't be done like yours.
Dick
Dick,
good morning. My hometown Budapest in Hungary is in the Central European timezone, i.e. we are 7 hours ahead of your time in Oklahoma City.
The tank is very simple.

The stopper is the same rubber stopper that you probably have in your hard tank, sold by hobbyshops. I bent 2 hard plastic tubes in 90 degree to shorten the overall tank length for more convenient accommodation in the tank compartment of the Streaker. The shorter whose end inside the ballon is just flush with the stropper bottom serves as the filler tube. The longer one attaches to the perforated silicone fuel tube whose length is roughly the same as that of the balloon. I punctured the perforations on the tube with a nail clipper to make the holes nice oval, which will not be a source of tube fracture.
The party balloon is what you get in any Kids'r'us store or similar. The material is resistant to nitro fuel, and unless you leave it sit for long , wet from fuel inside, that will end in sticking the walls together, it will outlast your plane.
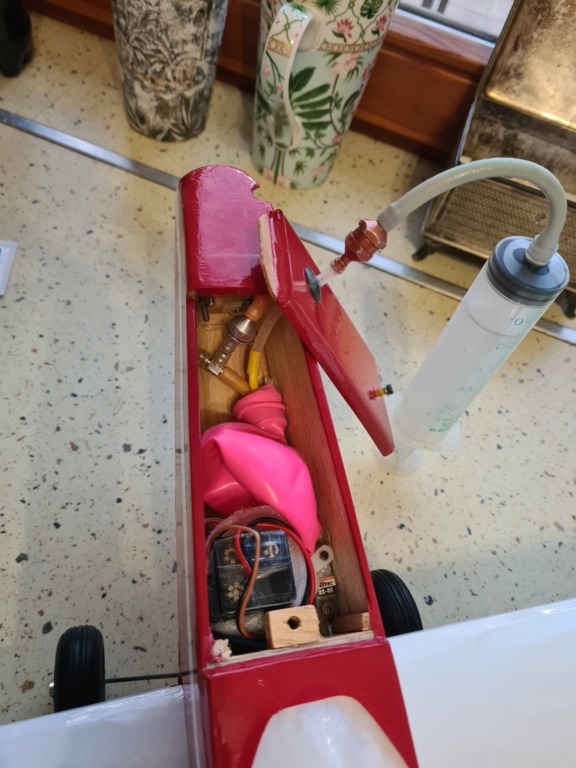
As you see the engine firewall has a hole just outside the perimeter of the David Brown mount, where I lead the supply line into the engine cowl. The line has a small aluminum fine mesh strainer.
The filling line hits through the tank compartment lid and can be connected to a 2 oz medical syringe that you can buy in vet's shops or similar. So I use a syringe to fill the tank. I keep the plane's nose up to make sure air vents from the tank when I pull on the syringe. When fueling in the field, you do not have to remove the lid of the compartment, just pull out the fillling line, remove the plug and connect it to the syringe.

With a transparent fuel line to the carb you will see when the tank is filled and the rubber balloon begins to stretch and pressurize the fuel. This is when you want to stop fueling so that the pressurization should not remain in the equation of fuel supply. The soft tank wall collapses as the fuel is gradually consumed, and the tank pressure is always atmospheric. If you place light foam under the tank to elevate it a bit, the TeeDee will easily draw even the last drop of fuel from it.
The tank sits limp in the compartment but it does not matter. Its occasional repositioning during aerobatics will not change the CG of the plane, at least not to the extent it would really matter.
The tank conveniently fills the available space in the compartment. and even if not sitting laid out slack but a bit folded, it will easily carry 2 oz fuel without pressurization.
I hope the above explains...
BTW I put the battery pack of 4 rechargeable AAA batteries standing in the tank compartment, and fixed it with rubber rings led through a hole on the front bulkhead, the other end fixed to the landing gear wire. Also shown is a - not yet adjusted - small servo in the tank compartment which will drive the Tarno carb throttle drum.
I hope to be able to finalize the plane tomorrow.

balogh- Top Poster


Posts : 4961
Join date : 2011-11-06
Age : 66
Location : Budapest Hungary

Levent Suberk- Diamond Member

- Posts : 2265
Join date : 2017-12-24
Location : Türkiye
Page 1 of 2 • 1, 2 
 Similar topics
» Pluto Build Project
» Spee-Dee 010, a new build project
» Guillows P-40, my next R/C build project for TD 049 platform
» Tigercat RC pylon racer build project
» The Breezy Hill / EAA Chapter 1635's "Build and Fly Project"
» Spee-Dee 010, a new build project
» Guillows P-40, my next R/C build project for TD 049 platform
» Tigercat RC pylon racer build project
» The Breezy Hill / EAA Chapter 1635's "Build and Fly Project"
Page 1 of 2
Permissions in this forum:
You cannot reply to topics in this forum

 Rules
Rules


