Log in
Search
Latest topics
» Cox films/videos...by Coxfledgling Today at 4:46 am
» Purchased the last of any bult engines from Ken Enya
by Coxfledgling Today at 4:18 am
» My N-1R build log
by roddie Today at 12:32 am
» Happy 77th birthday Andrew!
by akjgardner Today at 12:27 am
» TEE DEE Having issues
by TD ABUSER Yesterday at 9:43 pm
» Landing-gear tips
by roddie Yesterday at 6:17 pm
» Roger Harris revisited
by TD ABUSER Yesterday at 2:13 pm
» Tee Dee .020 combat model
by Ken Cook Yesterday at 1:41 pm
» Retail price mark-up.. how much is enough?
by Ken Cook Yesterday at 1:37 pm
» My latest doodle...
by roddie Yesterday at 10:43 am
» Chocolate chip cookie dough.........
by roddie Fri Nov 22, 2024 1:13 pm
» Free Flight Radio Assist
by rdw777 Fri Nov 22, 2024 9:24 am
Cox Engine of The Month
"Cox Gravity Warbirds" F4-U Corsair RC upgrade thread
Page 1 of 2
Page 1 of 2 • 1, 2 
 "Cox Gravity Warbirds" F4-U Corsair RC upgrade thread
Well I finally decided to start putting together the Cox Gravity Warbird F4-U Corsair I purchased on ebay. I will attempt to show the assembly in sensible pieces. First the elevator and rudder assembies.
I received the Cox gravity warbird kit for the F4-U Corsair with a basic electric motor and extra plastic propellers and decal set included. The kit included a 2 piece fuselage, dark tinted canopy, 1 – piece wing and elevator and rudder assemblies with moveable surfaces attached with a clear plastic hinge tape. The kit modification for 3/4 channel RC use will begin there.
The first item I wanted to accomplish was to finish the moveable surfaces and attach control horns. The seller of the kit on ebay provided a set of assembly instructions with photographs.
the elevator assembly prior to modification.
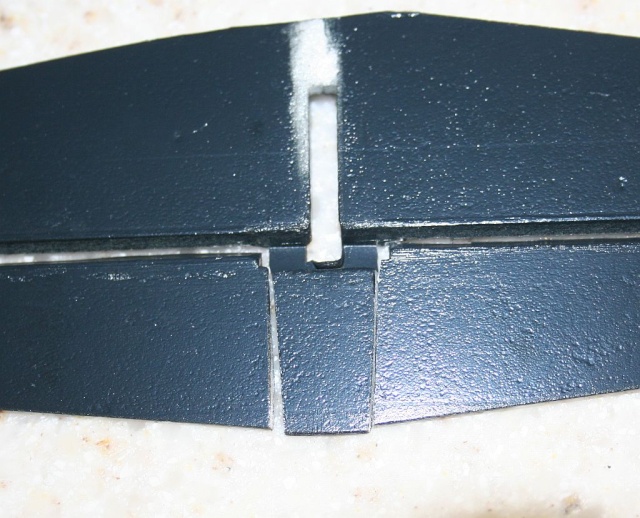
after marking the hole for the micro control horn and roughing surface where control horn would be glued to elevator. i used the dubro micro control horn.
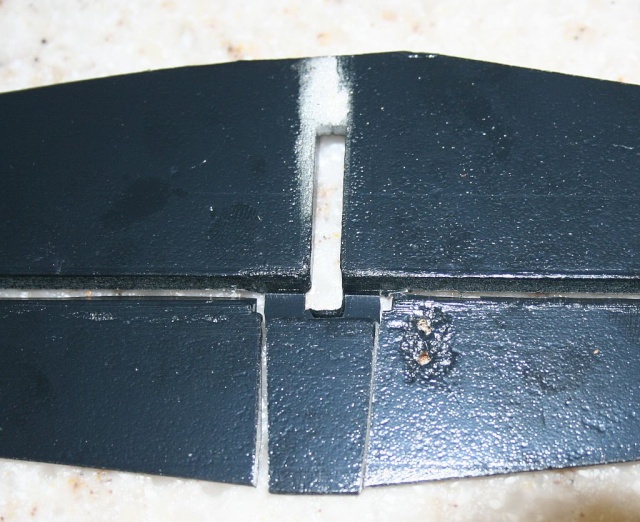
after glueing in the control horn. cut off the extra plastic and heat rod to enlarge so it will not come out.
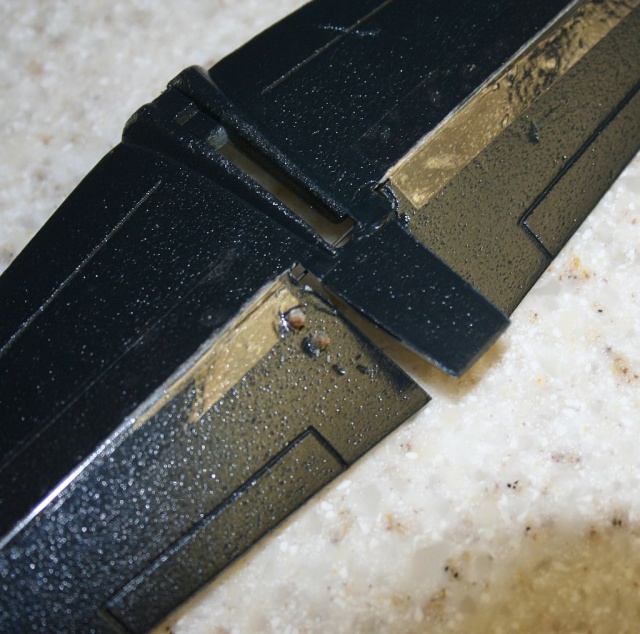
NOTE: this is the opposite side of the elevator assembly showing "tape hinge".
Now do the same things with the rudder assembly.
the rudder assembly prior to modification.
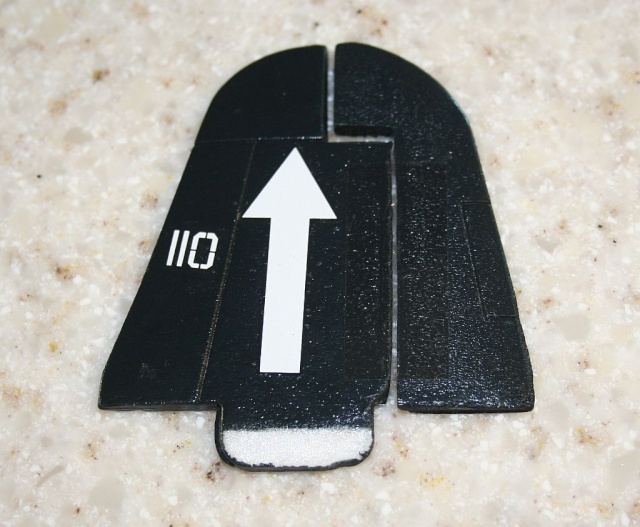
after marking the hole for the micro control horn and roughing surface where control horn would be glued to rudder. i used the dubro micro control horn.

after glueing in the control horn. cut off the extra plastic and heat rod to enlarge so it will not come out. sorry for the bad focus.
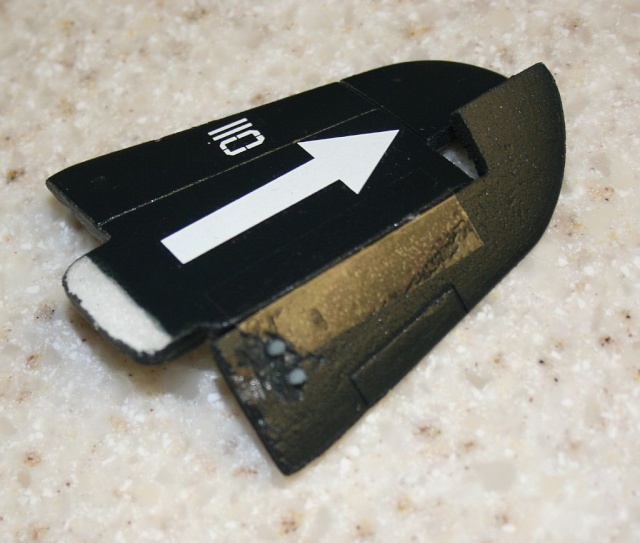
NOTE: this is the opposite side of the rudder assembly showing "tape hinge".
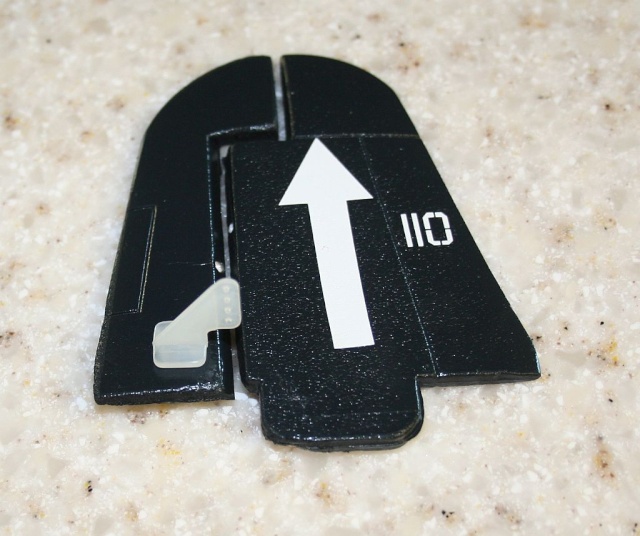
finished rudder assembly.
that's about all i can handle for today. i apologize for any spelling errors.
edited 9-10-12 10:31p.m. PST: i started the Cox Sky Cruisers Viper RC conversion thread today. i will add to F4-U Corsair and Cox Viper conversions as possible. and i encourage questions and comments. HD
edited 10-10-12 9:30p.m. PST - guess i don't know the difference between the rudder shown here and the elevator shown above. LOL
happydad


I received the Cox gravity warbird kit for the F4-U Corsair with a basic electric motor and extra plastic propellers and decal set included. The kit included a 2 piece fuselage, dark tinted canopy, 1 – piece wing and elevator and rudder assemblies with moveable surfaces attached with a clear plastic hinge tape. The kit modification for 3/4 channel RC use will begin there.
The first item I wanted to accomplish was to finish the moveable surfaces and attach control horns. The seller of the kit on ebay provided a set of assembly instructions with photographs.
the elevator assembly prior to modification.

after marking the hole for the micro control horn and roughing surface where control horn would be glued to elevator. i used the dubro micro control horn.

after glueing in the control horn. cut off the extra plastic and heat rod to enlarge so it will not come out.

NOTE: this is the opposite side of the elevator assembly showing "tape hinge".
Now do the same things with the rudder assembly.
the rudder assembly prior to modification.

after marking the hole for the micro control horn and roughing surface where control horn would be glued to rudder. i used the dubro micro control horn.

after glueing in the control horn. cut off the extra plastic and heat rod to enlarge so it will not come out. sorry for the bad focus.

NOTE: this is the opposite side of the rudder assembly showing "tape hinge".
finished rudder assembly.

that's about all i can handle for today. i apologize for any spelling errors.
edited 9-10-12 10:31p.m. PST: i started the Cox Sky Cruisers Viper RC conversion thread today. i will add to F4-U Corsair and Cox Viper conversions as possible. and i encourage questions and comments. HD
edited 10-10-12 9:30p.m. PST - guess i don't know the difference between the rudder shown here and the elevator shown above. LOL
happydad


Last edited by happydad on Wed Oct 10, 2012 11:36 pm; edited 2 times in total (Reason for editing : added Cox Sky Cruiser Viper conversion thread. corrected spelling of rudder, (was elevator))

happydad- Rest In Peace

- Posts : 1592
Join date : 2012-05-28
Age : 79
Location : Escondido, CA
 Re: "Cox Gravity Warbirds" F4-U Corsair RC upgrade thread
Looks like your on your way. Should be a fun little plane when you get it in the air.

Cribbs74- Moderator


Posts : 11907
Join date : 2011-10-24
Age : 50
Location : Tuttle, OK
 Re: "Cox Gravity Warbirds" F4-U Corsair RC upgrade thread
FWIW HD
My Bacaruda has always been a lot of fun but been a little 'ponderous' in the control dept....
I finally bit the bullet and fitted some 'proper' mylar (ok ok floppy disc) hinges instead of the previous
tape.
It has transformed the way it flys.
Give it a whirl
Great model btw

My Bacaruda has always been a lot of fun but been a little 'ponderous' in the control dept....
I finally bit the bullet and fitted some 'proper' mylar (ok ok floppy disc) hinges instead of the previous
tape.
It has transformed the way it flys.
Give it a whirl
Great model btw

John Goddard- Diamond Member

- Posts : 2447
Join date : 2011-11-24
Age : 60
Location : Leyton North East London
 re: mylar hinges
John Goddard wrote:FWIW HD
My Bacaruda has always been a lot of fun but been a little 'ponderous' in the control dept....
I finally bit the bullet and fitted some 'proper' mylar (ok ok floppy disc) hinges instead of the previous
tape.
It has transformed the way it flys.
Give it a whirl
Great model btw

so noted John. and as you will see during the Cox Gravity Warbirds F4-Y Corsair build i never trusted that type of hinge either. but since removing the mylar would also remove the paint i simply added good old clear monokote hinges on the opposite side.
yesterday for being a holiday was hot and brutal. take me here, let's go there, run to the LHS to see if they had my ordered parts, they didn't so off to the other LHS to get the last set of micro control horns to start, ( i needed 2 sets).
as i progress thru the F4-U Corsair conversion i will make reference to the "other" plane i am working on. it is a cox sky cruiser set up for free flight, but i have been converting it for 2 years. it looks like a P-51 with purple fuselage and yellow wing and elevator assembly. now i have a better plan and some better ideas. but no pictures. maybe later today. that's all folks. happydad


happydad- Rest In Peace

- Posts : 1592
Join date : 2012-05-28
Age : 79
Location : Escondido, CA
 re: arrow
WingingIt74 wrote:Do arrows pointing up provide more lift?

i think the arrow is to remind us oldtimers which way is up. LOL.
happydad.


happydad- Rest In Peace

- Posts : 1592
Join date : 2012-05-28
Age : 79
Location : Escondido, CA
 re: I finally bought the Gravity Spitfire
happydad wrote:Well I finally decided to start putting together the Cox Gravity Warbird F4-U Corsair I purchased on ebay. I will attempt to show the assembly in sensible pieces. First the elevator and rudder assembies.
I received the Cox gravity warbird kit for the F4-U Corsair with a basic electric motor and extra plastic propellers and decal set included. The kit included a 2 piece fuselage, dark tinted canopy, 1 – piece wing and elevator and rudder assemblies with moveable surfaces attached with a clear plastic hinge tape. The kit modification for 3/4 channel RC use will begin there.
The first item I wanted to accomplish was to finish the moveable surfaces and attach control horns.
finished rudder assembly.
that's about all i can handle for today. i apologize for any spelling errors.
edited 9-10-12 10:31p.m. PST: i started the Cox Sky Cruisers Viper RC conversion thread today. i will add to F4-U Corsair and Cox Viper conversions as possible. and i encourage questions and comments. HD
edited 10-10-12 9:30p.m. PST - guess i don't know the difference between the rudder shown here and the elevator shown above. LOL
happydad


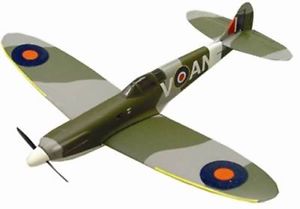
Well after 2 years of messing around with the original Cox Warbird Corsair I finally decided to buy the newer version of the Cox Warbirds Spitfire made by Gravity. I should be receiving the plane next week and I will do a comparison of the 2 ARF's and the included parts. The Gravity kits are supposed to include the control rods. I will also look at the hinges used on both of the ARF's.
edited 9-21-14: forgot to add the picture of the Gravity Spitfire
I will continue the thread and add pictures of the actual ARF as soon as I receive the package.
HD
happydad


Last edited by happydad on Sun Sep 21, 2014 1:40 pm; edited 1 time in total (Reason for editing : forgot to add the picture of the Gravity Spitfire)

happydad- Rest In Peace

- Posts : 1592
Join date : 2012-05-28
Age : 79
Location : Escondido, CA
 Update for Gravity Corsair Upgrade to RC
Well after almost 1 year I am finally back to looking at the Cox Warbird update to RC. I hope to post some added pictures later this week or early next week. I have looked at another similar kit made by the company that purchased the rights to build the Gravity Warbirds line. I will have some pictures soon of the 1 model I purchased It is similar to the P-47, but it is the British version. I can't remember the model number right now, Gravity Spitfire. I have actually made a lot of progress in placing the electronics and I have decided on which components I will use. The OrangeRX 4 channel receiver seems like a good fit or the LemonRX 6channel. The Esc is very small about the same diameter as the 130 size motor and I will provide the part number as well as the servo part number later. The servos are 3gram micro servos and 1 is mounted on each side of the fuselage to counterbalance weight distribution. 1 servo is for elevator control, and 1 is for rudder control.
hopefully some pictures here.
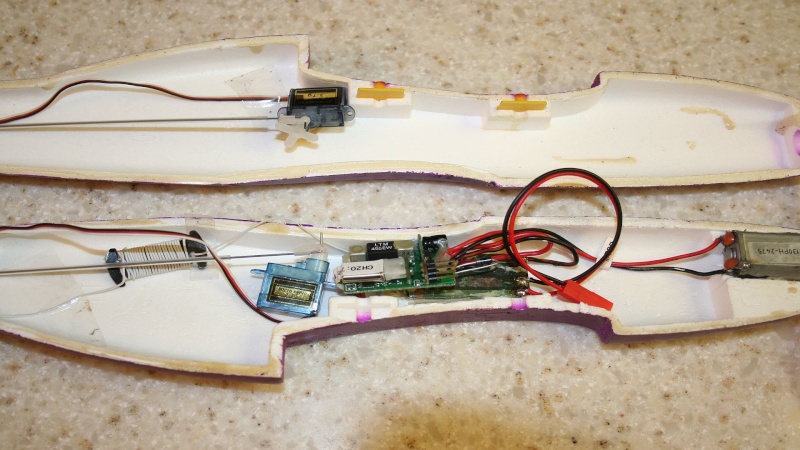
first attempt at electronics layout
happydad I'm retired
hopefully some pictures here.

first attempt at electronics layout
happydad I'm retired


happydad- Rest In Peace

- Posts : 1592
Join date : 2012-05-28
Age : 79
Location : Escondido, CA
 Re: "Cox Gravity Warbirds" F4-U Corsair RC upgrade thread
i beleve they do!WingingIt74 wrote:Do arrows pointing up provide more lift?


cox24711- Platinum Member

- Posts : 722
Join date : 2014-01-18
Age : 21
Location : Noosa Queensland Australia
 Re: "Cox Gravity Warbirds" F4-U Corsair RC upgrade thread
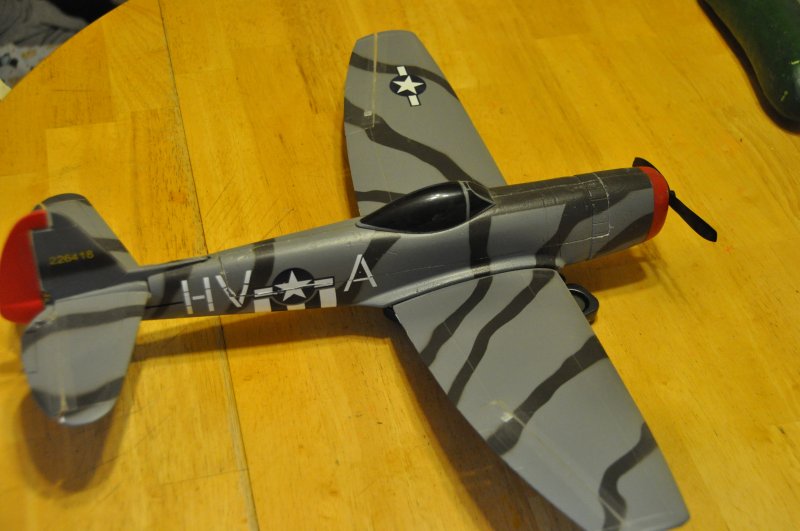
Go for it. I've built 3 Cox Gravity Warbirds. The first was the Zero, I used the stock brushed motor, a spectrum 6100E receiver & 2x4g servos. It flies pretty well. All up weight is around 5.5 oz if I remember correctly. The second was the P-40 warhawk, same radio gear but I used an outrunner motor. It flies better due to the extra power & lighter weight, about 4.6oz.
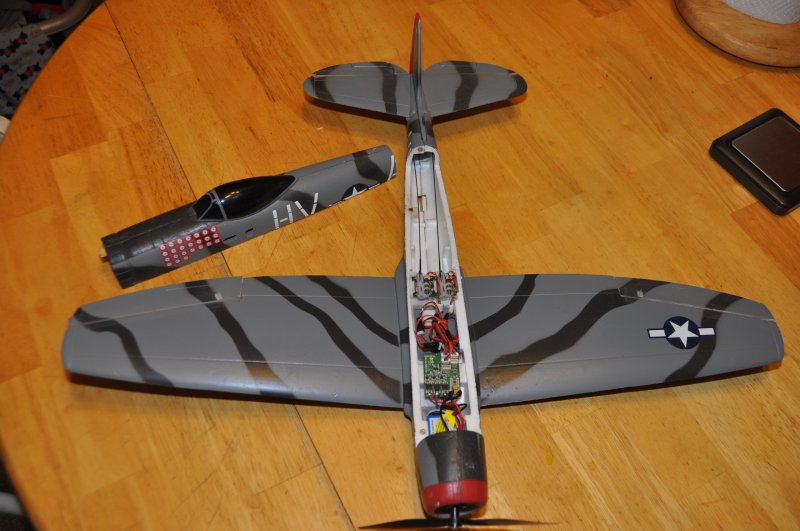
The third is the P-47 Thunderbolt, for that I used the Motor, electronics & linear servos from an EFlite UMX Gee Bee ( I knew there was a Bee in there someplace). I made it full 4 channel. It flies the best & is the lightest at 3.3 ounces.
I didn't like the way I couldn't access the electronics once the planes were glued together so on the P-47 I cut the top of the fuse to make it removable the way parkzone does their UMX warbirds but used magnets instead of tape to secure it for flight.
Good luck & have fun, the Cox Gravity warbirds were great little planes & can still be found on EBay. The Zero, FW-190 & ME 109 are available for around $20 - $25, Free shipping in the USA as of this morning.
I know most folks here are into control line flying & I bet one of these little puppies would even make a good little control line plane for .020
Regards,
Tony
The third is the P-47 Thunderbolt, for that I used the Motor, electronics & linear servos from an EFlite UMX Gee Bee ( I knew there was a Bee in there someplace). I made it full 4 channel. It flies the best & is the lightest at 3.3 ounces.
I didn't like the way I couldn't access the electronics once the planes were glued together so on the P-47 I cut the top of the fuse to make it removable the way parkzone does their UMX warbirds but used magnets instead of tape to secure it for flight.

Good luck & have fun, the Cox Gravity warbirds were great little planes & can still be found on EBay. The Zero, FW-190 & ME 109 are available for around $20 - $25, Free shipping in the USA as of this morning.
I know most folks here are into control line flying & I bet one of these little puppies would even make a good little control line plane for .020


Regards,
Tony

ElectricTony- Bronze Member

- Posts : 39
Join date : 2015-06-01
Age : 70
Location : Oakhurst, NJ
 Thanks Tony
ElectricTony wrote:Go for it. I've built 3 Cox Gravity Warbirds. The first was the Zero, I used the stock brushed motor, a spectrum 6100E receiver & 2x4g servos. It flies pretty well. All up weight is around 5.5 oz if I remember correctly. The second was the P-40 warhawk, same radio gear but I used an outrunner motor. It flies better due to the extra power & lighter weight, about 4.6oz.
The third is the P-47 Thunderbolt, for that I used the Motor, electronics & linear servos from an EFlite UMX Gee Bee ( I knew there was a Bee in there someplace). I made it full 4 channel. It flies the best & is the lightest at 3.3 ounces.
I didn't like the way I couldn't access the electronics once the planes were glued together so on the P-47 I cut the top of the fuse to make it removable the way parkzone does their UMX warbirds but used magnets instead of tape to secure it for flight.
Good luck & have fun, the Cox Gravity warbirds were great little planes & can still be found on EBay. The Zero, FW-190 & ME 109 are available for around $20 - $25, Free shipping in the USA as of this morning.
I know most folks here are into control line flying & I bet one of these little puppies would even make a good little control line plane for .020
Regards,
Tony
Thanks Tony for your inputs. I knew if I waited long enough, I started this thread in 2012, someone else would have some good information to add. Do you have any closeups of the magnet system you used to hold the fuselage halves together?
p.s. you notice my logo after my user name. I'm retired. That translates to no income, so I try to keep the cost to a bare minimum. Any money I do get I usually spend on my grandkids, not on my toys, I mean models.
Happydad I'm retired


happydad- Rest In Peace

- Posts : 1592
Join date : 2012-05-28
Age : 79
Location : Escondido, CA
 Re: "Cox Gravity Warbirds" F4-U Corsair RC upgrade thread
Greetings Happydad,
At 61, I'm not too far behind you although I can't retire yet... maybe in a few years
I just used small 1mm x 2mm Neodymium magnets. I think you can get 20 for about a buck on EBay.
I just put a few wherever I could & glued a wood tab up front just because.
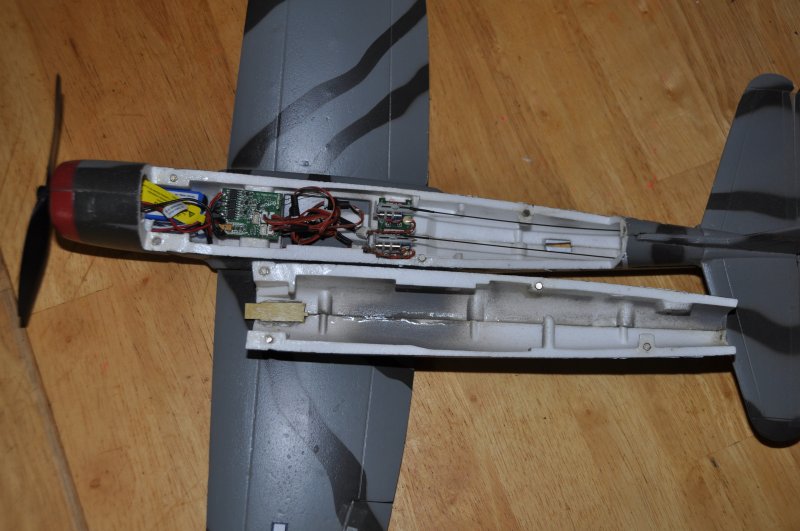

The best glue I found to use on the magnets is welders glue. The first glue I used was foam safe CA but the magnets kept coming loose.
Hope this helps.
Regards,
Tony
At 61, I'm not too far behind you although I can't retire yet...
I just used small 1mm x 2mm Neodymium magnets. I think you can get 20 for about a buck on EBay.
I just put a few wherever I could & glued a wood tab up front just because.


The best glue I found to use on the magnets is welders glue. The first glue I used was foam safe CA but the magnets kept coming loose.
Hope this helps.
Regards,
Tony

ElectricTony- Bronze Member

- Posts : 39
Join date : 2015-06-01
Age : 70
Location : Oakhurst, NJ
 what's that in your avatar
ElectricTony wrote:Greetings Happydad,
At 61, I'm not too far behind you although I can't retire yet...maybe in a few years

I just used small 1mm x 2mm Neodymium magnets. I think you can get 20 for about a buck on EBay.
I just put a few wherever I could & glued a wood tab up front just because.
The best glue I found to use on the magnets is welders glue. The first glue I used was foam safe CA but the magnets kept coming loose.
Hope this helps.
Regards,
Tony
Thanks for the pics. I'll look for some magnets on ebay. BTW what is the plane in your avatar ? it's either a little stick or a biplane I can't think the name of.
p.s. I was forced to retire early at 62 because of chronic back pain, but also to save 2 jobs of my friends. I retired and saved 2 jobs of other workers. Fair trade I thought. One's wife was having a baby and my wife was working so....
happydad I'm retired


happydad- Rest In Peace

- Posts : 1592
Join date : 2012-05-28
Age : 79
Location : Escondido, CA
 Re: "Cox Gravity Warbirds" F4-U Corsair RC upgrade thread
We have more in common than you think my friend. I just came off of temporary disability for back problems. So far epidurals have been working so I have been avoiding surgery. It is what it is & I understand your pain.
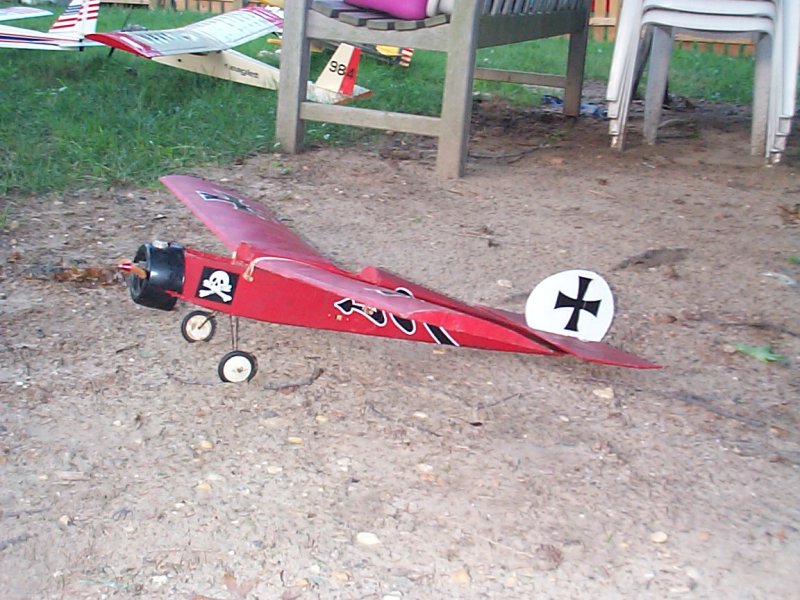
The plane in my Avatar is an old Cox Airtronics S-Tee that I modified a little to look like an Eindecker. The cowling was the bottom of a coke bottle back when they used to be on the "New" plastic bottles. It was Cox Golden Bee powered, 2 ch...just fly 'til the fuel runs out. It was part of my fleet from "Back in the day"
I still have it but I returned it to stock & recovered it. My neighbors are what I would call " Decibel Challenged" so it is now electric powered.

Regards,
Tony
The plane in my Avatar is an old Cox Airtronics S-Tee that I modified a little to look like an Eindecker. The cowling was the bottom of a coke bottle back when they used to be on the "New" plastic bottles. It was Cox Golden Bee powered, 2 ch...just fly 'til the fuel runs out. It was part of my fleet from "Back in the day"
I still have it but I returned it to stock & recovered it. My neighbors are what I would call " Decibel Challenged" so it is now electric powered.


Regards,
Tony

ElectricTony- Bronze Member

- Posts : 39
Join date : 2015-06-01
Age : 70
Location : Oakhurst, NJ
 what did you use to cut the fuselage horizontally??
ElectricTony wrote:We have more in common than you think my friend. I just came off of temporary disability for back problems. So far epidurals have been working so I have been avoiding surgery. It is what it is & I understand your pain.
The plane in my Avatar is an old Cox Airtronics S-Tee that I modified a little to look like an Eindecker. The cowling was the bottom of a coke bottle back when they used to be on the "New" plastic bottles. It was Cox Golden Bee powered, 2 ch...just fly 'til the fuel runs out. It was part of my fleet from "Back in the day"
I still have it but I returned it to stock & recovered it. My neighbors are what I would call " Decibel Challenged" so it is now electric powered.
Regards,
Tony
Nice group of planes there Tony. What did you use to cut the fuselage horizontally? It looks so even and smooth. Maybe a hotwire setup? My closest choice would be a sabre saw or a 7inch rotary saw. LOL

happydad I'm retired


happydad- Rest In Peace

- Posts : 1592
Join date : 2012-05-28
Age : 79
Location : Escondido, CA
 Re: "Cox Gravity Warbirds" F4-U Corsair RC upgrade thread
nnnoooooooooo its electric you've now killed us alll!!!!!! 


cox24711- Platinum Member

- Posts : 722
Join date : 2014-01-18
Age : 21
Location : Noosa Queensland Australia
 Re: "Cox Gravity Warbirds" F4-U Corsair RC upgrade thread
cox24711 wrote:nnnoooooooooo its electric you've now killed us alll!!!!!!
I dug out my old .051 Tee Dee & put a Tarno Carb on it. If I can get it to run reliably It may again someday be Cox powered.
One never knows!

ElectricTony- Bronze Member

- Posts : 39
Join date : 2015-06-01
Age : 70
Location : Oakhurst, NJ
 Re: "Cox Gravity Warbirds" F4-U Corsair RC upgrade thread
Happydad,
I just used a surgical scalpel with #11 blades & cut along existing panel lines that were already molded into the fuse.
I find scalpels sharper than xacto knives. I also find the flat handle easier to control & they don't roll away on you. Yet another item easily available & fairly inexpensive on EBay. I just did a quick search & found 100 blades & handle for $9...free shipping.
Regards,
Tony

ElectricTony- Bronze Member

- Posts : 39
Join date : 2015-06-01
Age : 70
Location : Oakhurst, NJ
 Re: "Cox Gravity Warbirds" F4-U Corsair RC upgrade thread
cool that would be quite fast!ElectricTony wrote:cox24711 wrote:nnnoooooooooo its electric you've now killed us alll!!!!!!
I dug out my old .051 Tee Dee & put a Tarno Carb on it. If I can get it to run reliably It may again someday be Cox powered.
One never knows!

cox24711- Platinum Member

- Posts : 722
Join date : 2014-01-18
Age : 21
Location : Noosa Queensland Australia
 Td .051 with Cox carburator
cox24711 wrote:cool that would be quite fast!ElectricTony wrote:cox24711 wrote:nnnoooooooooo its electric you've now killed us alll!!!!!!
I dug out my old .051 Tee Dee & put a Tarno Carb on it. If I can get it to run reliably It may again someday be Cox powered.
One never knows!
Tony: I sold my Cox RC carb last year for a pretty penny. coxengines.ca now carries new carbs or parts for less that I sold my 20 year old one for. I still have a Cox TD .051 and a Cox Medallion Ghost .051, (no groove on the piston). See my engine in the Gallery under engines - happydad it shows a picture of the medallion disassembled with a caliper on the piston head.
happydad I'm retired


happydad- Rest In Peace

- Posts : 1592
Join date : 2012-05-28
Age : 79
Location : Escondido, CA
 off to the upgrade
Well here we are again after a long layoff. Today I am showing the layout of the servos for rudder and elevator and the location of the on-off switch for power to charge the battery or turn on the radio. Also the location of the motor, ESC and receiver. I have highlighted the areas of importance like the (+) and (-) leads of the battery and the motor.
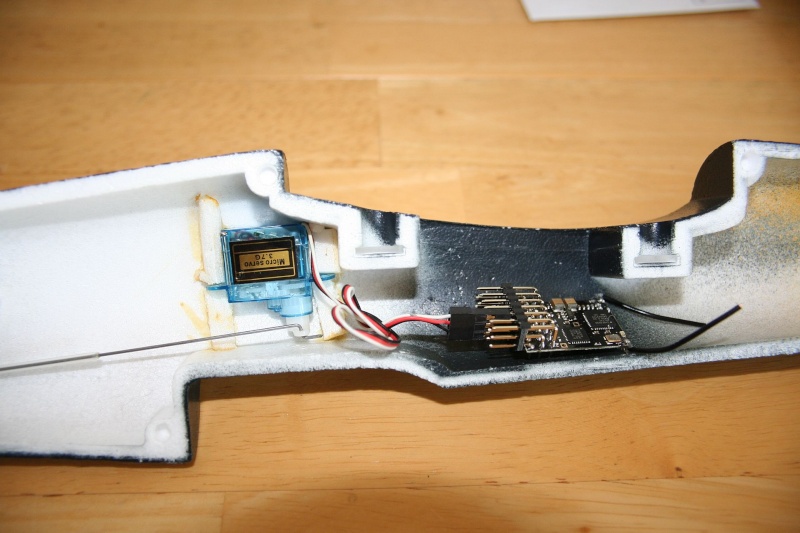
location of rudder servo and receiver in one half of fuselage
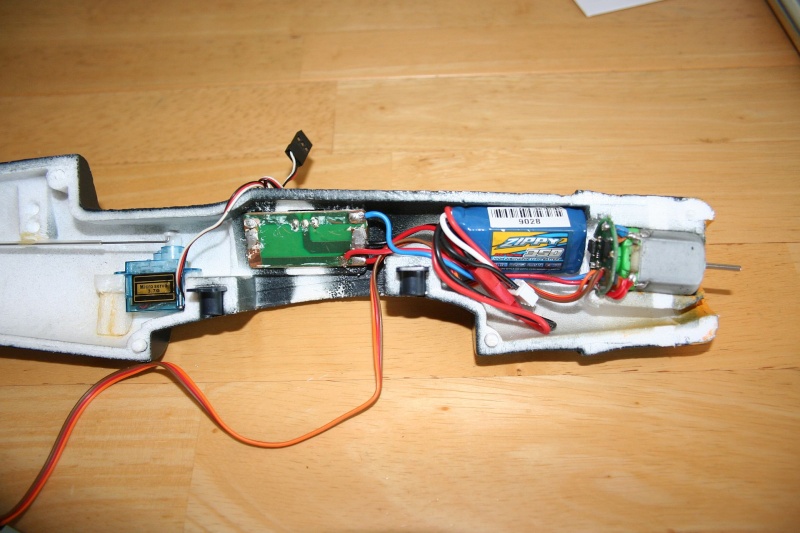
location of the elevator servo, power ON-OFF board, battery, ESC and motor wires
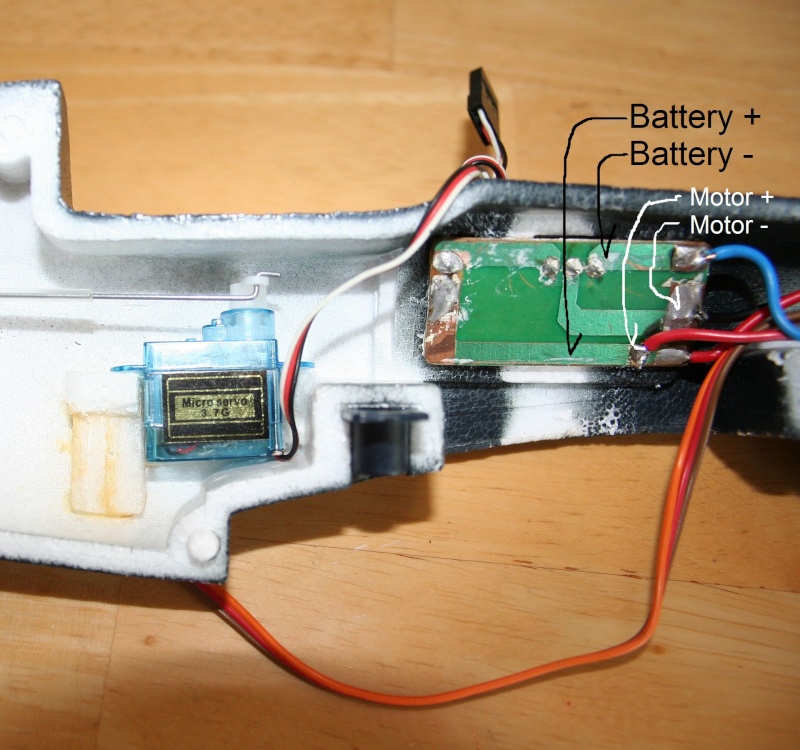
highlighted area of power board, battery, ESC and motor wires
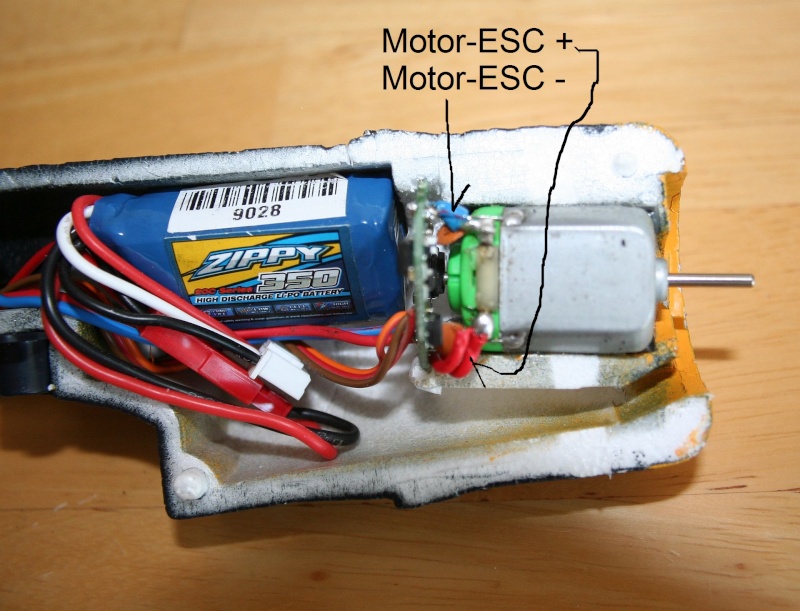
highlighted area of ESC and motor connection wires
that's it for today
happydad I'm retired


location of rudder servo and receiver in one half of fuselage

location of the elevator servo, power ON-OFF board, battery, ESC and motor wires

highlighted area of power board, battery, ESC and motor wires

highlighted area of ESC and motor connection wires
that's it for today
happydad I'm retired


Last edited by happydad on Sun Aug 23, 2015 7:26 pm; edited 1 time in total (Reason for editing : added material)

happydad- Rest In Peace

- Posts : 1592
Join date : 2012-05-28
Age : 79
Location : Escondido, CA
 well that almost it for today. Just a little more on the Spitfire
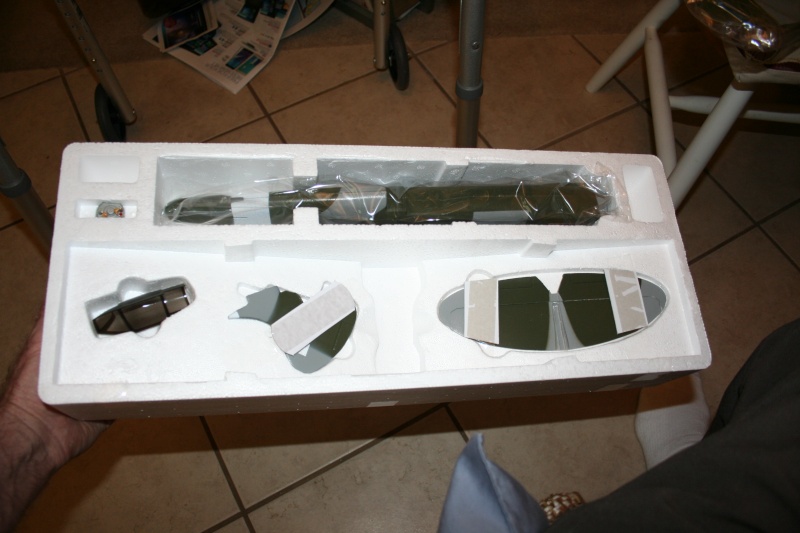
Here is a little on the Gravity (Cox) Spitfire as received. The Gravity kit has a few more pieces included like wire linkages for rudder and elevator servos.
Here are a couple of pictures of the as received kit.

open box
removing wing to see rudder and elevator
sorry I forgot to take a picture of the instructions, decals and servo linkages. manana
happydad I'm retired

 83deg. now in Escondido, CA
Here are a couple of pictures of the as received kit.

open box

removing wing to see rudder and elevator
sorry I forgot to take a picture of the instructions, decals and servo linkages. manana

happydad I'm retired


 83deg. now in Escondido, CA
happydad- Rest In Peace

- Posts : 1592
Join date : 2012-05-28
Age : 79
Location : Escondido, CA
 Re: "Cox Gravity Warbirds" F4-U Corsair RC upgrade thread
Make sure you position the receiver so you can always have access to the bind plug once everything is glued together. If you can't, then run a short servo extension. You never know when you'll need to get to it.
Regards,
Tony
Regards,
Tony

ElectricTony- Bronze Member

- Posts : 39
Join date : 2015-06-01
Age : 70
Location : Oakhurst, NJ
 Good suggestion
ElectricTony wrote:Make sure you position the receiver so you can always have access to the bind plug once everything is glued together. If you can't, then run a short servo extension. You never know when you'll need to get to it.
Regards,
Tony
Tony: that is the best suggestion ever. +1 for that idea.
Happydad I'm retired.


happydad- Rest In Peace

- Posts : 1592
Join date : 2012-05-28
Age : 79
Location : Escondido, CA
 Re: "Cox Gravity Warbirds" F4-U Corsair RC upgrade thread
First what is a bind plug ? /// and I was just thinking  I have old systems that have large batt. / servos /reciev. too heavy for small planes and if a person were going to purchase a complete (expensive) but reliable system with micro servo and all the goodies for later use in small 2-3 channel planes with Cox engines in them , what would you recommend ? Not to
  your build Larry , Looking good !1 getback
 I have old systems that have large batt. / servos /reciev. too heavy for small planes and if a person were going to purchase a complete (expensive) but reliable system with micro servo and all the goodies for later use in small 2-3 channel planes with Cox engines in them , what would you recommend ? Not to
  your build Larry , Looking good !1 getback

getback- Top Poster


Posts : 10442
Join date : 2013-01-18
Age : 67
Location : julian , NC
Page 1 of 2 • 1, 2 
 Similar topics
» for sale as seen on Ebay Gravity (formerly Cox) Warbirds
» For sale on ebay again Cox Gravity iPhox Warbirds
» Follow The World's Smallest Traveling Engine!
» CG Centre of Gravity
» adjustable centre of gravity
» For sale on ebay again Cox Gravity iPhox Warbirds
» Follow The World's Smallest Traveling Engine!
» CG Centre of Gravity
» adjustable centre of gravity
Page 1 of 2
Permissions in this forum:
You cannot reply to topics in this forum

 Rules
Rules


