Log in
Search
Latest topics
» Roger Harris revisitedby rsv1cox Today at 10:46 am
» Duende V model from RC Model magazine 1983.
by MauricioB Today at 10:29 am
» A Little 400 Mile Hop for Some Memory Lane Stuff, and to Hit a Swap Meet.
by getback Today at 7:48 am
» Free Flight Radio Assist
by getback Today at 6:39 am
» Happy 77th birthday Andrew!
by Kim Yesterday at 9:18 am
» Promote the forum with flyers!
by Admin Yesterday at 1:35 am
» Engine choice
by GallopingGhostler Mon Nov 25, 2024 4:03 pm
» My N-1R build log
by roddie Mon Nov 25, 2024 9:19 am
» Night flying at Walters RC park
by 1975 control line guy Sun Nov 24, 2024 7:29 pm
» Cox films/videos...
by GallopingGhostler Sun Nov 24, 2024 7:07 pm
» Cox 020 PeeWee rebuild questions
by LooseSpinner99 Sun Nov 24, 2024 6:13 pm
» Did you spot the Cox engine in this NASA research video?
by balogh Sun Nov 24, 2024 5:08 pm
Cox Engine of The Month
Breaking the seal on a Scientific Kingpin
Page 2 of 2
Page 2 of 2 •  1, 2
1, 2
 Re: Breaking the seal on a Scientific Kingpin
Thanks, Eddie for the inputs and your experiences with the KP. I thought it interesting that the KP of the 1950's, Scientific ads in magazines don't state wingspan, only it had 50 sq. inches wing area. Yet Bob's box states 62 sq. inches. This may account for Jim's recollection of 14 inch wingspan, so may be Walt Musciano redesigned it a touch, or Scientific's design staff made some changes for better "kit-ability"?
I was thinking that if the design was upscaled to say a 100 sq. in. wing area, then it might be suitable for a Babe Bee, which would also help to resolve the nose heaviness. Upping it to 140 - 150 sq. inches, then perhaps a hot Medallion or a Tee Dee .049 would power it.
Anyway, just some back of the envelop thoughts. As a recall, think Walt had the larger King Pin for .35 engine. I don't know if anyone kits that these days.

GallopingGhostler- Top Poster


Posts : 5735
Join date : 2013-07-13
Age : 70
Location : Clovis NM or NFL KC Chiefs
 Re: Breaking the seal on a Scientific Kingpin
Wow. Very neat little plane. After looking at the pictures had me wondering about fuselage strength. Seeing as it is a built up wing, I do understand the fuselage being in 2 pieces, presumably to make it easy to install the wing, followed by gluing in/on teh lower fuselage below the wing to complete it. Now I wonder if this would be a future 'weak spot'? Or is there a doubler of some sort on either side to hide the 'joint'?

NEW222- Top Poster

- Posts : 3896
Join date : 2011-08-13
Age : 46
Location : oakbank, mb
 Re: Breaking the seal on a Scientific Kingpin
The lower section that is glued in later is known as the belly pan. It is a weak spot. Not so much on small 1/2A's , practically all large stunters use the same method. In order to combat any cracking issues, 1/32" ply tabs are installed. The tabs are usually about 1" long and extend into the opening to receive the belly pan. This is then followed with a strip of lightweight glass over the joints. Failure to do so even using silkspan over the joints will yield cracks due to wing flexing and vibration. This leads to oil migration and failure. This area typically sees a lot of residual oil and really needs the most attention next to the nose. Mostly because of oil that finds itself onto the wing root runs off the leading edge and trailing edge.

Ken Cook- Top Poster

- Posts : 5644
Join date : 2012-03-27
Location : pennsylvania
 Re: Breaking the seal on a Scientific Kingpin
Miffed fellow never did get back to me on the open box Kingpin so I'm just letting it die. However he does have a couple of interesting vintage kits.
https://www.ebay.com/itm/305080153932?hash=item470831b74c:g:K9MAAOSwU7xk4NK4
I always wanted one of these but hate seeing a Jet with a prop sticking out of it's nose. However I do have a Jetex engine...................
Anyone buying one of his auctions, I would not recommend mentioning my name.
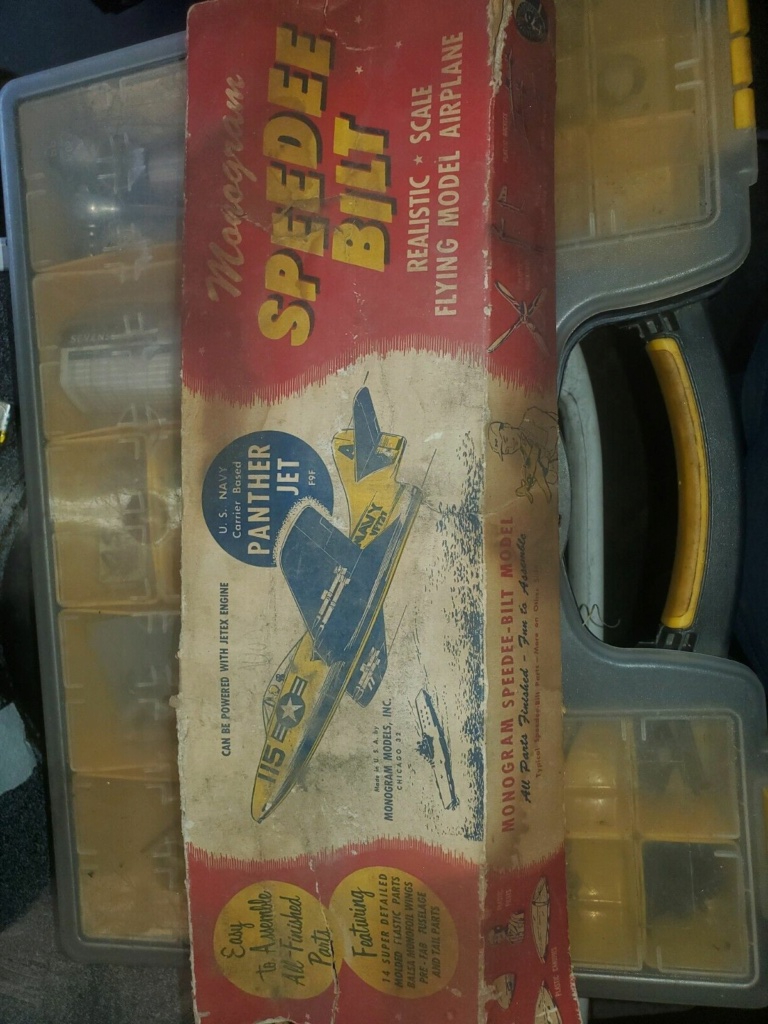
Jet (F-100) Scientific kit much modified with a propeller sticking out of it's nose.

https://www.ebay.com/itm/305080153932?hash=item470831b74c:g:K9MAAOSwU7xk4NK4
I always wanted one of these but hate seeing a Jet with a prop sticking out of it's nose. However I do have a Jetex engine...................
Anyone buying one of his auctions, I would not recommend mentioning my name.

Jet (F-100) Scientific kit much modified with a propeller sticking out of it's nose.


rsv1cox- Top Poster


Posts : 11260
Join date : 2014-08-18
Location : West Virginia
 Re: Breaking the seal on a Scientific Kingpin
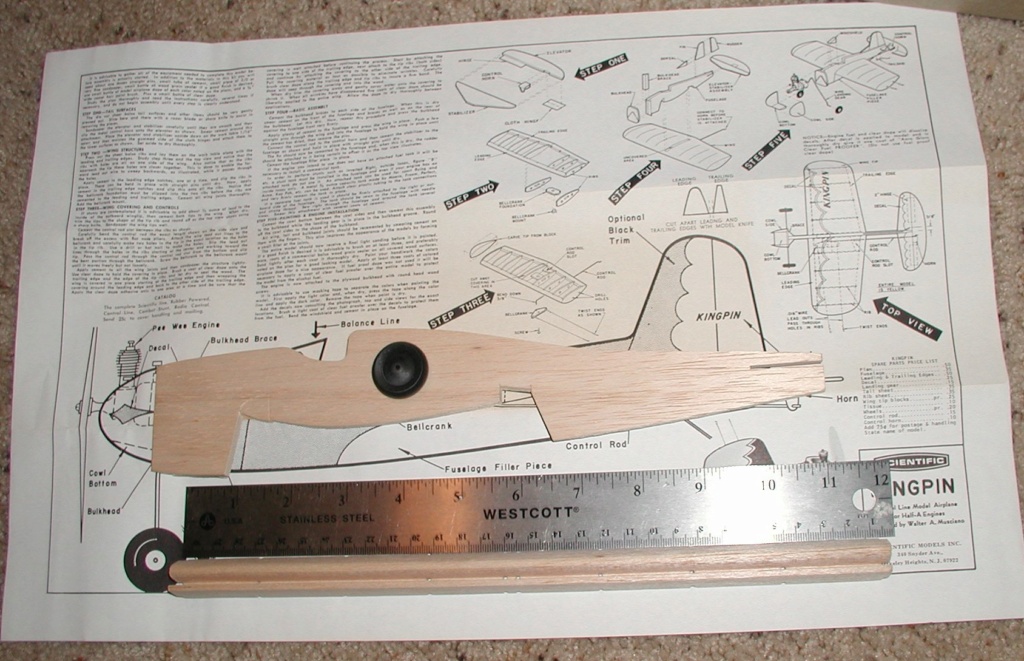
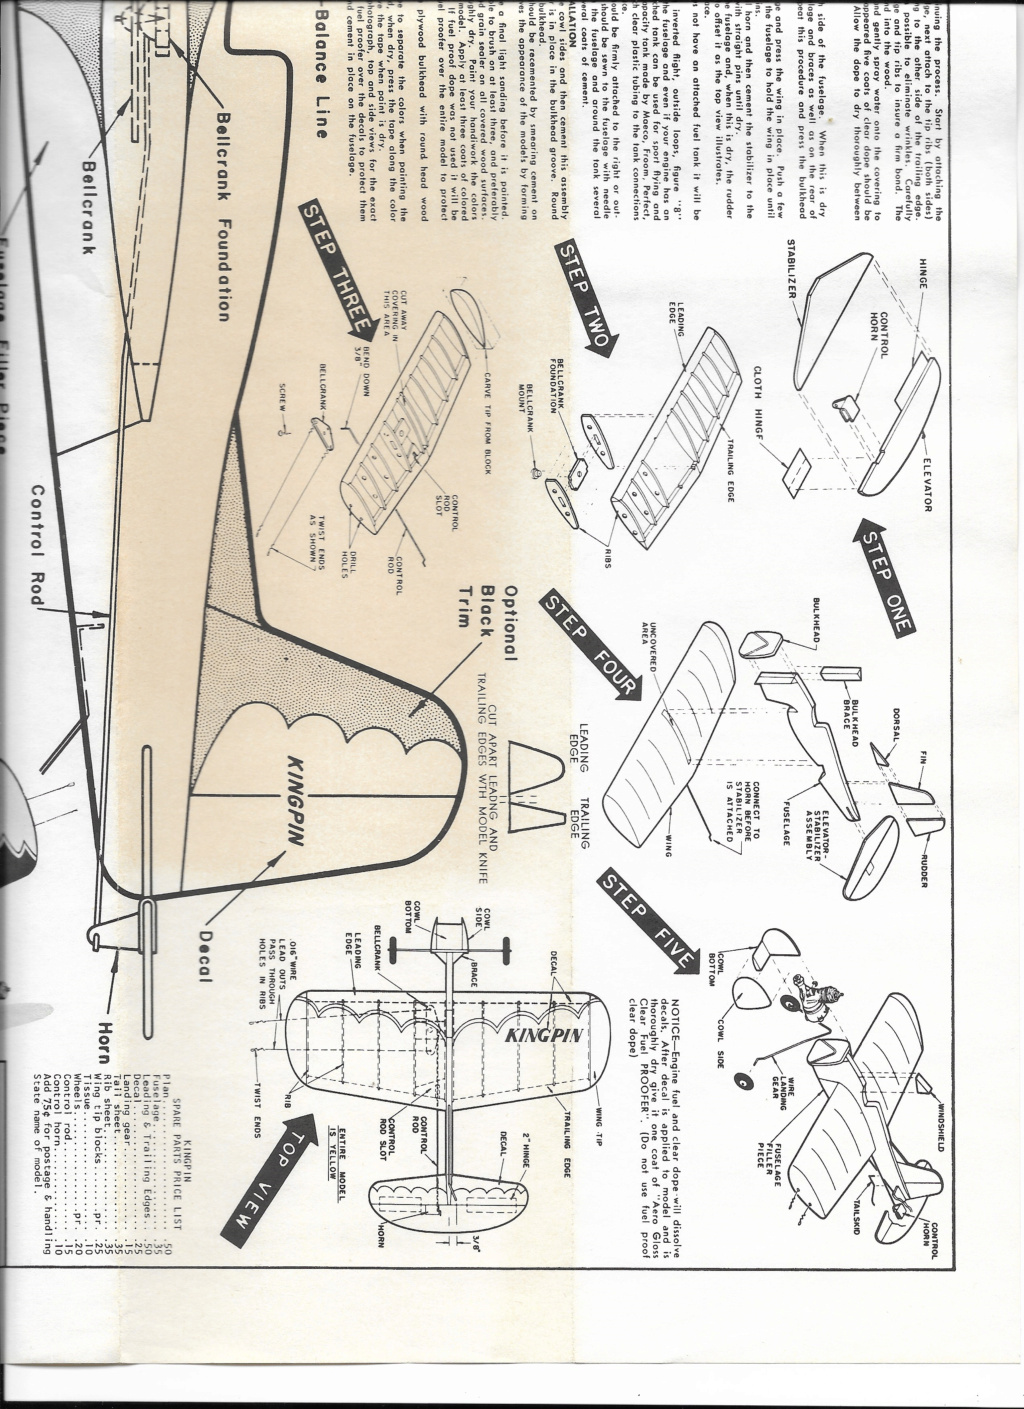
A few days ago Jim PM'd me with a request to send him the Kingpins plans which he would copy and return to me. To save him the trouble I would just have Staples copy locally and send him the copy. Trouble is Staples is a fifty mile round-trip away and I don't get there often. Can anyone help him out sooner?
In the interum I sent him these with my regrets.

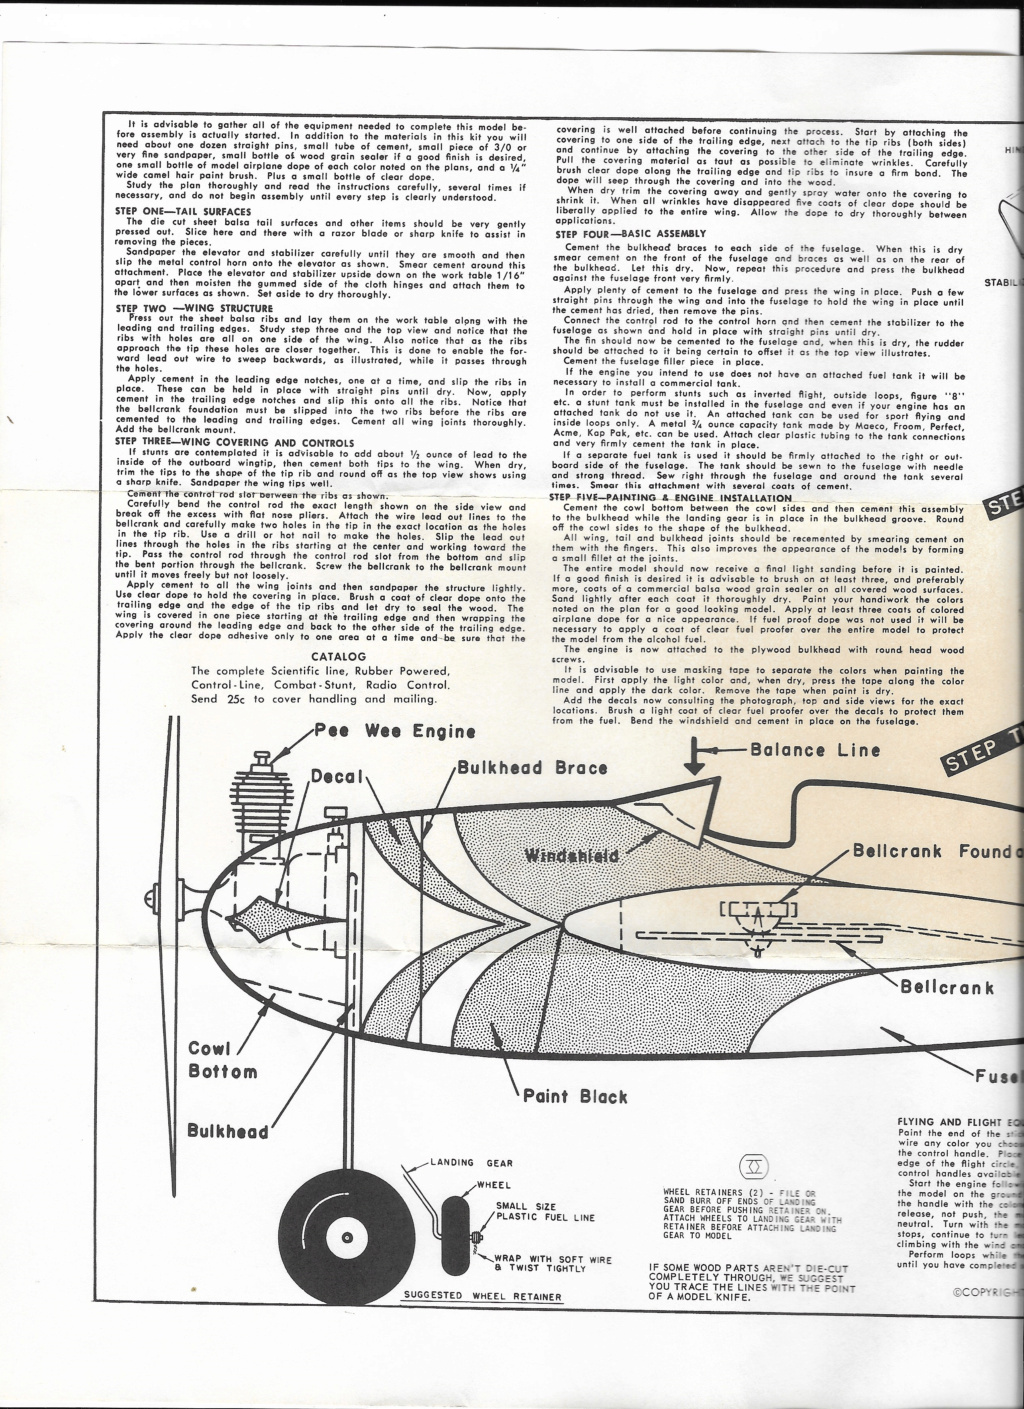
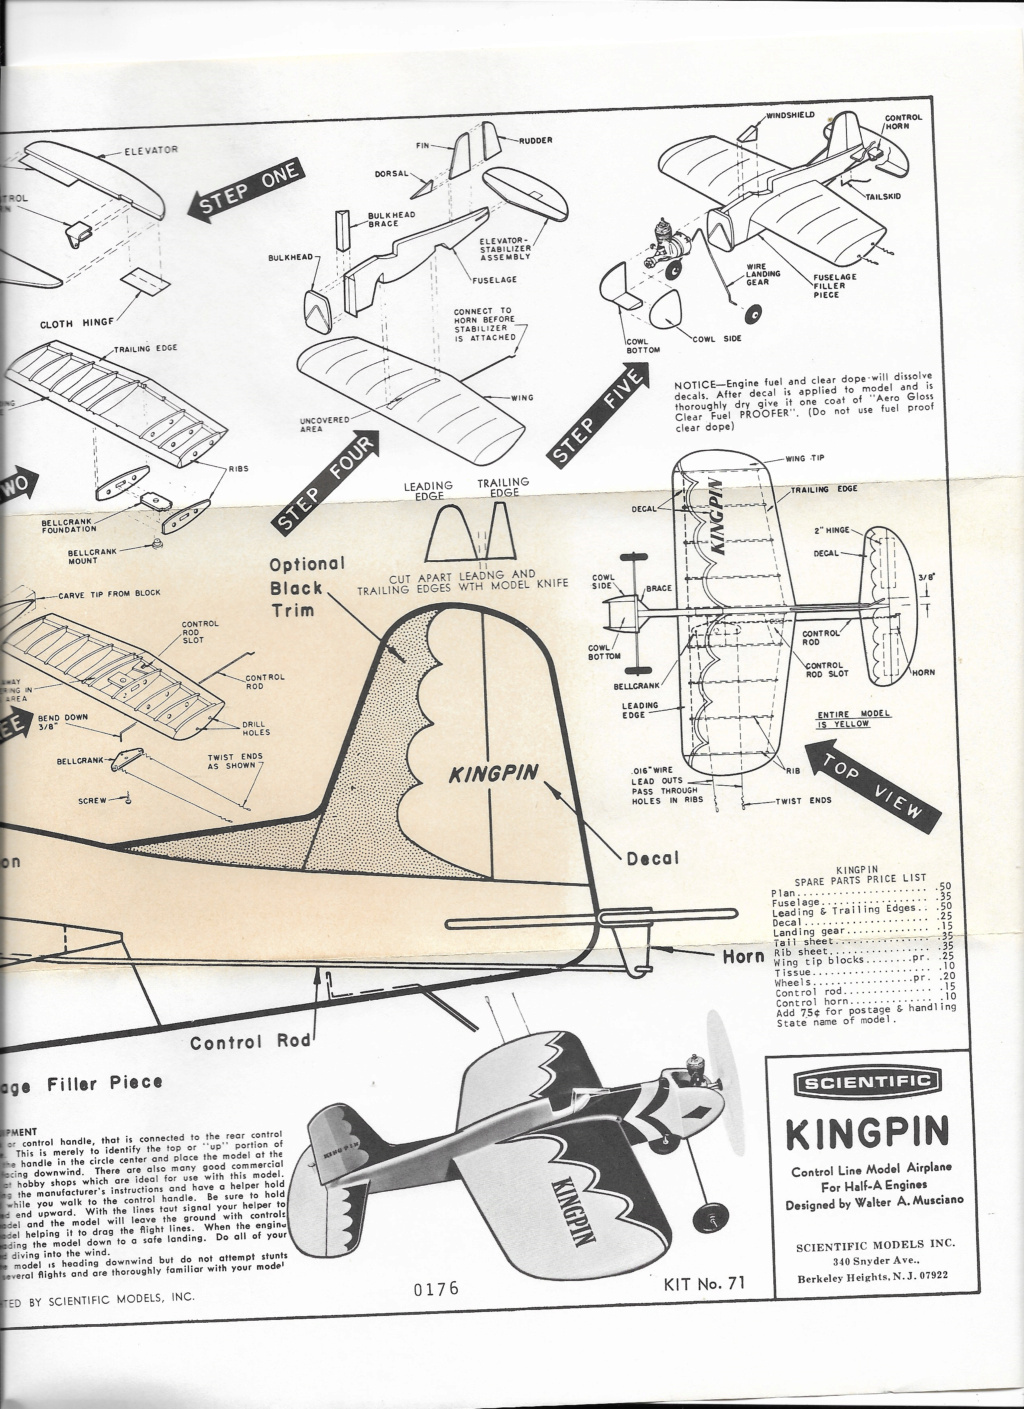
In the interum I sent him these with my regrets.


rsv1cox- Top Poster


Posts : 11260
Join date : 2014-08-18
Location : West Virginia
 Re: Breaking the seal on a Scientific Kingpin
I'm jonesing for a backyard flier now that I have the wireless stooge. I don't know how the dog will behave...but I bet my wife will appreciate the new "near-by field!"
I'm backyard limited to just about 20 foot lines. Time to verify before I build for this unique purpose. I sure like the "step out and fly" angle.
I'm backyard limited to just about 20 foot lines. Time to verify before I build for this unique purpose. I sure like the "step out and fly" angle.
_________________
Never enough time to build them all...always enough time to smash them all!
944_Jim- Diamond Member


Posts : 2023
Join date : 2017-02-08
Age : 59
Location : NE MS
 Re: Breaking the seal on a Scientific Kingpin
Jim, this link is to an RCG post by Kim that includes a pretty good copy of the plan.
https://www.rcgroups.com/forums/showthread.php?3612879-A-little-flight-time-on-a-Scientific-Models-Kingpin
https://www.rcgroups.com/forums/showthread.php?3612879-A-little-flight-time-on-a-Scientific-Models-Kingpin

duaneh- Gold Member

- Posts : 227
Join date : 2019-04-06
 Re: Breaking the seal on a Scientific Kingpin
Good find, Duane,
Time to drag it into Acrobat.
Thanks a bunch!
Time to drag it into Acrobat.
Thanks a bunch!
_________________
Never enough time to build them all...always enough time to smash them all!

944_Jim- Diamond Member


Posts : 2023
Join date : 2017-02-08
Age : 59
Location : NE MS
 Re: Breaking the seal on a Scientific Kingpin
Latest update...I "printed" the jpg (at the RCG link) to my PC printer known as "Microsoft Print to PDF" to successfully change the JPG to PDF. Then I did some scaling changes.
Bob,
Could you confirm a few things please?
IF I have the scaling right, my converted plan shows a one inch wheel, and a four and one quarter inch chord on the root rib.
I'll check against my Pee Wee once I get my hands on it, but I think a quick wheel measurement would confirm the copy.
Thanks for your help.
_________________
Never enough time to build them all...always enough time to smash them all!

944_Jim- Diamond Member


Posts : 2023
Join date : 2017-02-08
Age : 59
Location : NE MS
 Re: Breaking the seal on a Scientific Kingpin
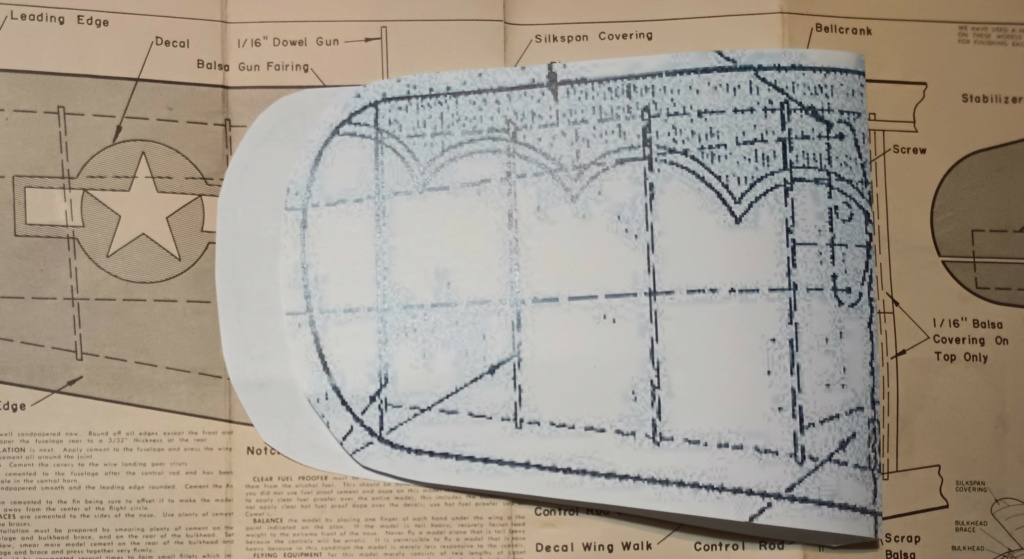
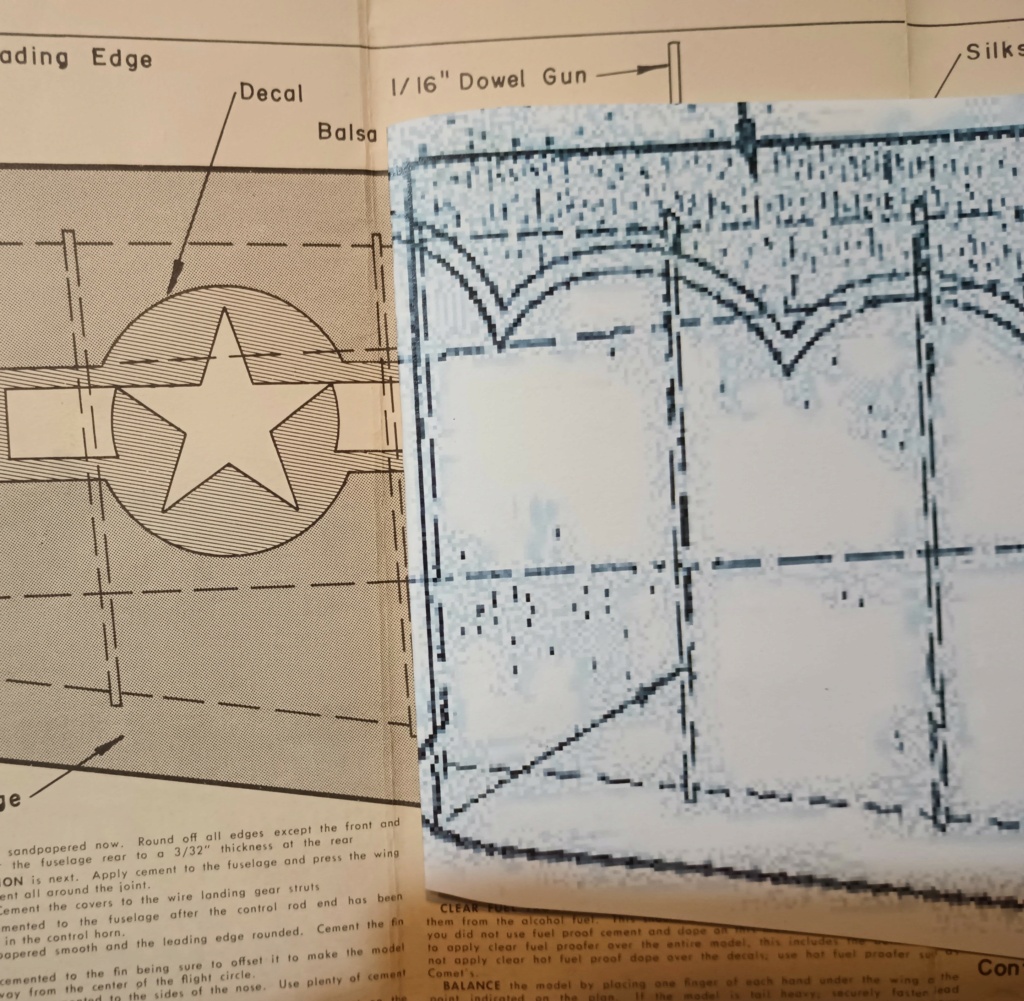
With DuaneH's help I've got the fast track on information. I used his sidebar-provided info and an exploded top view to speed up reverse engineering this one.
I believe Scientific used the same rib profiles as on the bigger P-63 King Cobra. A comparison between wing cutouts shows rib length and height pretty much the same. Wing plan form shows the Kingpin will work with the inner 5 ribs (per side) from the King Cobra.
I checked my wood stock. I have the wood to do this. I have lots of spare hardware in this size, to include Roddie wooden wheels!


_________________
Never enough time to build them all...always enough time to smash them all!

944_Jim- Diamond Member


Posts : 2023
Join date : 2017-02-08
Age : 59
Location : NE MS
 Re: Breaking the seal on a Scientific Kingpin
944_Jim wrote:Latest update...I "printed" the jpg (at the RCG link) to my PC printer known as "Microsoft Print to PDF" to successfully change the JPG to PDF. Then I did some scaling changes.
Bob,
Could you confirm a few things please?
IF I have the scaling right, my converted plan shows a one inch wheel, and a four and one quarter inch chord on the root rib.
I'll check against my Pee Wee once I get my hands on it, but I think a quick wheel measurement would confirm the copy.
Thanks for your help.
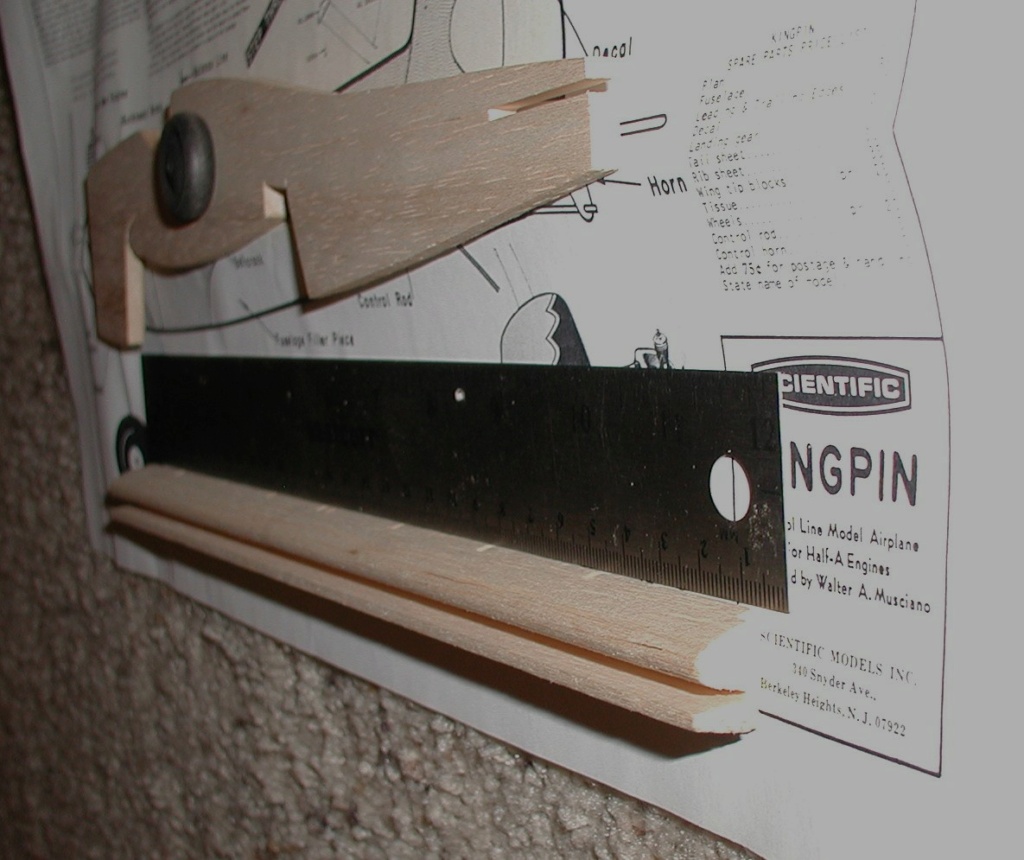
Hi Jim, the wheels measure 1", I couldn't check the Chord accurartely. I thought it neat where Scientific milled the leading and trailing wing parts together.
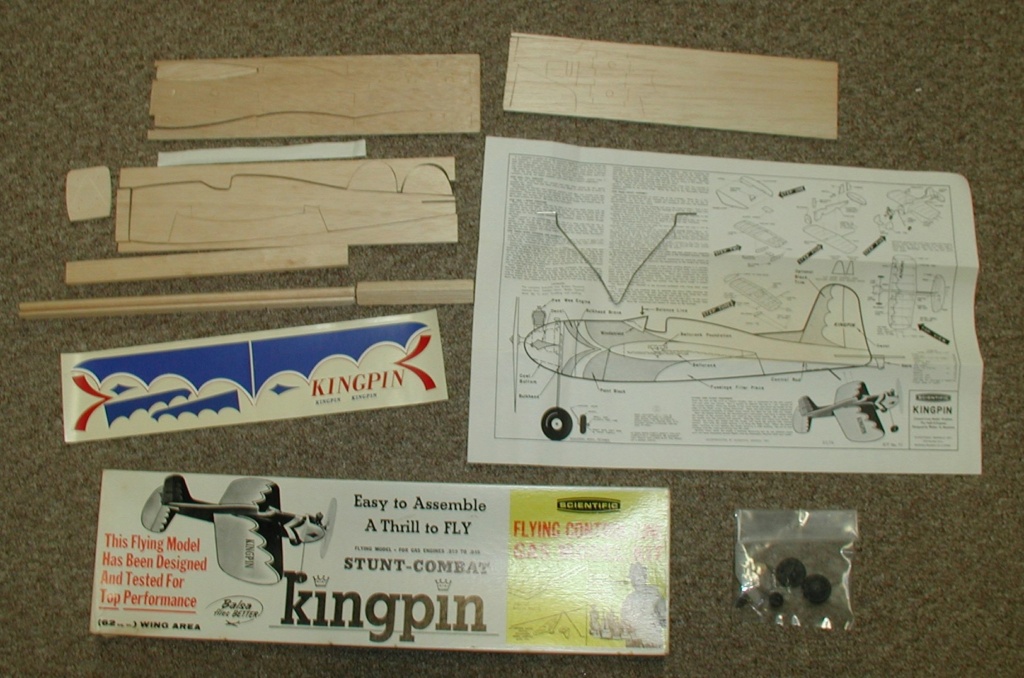
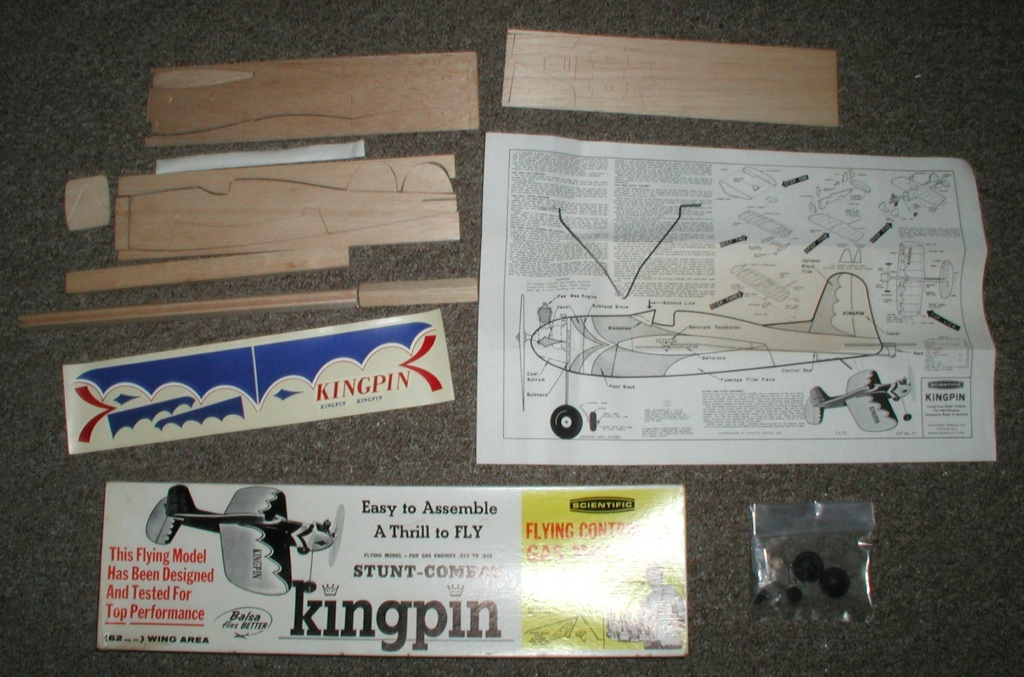

Godd luck with your build, I'm looking forward to reading about it.

rsv1cox- Top Poster


Posts : 11260
Join date : 2014-08-18
Location : West Virginia
 Re: Breaking the seal on a Scientific Kingpin
Hi Bob,
Welcome back "from hibernation!"
I originally did my scaling based on a 1" wheel. Then Duane indicated his work provided a 1.25" wheel. My later effort was done using this as my scale.
Could I trouble you to measure the length of the TE/LE stick and the length of your longest rib? This is so I know provided woods for a more accurate scale. Wheels could be just about whatever Scientific had on hand.
Even the side view of the plansheet may have a scaled image, so addition information that nails down measurements would be to place a wheel and the fuselage on top of the plan. If the woods and hard parts match the sideview sizes, then I can re-work the side view to "full-size OEM parts."
All of the Scientifics I've held had the same type LE/TE millwork. While the rib slotting works just fine for "Hershey bar" wings, that distance between ribs on the TE creates a funny distortion with rib placement on tapered wings. It demands that the first/root rib to either side of center to be positioned first (at right angles to the LE in this instance). Then the subsequent ribs start angling away from straight fore/aft. Dave Cowell of DPC-Models used to re-do plansheets and wing top views to reflect rib slot placement on his furnished (but square/rectangle) TE/LE stock. I appreciate the effort, but I think a seasoned builder can make the same determinations on a straight-up copy of the overhead views. It is only an appearance thing on a model of this scale regardless of OEM or cottage industry kit.
Thanks for playing along!
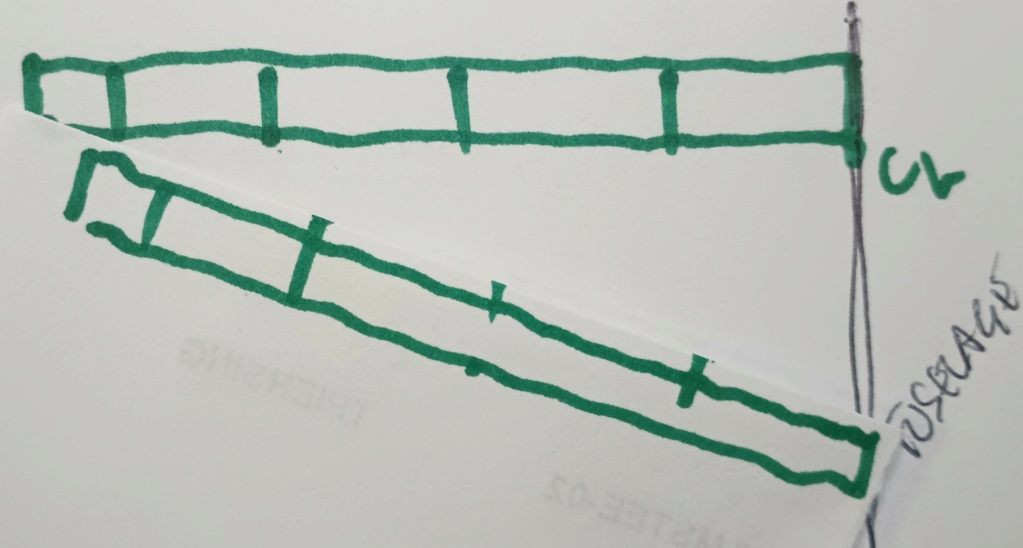


Last edited by 944_Jim on Mon Jan 15, 2024 10:27 am; edited 2 times in total (Reason for editing : Fix images)
_________________
Never enough time to build them all...always enough time to smash them all!

944_Jim- Diamond Member


Posts : 2023
Join date : 2017-02-08
Age : 59
Location : NE MS

rsv1cox- Top Poster


Posts : 11260
Join date : 2014-08-18
Location : West Virginia
 Re: Breaking the seal on a Scientific Kingpin
Thanks, Bob,
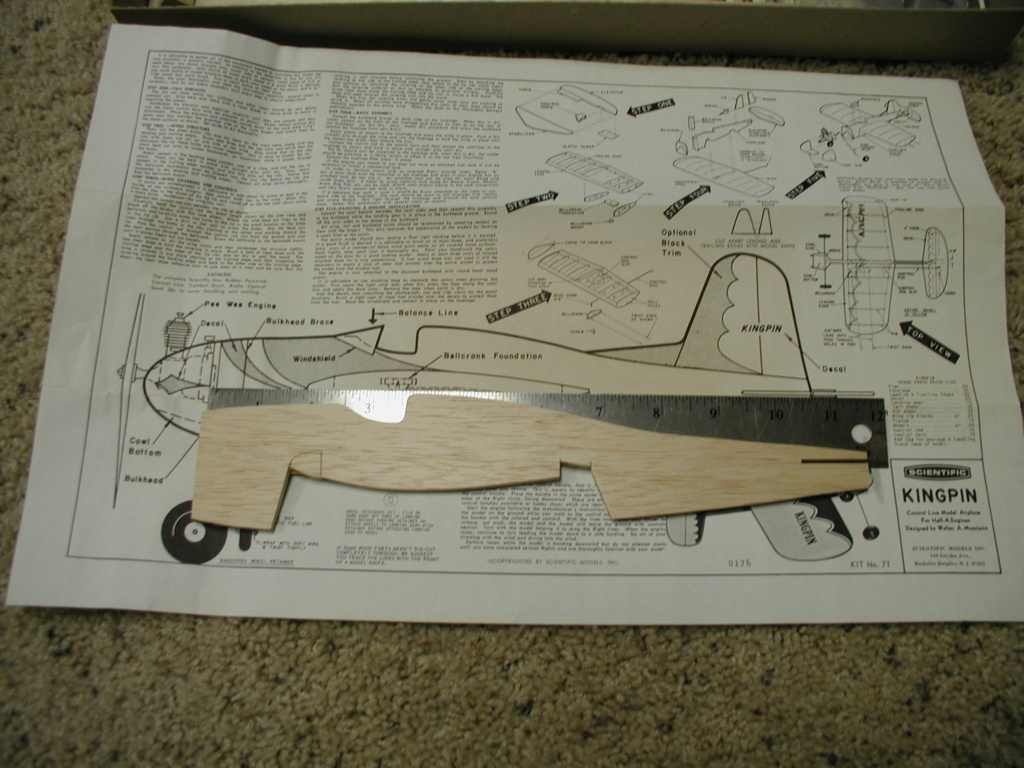
The LE/TE is 12 inches...I'll keep the photos nearby while I re-check some scaling.
Evidently the kit fuselage is a bit longer than on the plan. Hmmm.
The LE/TE is 12 inches...I'll keep the photos nearby while I re-check some scaling.
Evidently the kit fuselage is a bit longer than on the plan. Hmmm.
_________________
Never enough time to build them all...always enough time to smash them all!

944_Jim- Diamond Member


Posts : 2023
Join date : 2017-02-08
Age : 59
Location : NE MS

rsv1cox- Top Poster


Posts : 11260
Join date : 2014-08-18
Location : West Virginia
 Re: Breaking the seal on a Scientific Kingpin
The printed sheets that come with the Scientific planes are not plans, they are assembly instructions. They are made to fit a certain size sheet of paper.
Mike1484
Mike1484

Mike1484- Gold Member

- Posts : 303
Join date : 2011-10-28
Age : 76
Location : Northern Ohio
 Re: Breaking the seal on a Scientific Kingpin
Mike1484 wrote:The printed sheets that come with the Scientific planes are not plans, they are assembly instructions. They are made to fit a certain size sheet of paper.
Mike1484
Yes, very similiar though in the cutouts but they sure squished that tail end in.

rsv1cox- Top Poster


Posts : 11260
Join date : 2014-08-18
Location : West Virginia
 Re: Breaking the seal on a Scientific Kingpin
Mike1484 wrote:The printed sheets that come with the Scientific planes are not plans, they are assembly instructions. They are made to fit a certain size sheet of paper.
Mike1484
That is correct, and common for kits of the period. However, my experience has been the smaller kits are usually 1 for 1 on the side view, and the top view is represented at 1/4 scale. The hand-written note on the "published" plan suggests 1/5 scale.
This is the first one I see the fuselage won't fit over the side view.
I know I said I'm done scaling, Bob. But if you want to see if the side view has been squished in one dimension only, this is simply a matter of taking measurements in a few key/representative positions. I would recommend from the back of the root rib to the tip of tail, one from the LE forward edge to the glue joint for the firewall, one vertical one from headrest top to fuselage bottom, and last one would be rudder height. All ratios should be the same...any difference in ratios would be a clear tell that the side view does not model the parts. I suspect the sideview is 95% of the full-size balsa.
At this point, I'm going with "close-enough." My top view is scaled to the side view, which is scaled for using the King Cobra ribs...which happen to be the same as the Super Mustang. I have a complete Super Mustang, so this gives me ready-made rib templates. I used the King Cobra only because it was on top of "the stack," while the Super Mustang is closer to the bottom. Both KC and SM were evaluated for similarities against each other an while back.
Last edited by 944_Jim on Tue Jan 16, 2024 10:44 am; edited 1 time in total
_________________
Never enough time to build them all...always enough time to smash them all!

944_Jim- Diamond Member


Posts : 2023
Join date : 2017-02-08
Age : 59
Location : NE MS

getback- Top Poster


Posts : 10448
Join date : 2013-01-18
Age : 67
Location : julian , NC
 Re: Breaking the seal on a Scientific Kingpin
I was surprised that the balsa fuselage fit as well as it did over the plans, err assembly instructions. The cutouts were near perfect only the length was wrong. Close enough for Jim's requirements.
At this point, I'm going with "close-enough." I like the sound of that Jim.
And, Mike is correct, they are more Assembly Instructions than plans.
At this point, I'm going with "close-enough." I like the sound of that Jim.
And, Mike is correct, they are more Assembly Instructions than plans.

rsv1cox- Top Poster


Posts : 11260
Join date : 2014-08-18
Location : West Virginia
 Re: Breaking the seal on a Scientific Kingpin
Close enough is just fine for our control line models. I don't think I have ever built a kit that I didn't change or modify something. This cold weather is a good time to get our building done and fixing our models for this spring and summer flying.
Mike1484
Mike1484

Mike1484- Gold Member

- Posts : 303
Join date : 2011-10-28
Age : 76
Location : Northern Ohio
 Remains of my Vintage 1962-1965 Kingpin
There has been discussion of the span and the trailing edge on the Kingpin. This is the remains of my Kingpin circa 1962-1965. It was in the house I grew up in until around 2015. Then it came to my house from what was my parents and my home as I was growing up.
This was built from an original kit that was purchased in Halifax, Nova Scotia. So some hobby shops in Canada did get Scientific kits in stock.
Note the span. It is about 6.25 inches from the fuselage side to the wingtip on both sides. That gives a 12-3/4 to 12-7/8" span. That depends on how you shaped and sanded the wing tip blocks. The fuselage side is 10-3/4" from the back of the firewall to the tip above the horizontal tail. I don't know how that matches the assembly instructions. If anyone needs further dimensions just post your request here.
The wing has the large leading edge with notches to align the ribs, The trailing edge is similarly notched.
The original decals are black, not blue as in some other kits. The scallops do not line up with the ribs. The horizontal tail has a similar scallop decal. The wing decals have a thin line about 3/16" away from the main body of the decal. This is similar to the illustration on the assembly drawing.
The control horn was shaped metal. The hinge was tape similar to medical adhesive tape of that vintage.
The model broke in 2 and you can see the attempt at fibreglass reinforcement on the fuselage. Of course that made it even more tail heavy. The nose is missing the firewall and side cheeks.
I am surprised that it still exists some 60 years after being purchased.
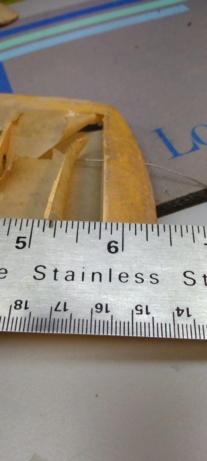
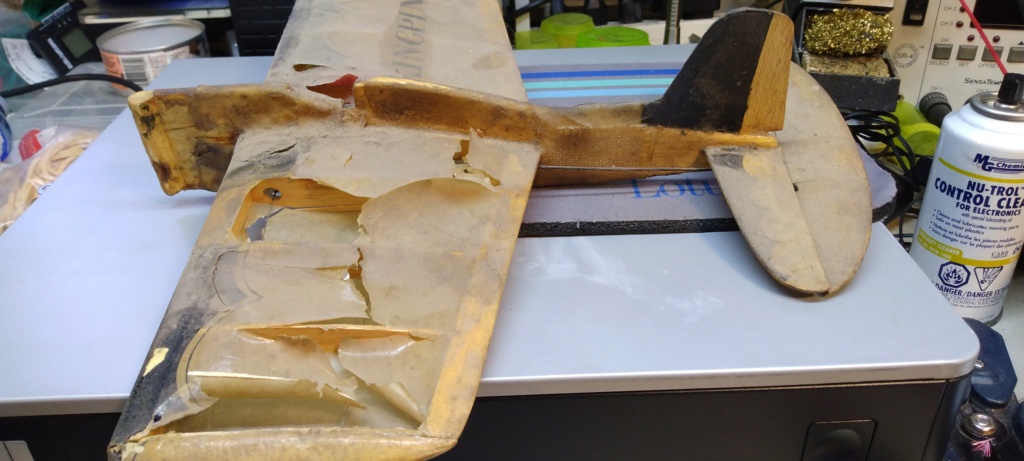


SABOO- Moderate Poster

- Posts : 10
Join date : 2019-10-03
Location : HALIFAX NS
 Re: Breaking the seal on a Scientific Kingpin
That is a well preserved Kingpin Jr., @SABOO .  It would be fairly easy to clean up, replace the old silkspan with new covering.
I did that when I was younger, didn't have much love for silkspan due to its ease in tearing, especially handling in grass. Did my share of patch and repair to include hangar rash, and wholesale replacement, too.
Found later that when you could still easily get silk (still available, but have to know where to shop from fabric suppliers), K&S comes to mind, finish was lighter and sturdy especially if left in clear dope with some trim color to accent it.
The slight reduction in weight benefitted my Sterling 36-in. Minnie Mambo single channel R/C. Keeping it light with Silk, rest in lighter Solar-Film transparent yellow, it was one of the best R/C fliers, especially with auxiliary throttle using a then new, Cox .049 R/C Bee. Extended tank gave about 4 minute flights, it would loop like crazy after a couple spirals down.
Back to your plane, it is definitely restorable to its former glory.
 It would be fairly easy to clean up, replace the old silkspan with new covering.
I did that when I was younger, didn't have much love for silkspan due to its ease in tearing, especially handling in grass. Did my share of patch and repair to include hangar rash, and wholesale replacement, too.
Found later that when you could still easily get silk (still available, but have to know where to shop from fabric suppliers), K&S comes to mind, finish was lighter and sturdy especially if left in clear dope with some trim color to accent it.
The slight reduction in weight benefitted my Sterling 36-in. Minnie Mambo single channel R/C. Keeping it light with Silk, rest in lighter Solar-Film transparent yellow, it was one of the best R/C fliers, especially with auxiliary throttle using a then new, Cox .049 R/C Bee. Extended tank gave about 4 minute flights, it would loop like crazy after a couple spirals down.
Back to your plane, it is definitely restorable to its former glory.

GallopingGhostler- Top Poster


Posts : 5735
Join date : 2013-07-13
Age : 70
Location : Clovis NM or NFL KC Chiefs
Page 2 of 2 •  1, 2
1, 2
 Similar topics
» Gifted Scientific "Kingpin" gets a Re-Fit
» Front Yard Flying with the Scientific "Kingpin"
» Kingpin, I said I wasn't going to build it...
» Why Seal Bee Tanks?
» Cox .049 boat cooling upgrades
» Front Yard Flying with the Scientific "Kingpin"
» Kingpin, I said I wasn't going to build it...
» Why Seal Bee Tanks?
» Cox .049 boat cooling upgrades
Page 2 of 2
Permissions in this forum:
You cannot reply to topics in this forum

 Rules
Rules


