Log in
Search
Latest topics
» Roger Harris revisitedby TD ABUSER Today at 2:13 pm
» Tee Dee .020 combat model
by Ken Cook Today at 1:41 pm
» Retail price mark-up.. how much is enough?
by Ken Cook Today at 1:37 pm
» Happy 77th birthday Andrew!
by getback Today at 11:52 am
» My latest doodle...
by roddie Today at 10:43 am
» My N-1R build log
by GallopingGhostler Yesterday at 3:04 pm
» Chocolate chip cookie dough.........
by roddie Yesterday at 1:13 pm
» Purchased the last of any bult engines from Ken Enya
by sosam117 Yesterday at 11:32 am
» Free Flight Radio Assist
by rdw777 Yesterday at 9:24 am
» Funny what you find when you go looking
by rsv1cox Wed Nov 20, 2024 3:21 pm
» Landing-gear tips
by 1975 control line guy Wed Nov 20, 2024 8:17 am
» Cox NaBOO - Just in time for Halloween
by rsv1cox Tue Nov 19, 2024 6:35 pm
Cox Engine of The Month
Guillow's P40 Warhawk build, photos of the finished model
Page 1 of 5
Page 1 of 5 • 1, 2, 3, 4, 5 
 Guillow's P40 Warhawk build, photos of the finished model
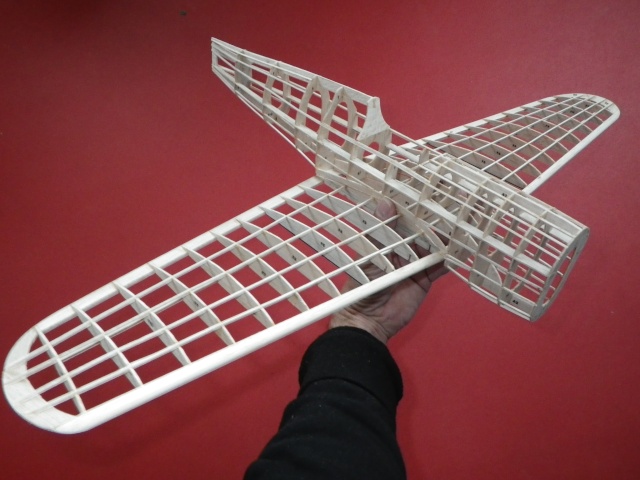
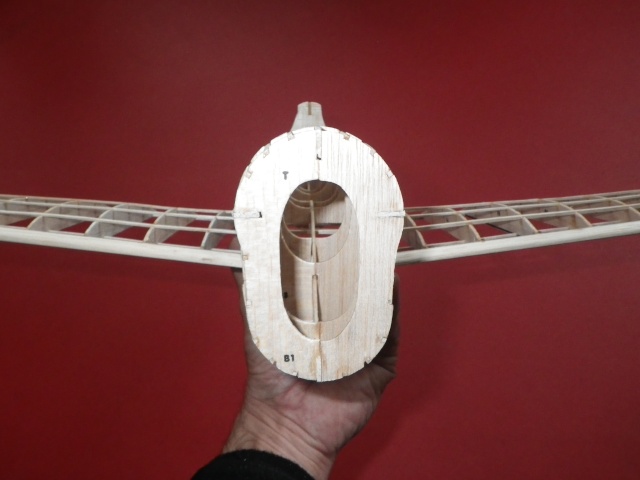
I started the construction of the P40 Warhawk kit I got last year. It's a die cut Guillow's kit nr 405. When removing the parts, the wood was found very fragile. Some wood even had a grey colour coming from the outer skins of the tree. The fuse and main plane are ready and sanded.
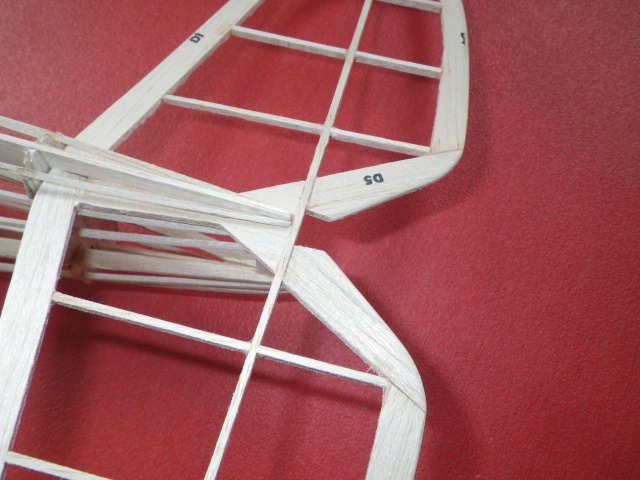
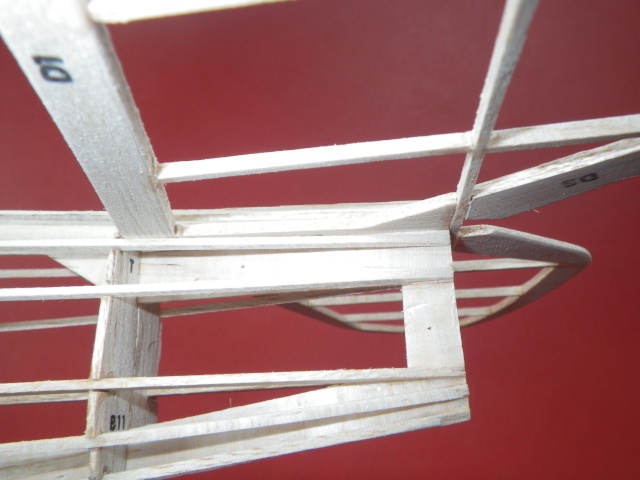
Yesterday, I glued rudder and stab together. Curiously, the slot for the stab is not long enough. I'll have to provide a notch in the rudder in order to make a good fit.
This evening, I will start doping the wood.
Lieven


Yesterday, I glued rudder and stab together. Curiously, the slot for the stab is not long enough. I'll have to provide a notch in the rudder in order to make a good fit.


This evening, I will start doping the wood.
Lieven

OVERLORD- Diamond Member

- Posts : 1807
Join date : 2013-03-19
Age : 58
Location : Normandy, France
 Re: Guillow's P40 Warhawk build, photos of the finished model
Very Nice Lieven! The P40 was my 1st favorite airplane as a young child. Will this model be for static display? I remember how much painstaking work was involved with this type of model when I built my 23.5" span Sterling kit E2 Fokker DR-1.
Interestingly, I had a job interview last week for a CNC laser cutting machine operator at a company that makes all types of packaging. While on a tour of the facility with the owner; he brought me to the machine which was currently cutting 15mil (1/2”) Baltic Birch plywood. I mentioned my hobby and the laser cut model kits available and he stated that he’d done some work for Guillows. I found out a few days ago (unfortunately) that I was passed-over for the job.
Interestingly, I had a job interview last week for a CNC laser cutting machine operator at a company that makes all types of packaging. While on a tour of the facility with the owner; he brought me to the machine which was currently cutting 15mil (1/2”) Baltic Birch plywood. I mentioned my hobby and the laser cut model kits available and he stated that he’d done some work for Guillows. I found out a few days ago (unfortunately) that I was passed-over for the job.
 Re: Guillow's P40 Warhawk build, photos of the finished model
Roddie, It will be a free flight model and I'd like to make it without landing gear. It looks so much nicer in flight. Just like the drawing on the box. I'm sorry you didn't get that job.

OVERLORD- Diamond Member

- Posts : 1807
Join date : 2013-03-19
Age : 58
Location : Normandy, France
 Re: Guillow's P40 Warhawk build, photos of the finished model
Me too Roddie! Next time bring the keyboard and show them your versatility.
Nice P-40 bones BTW.
Nice P-40 bones BTW.

Cribbs74- Moderator


Posts : 11907
Join date : 2011-10-24
Age : 50
Location : Tuttle, OK
 Re: Guillow's P40 Warhawk build, photos of the finished model
The thought of building such complex framework well enough to actually fly is a little intimidating. Beautiful work Lieven.
Rusty
Rusty
_________________
Don't Panic!
...and never Ever think about how good you are at something...
while you're doing it!
My Hot Rock & Blues Playlist
...and never Ever think about how good you are at something...
while you're doing it!
My Hot Rock & Blues Playlist

RknRusty- Rest In Peace

- Posts : 10869
Join date : 2011-08-10
Age : 68
Location : South Carolina, USA
 Re: Guillow's P40 Warhawk build, photos of the finished model
My favorite part is the covering of stick and tissue models. Ken

Ken Cook- Top Poster

- Posts : 5640
Join date : 2012-03-27
Location : pennsylvania
 Re: Guillow's P40 Warhawk build, photos of the finished model
Yeah, there is that. I think one would be we well advised to learn to cover some simpler structures, managing the stretch and twist before trying it on one of these flying fish traps. Learning to use dope and tissue is on my bucket list, but I believe it's likely I shall forever remain a Monokote Hack. I only really first felt a twang of unsophistication last weekend while admiring my new friend's Humongous with its flawless finish.Ken Cook wrote: My favorite part is the covering of stick and tissue models. Ken
Rusty
Last edited by RknRusty on Sat May 10, 2014 7:27 am; edited 1 time in total
_________________
Don't Panic!
...and never Ever think about how good you are at something...
while you're doing it!
My Hot Rock & Blues Playlist
...and never Ever think about how good you are at something...
while you're doing it!
My Hot Rock & Blues Playlist

RknRusty- Rest In Peace

- Posts : 10869
Join date : 2011-08-10
Age : 68
Location : South Carolina, USA
 Re: Guillow's P40 Warhawk build, photos of the finished model
OVERLORD wrote:Roddie, It will be a free flight model and I'd like to make it without landing gear. It looks so much nicer in flight. Just like the drawing on the box. I'm sorry you didn't get that job.
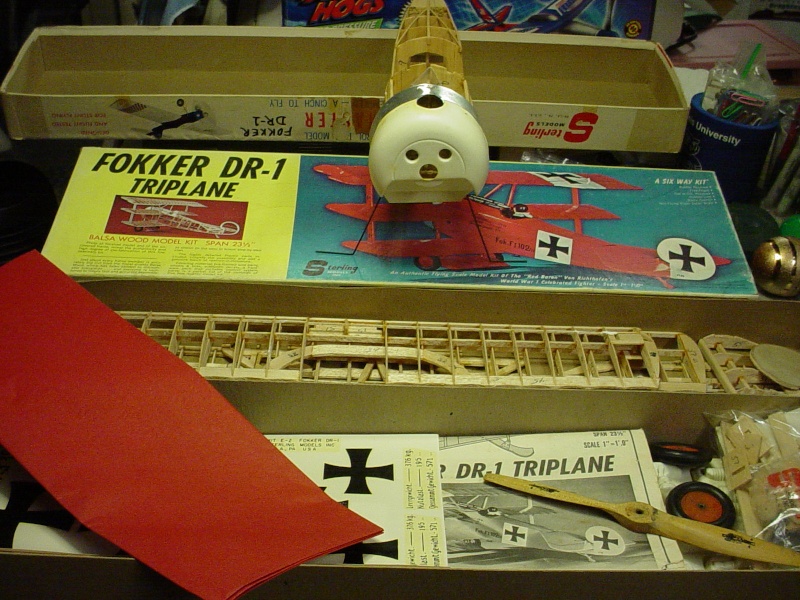
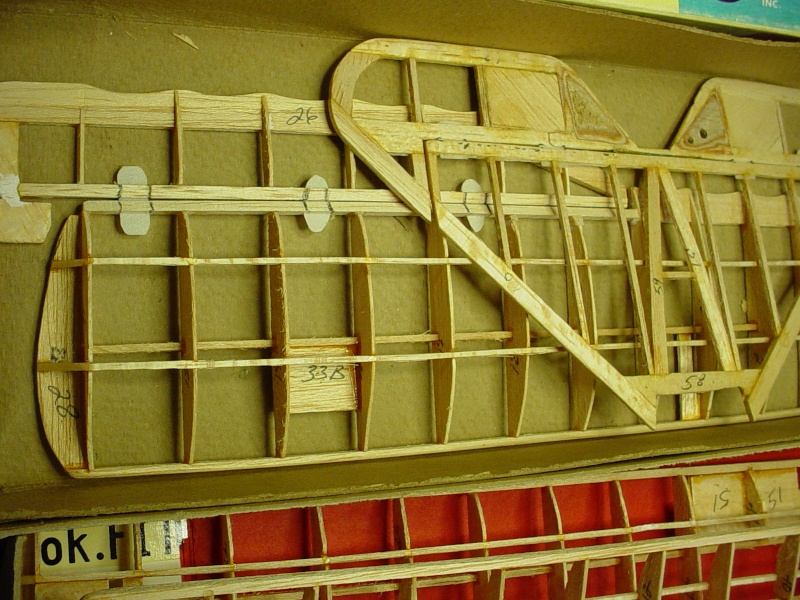
Thanks for the kind words Lieven and Ron. That's Guillow's Giant series P40 right? The hobby shop that closed near me recently, had 2-3 different WWII Warbirds. They were regularly full-retail.. but were going for 40% off along with everything else. They also had this slick electric rubber-motor winder. It looked like a space pistol! It's body was clear plastic and you could see the motor, gearbox, switch, wiring and batteries inside. I'm assuming yours will be rubber-powered, but maybe could be a glider? I wonder if a Compressed-air engine like a Gasparin would fly it? My DR-1 was built for Glow RC many years ago and "still" sits bare-bones. The 3 wings, and tail-plane are built and stored in a box. Today the airborne radio gear available is less than 1/2 the weight. It's on my modeling "bucket-list".
Congrats BTW.. on getting the Jr. Satan repaired. You did a GREAT job on it!
 Re: Guillow's P40 Warhawk build, photos of the finished model
Lieven that plane is looking nice , but your hands have a lot of wrinkles and really offsets the appearance. 
 got u covered
  Getback

 got u covered
  Getback
getback- Top Poster


Posts : 10442
Join date : 2013-01-18
Age : 67
Location : julian , NC
 Re: Guillow's P40 Warhawk build, photos of the finished model
Roddie that J.O.B. would have sucked down the other side of the grass slid anyway!!getback wrote:Lieven that plane is looking nice , but your hands have a lot of wrinkles and really offsets the appearance.
got u covered
Getback


getback- Top Poster


Posts : 10442
Join date : 2013-01-18
Age : 67
Location : julian , NC
 Re: Guillow's P40 Warhawk build, photos of the finished model
Thanks guys. I actually got a Pee Wee for it. I am thrilled to see how it will fly. Concerning the covering, I haven't done that before, but although it looks intimidating as you said, Rusty, the model has no severe double curves and by slightly and carefully stretching the tissue, I hope to manage that. Kirt Blattenberger explains covering very well in hie 4 part tutorial:
He takes his time to explain all the détails and with that base and a serious coffee dosis, it should be all right.
Lieven
He takes his time to explain all the détails and with that base and a serious coffee dosis, it should be all right.
Lieven

OVERLORD- Diamond Member

- Posts : 1807
Join date : 2013-03-19
Age : 58
Location : Normandy, France
 Re: Guillow's P40 Warhawk build, photos of the finished model
I'm really looking forward to seeing how it turns out. That's what I always forget about RC planes. You can make them floaty and fly with a tiny engine.
Rusty
Rusty
_________________
Don't Panic!
...and never Ever think about how good you are at something...
while you're doing it!
My Hot Rock & Blues Playlist
...and never Ever think about how good you are at something...
while you're doing it!
My Hot Rock & Blues Playlist

RknRusty- Rest In Peace

- Posts : 10869
Join date : 2011-08-10
Age : 68
Location : South Carolina, USA
 Re: Guillow's P40 Warhawk build, photos of the finished model
Especially with the development of modern radio and servos, RC has really been revolutionized in the last decade or so. You can know have full house controls, and have a plane that is much lighter than what even a single or double channel use to be. It is only now that it makes sense to have a throttle, before you were always hoping/praying for a strong run to get any elevation...
Here is a J3 cub with a peewee in the front, I've run it on glow before but it is much nicer on diesel. Swinging a 6x3 prop at a solid 10krpm, the sound and thrust is much better (compared to the stock prop on glow...)
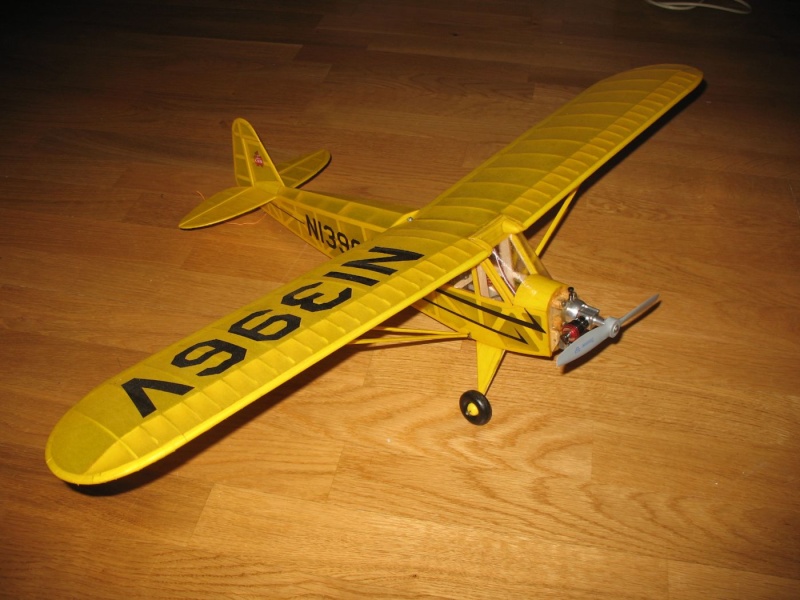
Here is a J3 cub with a peewee in the front, I've run it on glow before but it is much nicer on diesel. Swinging a 6x3 prop at a solid 10krpm, the sound and thrust is much better (compared to the stock prop on glow...)


Surfer_kris- Diamond Member

- Posts : 1912
Join date : 2010-11-20
Location : Sweden
 Re: Guillow's P40 Warhawk build, photos of the finished model
Kris, that is really a beautiful looking model. I really like J-3's. Ken

Ken Cook- Top Poster

- Posts : 5640
Join date : 2012-03-27
Location : pennsylvania
 Re: Guillow's P40 Warhawk build, photos of the finished model
OVERLORD wrote:Thanks guys. I actually got a Pee Wee for it. I am thrilled to see how it will fly. Concerning the covering, I haven't done that before, but although it looks intimidating as you said, Rusty, the model has no severe double curves and by slightly and carefully stretching the tissue, I hope to manage that. Kirt Blattenberger explains covering very well in hie 4 part tutorial:
He takes his time to explain all the détails and with that base and a serious coffee dosis, it should be all right.
Lieven
I can't imagine how tedious a job it must have been to remove the 1st Monokote covering from that model in the vid.
Thanks for posting Lieven.. This is what I must do with my DR1 eventually.
This will be set up for 2.4 GHz 4-ch RC with nano-servos and a 200mAh LiFe receiver pack, using a Babe Bee with venturi throttle and my muffler design with a pressure-tap to a small external clunk-tank. I cut the top wing's T/E apart to make functional ailerons and the split-elevator's brace/horn areas are reinforced with 1/64" plywood. The rear cowl extension was cut from aluminum step-flashing, and has 3 relief holes in the top for the needle and non-functional tank vents. The Zinger 8 x 4 prop shown is scale size and would work for RC I think. I have used that prop on a heavy C/L bi-plane with a .049 reedie with Sig Champion 35.. and it flew. The sound is something you have to hear.. albeit the rod/socket joint gets a workout.
Ken mentioned using fiberglass filament tape on another post, for adding torsional rigidity. That would be a nice light way to beef-up all 3 wings for any high-stress maneuvers. Believe me; I'll have an experienced RC Pilot fly it for the first time.
 Re: Guillow's P40 Warhawk build, photos of the finished model
That's a nice looking Piper Kris; and a very interesting model-to-be, Roddie.
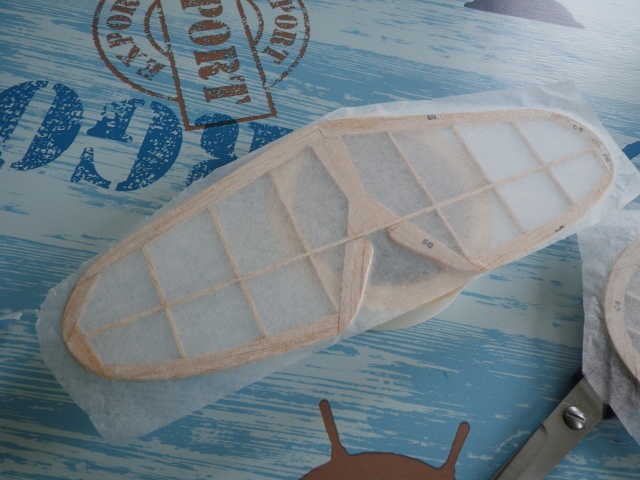
I covered stab, rudder and main plane. I followed the instructions as explained by Kirt Blattenberger in his videos.



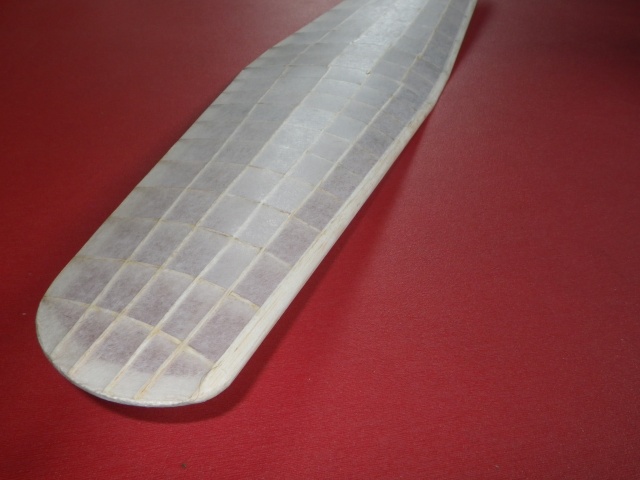
At the moment, the fuselage gets covered.
Lieven
I covered stab, rudder and main plane. I followed the instructions as explained by Kirt Blattenberger in his videos.


At the moment, the fuselage gets covered.
Lieven

OVERLORD- Diamond Member

- Posts : 1807
Join date : 2013-03-19
Age : 58
Location : Normandy, France
 Re: Guillow's P40 Warhawk build, photos of the finished model
Nice , Lieven man no wrinkles !! I get time I will watch that vid . been a lot of push to shove with the J.O.B. let go and tring to make some arrangements ..... sharp plane Kris ... Roddie get r done 

getback- Top Poster


Posts : 10442
Join date : 2013-01-18
Age : 67
Location : julian , NC
 Re: Guillow's P40 Warhawk build, photos of the finished model
Nice work.
I created a new playlist and added Kirt's 4 videos on dope and tissue. Thanks for posting that video.
Rusty
I created a new playlist and added Kirt's 4 videos on dope and tissue. Thanks for posting that video.
Rusty
_________________
Don't Panic!
...and never Ever think about how good you are at something...
while you're doing it!
My Hot Rock & Blues Playlist
...and never Ever think about how good you are at something...
while you're doing it!
My Hot Rock & Blues Playlist

RknRusty- Rest In Peace

- Posts : 10869
Join date : 2011-08-10
Age : 68
Location : South Carolina, USA
 Re: Guillow's P40 Warhawk build, photos of the finished model
Looking great Lieven! This is inspiring for me.
 Re: Guillow's P40 Warhawk build, photos of the finished model
Great covering skills Lieven
The plane is going to look awesome.
Theo
The plane is going to look awesome.
Theo

Theo Kleynhans- Gold Member

- Posts : 196
Join date : 2013-12-30
Age : 43
Location : South Africa
 Re: Guillow's P40 Warhawk build, photos of the finished model
Thanks guys for your comments but it's not yet finished though. What Kirt's videos are concerned, there are actually 6 parts. He added 2 parts later on. Here is the link to the web page of Airplanes and Rockets:
http://www.airplanesandrockets.com/resources/silkspan-dope-covering-tutorial.htm
I just got 1 little wrinkle at the TE wing root. It's not a big deal as it will be covered with cardboard to smoothen out the joint of wing with fuse. I also punctured the covering once with the corner of my sandpaper. It's easy to repair by just sticking on a patch with dope.
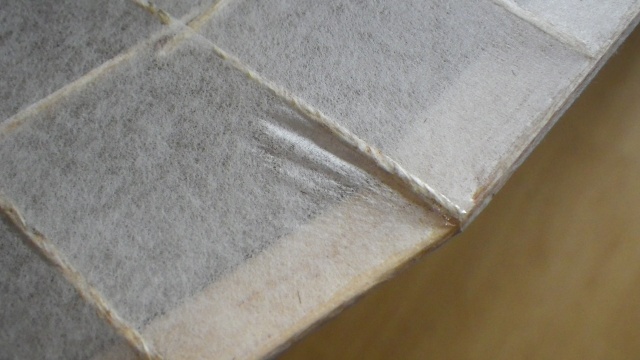
The wrinkle appeared just on an edge of tissue. I think the edge did not stuck well enough to the rib. When drying, it pulled back a little.
The fuse is covered for 2/3 on both sides. The tissue still has to be doped.
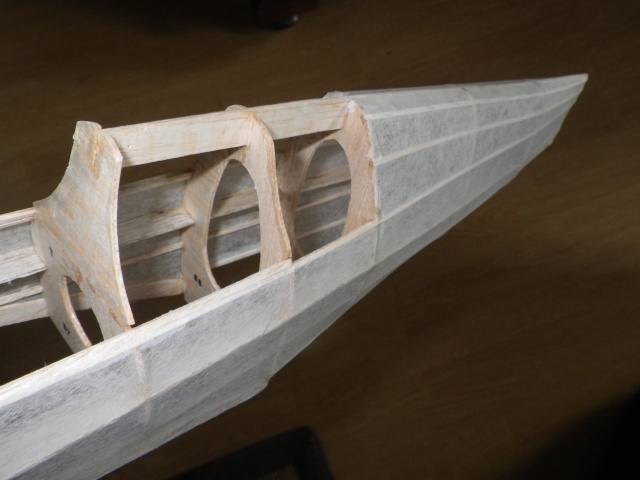
Lieven
http://www.airplanesandrockets.com/resources/silkspan-dope-covering-tutorial.htm
I just got 1 little wrinkle at the TE wing root. It's not a big deal as it will be covered with cardboard to smoothen out the joint of wing with fuse. I also punctured the covering once with the corner of my sandpaper. It's easy to repair by just sticking on a patch with dope.

The wrinkle appeared just on an edge of tissue. I think the edge did not stuck well enough to the rib. When drying, it pulled back a little.
The fuse is covered for 2/3 on both sides. The tissue still has to be doped.

Lieven

OVERLORD- Diamond Member

- Posts : 1807
Join date : 2013-03-19
Age : 58
Location : Normandy, France
 Re: Guillow's P40 Warhawk build, photos of the finished model
On their plans, Guillow's says to cover the plane with 2 sheets on each side: 1 sheet from the tail to the frame in the middle of the cockpit opening and a second sheet from there forward to the fire wall bulkhead. That are quite long sheets and for better handling, I decided to cover 1 side in 3 sections: from the tail to the canopy rear edge, with the 90° corner. Then a second sheet up to the frame in the middle of the cockpit opening, and from there, a 3 sheet to the forward bulkhead.
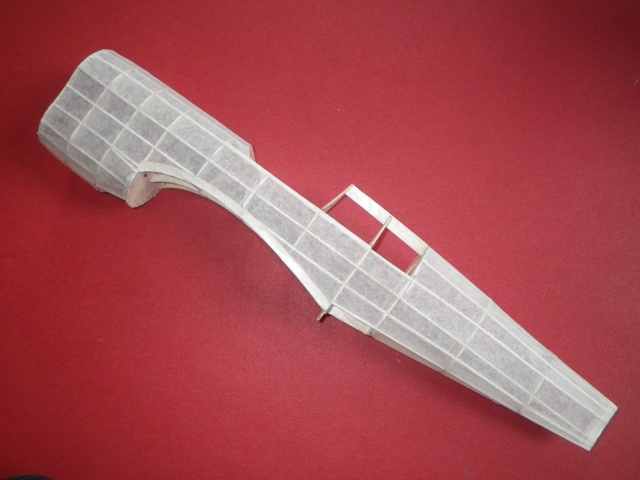
I noticed that wrinkles appeared between the firewall bulkhead and the nearby frame, in way of the rounded corners. After doing port, I covered starboard using 4 sheets. The 4th sheet just covers the area between the last frame and the bulkhead. This method avoided the wrinkles. After doping a first time, I hoped the wrinkles would disappear but they didn't. I cut out the tissue in way of the top and bottom rounded areas and put new tissue on.

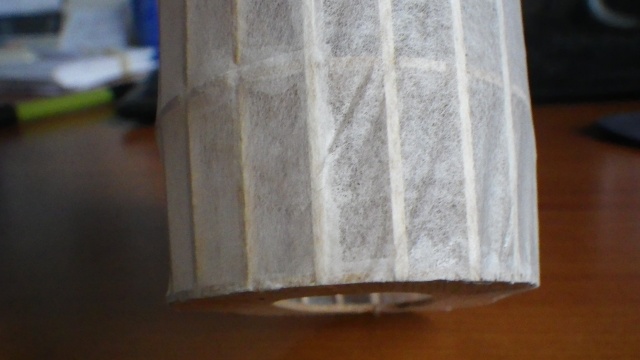
Above, the difference is clearly visible. To the right of the centre line the wrinkles and to the left, the separate wrinkle-free part
After a few coats of thinned dope:
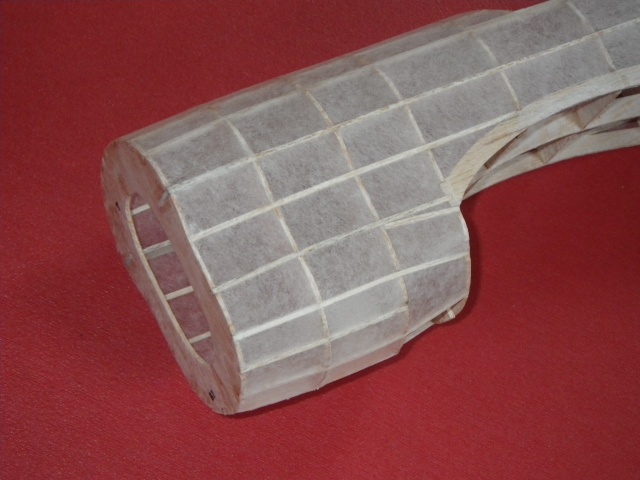
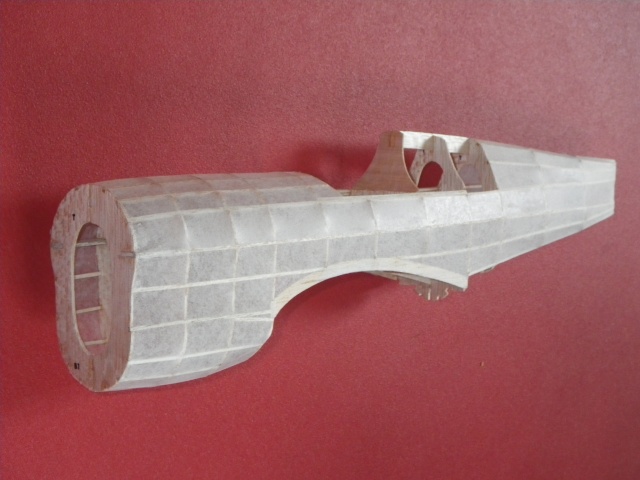
Lieven

I noticed that wrinkles appeared between the firewall bulkhead and the nearby frame, in way of the rounded corners. After doing port, I covered starboard using 4 sheets. The 4th sheet just covers the area between the last frame and the bulkhead. This method avoided the wrinkles. After doping a first time, I hoped the wrinkles would disappear but they didn't. I cut out the tissue in way of the top and bottom rounded areas and put new tissue on.


Above, the difference is clearly visible. To the right of the centre line the wrinkles and to the left, the separate wrinkle-free part
After a few coats of thinned dope:


Lieven

OVERLORD- Diamond Member

- Posts : 1807
Join date : 2013-03-19
Age : 58
Location : Normandy, France
 Re: Guillow's P40 Warhawk build, photos of the finished model
Beautiful job Lieven! It's always worth taking your time and doing whatever extra steps are necessary to assure a fine finish. Kit manufacturers will only explain the basics.. probably so as not to overwhelm the novice builder. Every component of every model I've seen built by you, has exhibited fine attention to detail and impeccable construction.
 Re: Guillow's P40 Warhawk build, photos of the finished model
Thanks Roddie. During the weekend, I glued the wing and stab to the fuse. I also cut out the canopy. When trying to fit the canopy in place I found that there was a "ventilation" opening on each side.
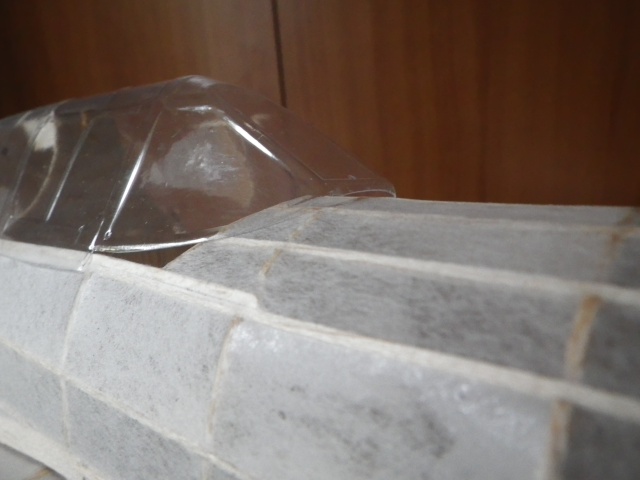
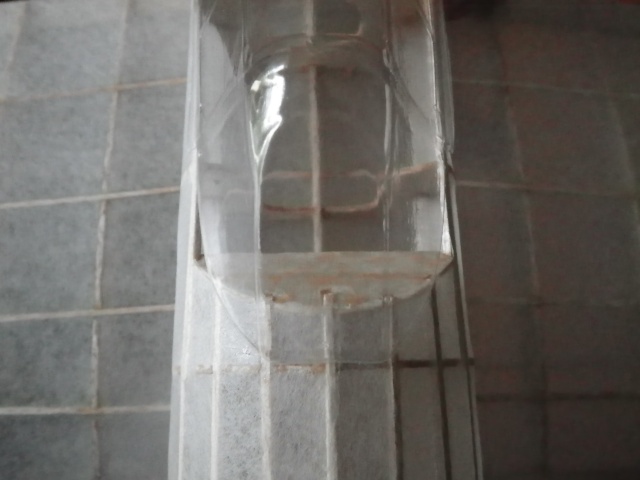
I glued some extra wood and covered it to close the gap
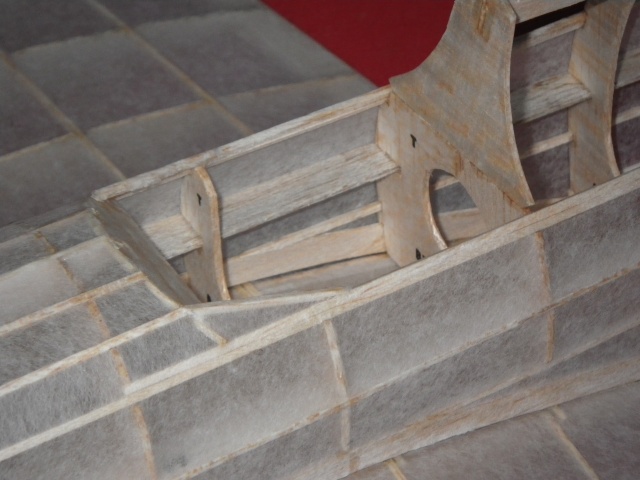
Then, I made the bottom piece below the wing.

Talking of spinners. I bought a 1 3/4" plastic spinner as per plan from Thunder Tiger. When I fit the Pee Wee 4.5x2 prop, this one is almost completely hidden. I have 33 mm of prop left over on each blade. I also have to find a spacer: 5mm hole in the spinner and a 2.5mm bolt of the engine!
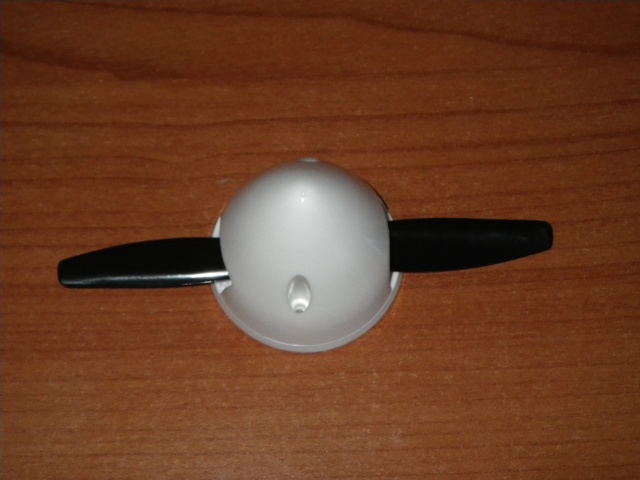
Could I use a larger prop? Or will that wear out the engine? If mountung a 4.5 prop with that spinner, would it still be sufficient to keep the plane moving?
Lieven


I glued some extra wood and covered it to close the gap

Then, I made the bottom piece below the wing.

Talking of spinners. I bought a 1 3/4" plastic spinner as per plan from Thunder Tiger. When I fit the Pee Wee 4.5x2 prop, this one is almost completely hidden. I have 33 mm of prop left over on each blade. I also have to find a spacer: 5mm hole in the spinner and a 2.5mm bolt of the engine!

Could I use a larger prop? Or will that wear out the engine? If mountung a 4.5 prop with that spinner, would it still be sufficient to keep the plane moving?
Lieven

OVERLORD- Diamond Member

- Posts : 1807
Join date : 2013-03-19
Age : 58
Location : Normandy, France
 Re: Guillow's P40 Warhawk build, photos of the finished model
Well.. this is (beautiful) going to be a free flight model right? Since it's not burdened by any radio gear.. and probably weighs less than 5-6 ounces.. you could try running a Cox 2-blade 6" x 2" on it. I just bought some NOS Cox 6 x 2's from that LHS that closed a month ago.. and could mail you one to bench test. If you can tune your engine into a steady 2-stroke firing with a larger prop, it might make for some enjoyable flights. Beware though.. if the engine agrees with a larger prop..only start with a small amount of fuel in the tank for the 1st flight. Your Pee Wee will take-on the characteristics of a mini-Texaco endurance engine when using a larger prop.. and could fly out of sight if it catches a thermal. As far as wearing-out the engine is concerned.. there are a few factors here. Running a larger prop will stress the piston/rod ball-socket joint more.. and will make the engine run hotter. Where it is difficult to obtain cooler-running high-nitro fuel in your geographic location.. this could be a concern if you fly the model frequently. On the other hand.. the engine in this model only has to run for a short time to give you the results you're looking for. I personally; would try running a larger prop on this model to start with. It will also yield a more realistic slower speed and sound while climbing.. because of the lower engine rpm's.
Page 1 of 5 • 1, 2, 3, 4, 5 
 Similar topics
» guillows, curtiss p-40 warhawk free flight
» Guillows Cessna 150 build circa 1970 (Build Log)
» Another Li'l Satan build (Finished)
» Guillows Spitfire park flyer FINISHED!!!!!!!!!!!!
» Guillows Cessna build advice needed
» Guillows Cessna 150 build circa 1970 (Build Log)
» Another Li'l Satan build (Finished)
» Guillows Spitfire park flyer FINISHED!!!!!!!!!!!!
» Guillows Cessna build advice needed
Page 1 of 5
Permissions in this forum:
You cannot reply to topics in this forum

 Rules
Rules


