Log in
Search
Latest topics
» Roger Harris revisitedby TD ABUSER Today at 2:30 am
» My latest doodle...
by batjac Yesterday at 10:05 pm
» Retail price mark-up.. how much is enough?
by gkamysz Yesterday at 9:29 pm
» Happy 77th birthday Andrew!
by roddie Yesterday at 9:22 pm
» My N-1R build log
by GallopingGhostler Yesterday at 3:04 pm
» Tee Dee .020 combat model
by 1/2A Nut Yesterday at 2:43 pm
» Chocolate chip cookie dough.........
by roddie Yesterday at 1:13 pm
» Purchased the last of any bult engines from Ken Enya
by sosam117 Yesterday at 11:32 am
» Free Flight Radio Assist
by rdw777 Yesterday at 9:24 am
» Funny what you find when you go looking
by rsv1cox Wed Nov 20, 2024 3:21 pm
» Landing-gear tips
by 1975 control line guy Wed Nov 20, 2024 8:17 am
» Cox NaBOO - Just in time for Halloween
by rsv1cox Tue Nov 19, 2024 6:35 pm
Cox Engine of The Month
Flats on top cylinder fin for COX wrench - DIY
Page 1 of 1
 Flats on top cylinder fin for COX wrench - DIY
I prefer collecting old stock engines made in the heydays of COX, with thin or stepped wall cylinders, which came with no flats cut in the top fin for the wrench. Removal of such cylinders from the engine is normally done with the forked end of COX wrenches tucked into the cylinder along the exhaust ports, that may end up with the cylinder burred.
The leather strap method has never worked form me no matter how long and much I had pre-heated the crankcase or soaked the engine in fuel to soften the goo between the case and cylinder threads, so as to allow the cylinder to unscrew.
So I took a deep breath and experimented with filing away the top fin of an scrapped old cylinder, to accommodate the wrench.
In order to limit the filing to the top fin only without damage caused by the file to the 2nd fin, I first cut a protecting sheet from a beer can skin, by using the contour of the COX wrench opening:
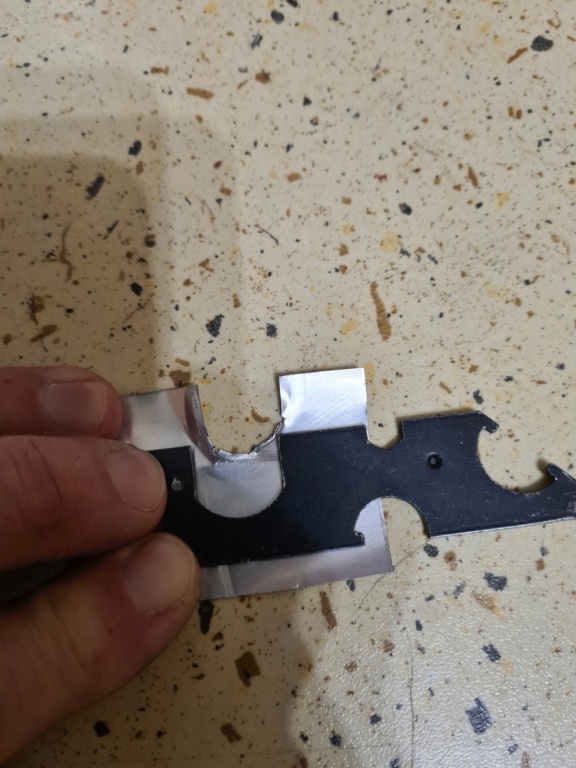
Then I slipped the contoured cutout of the aluminum sheet in between the top and 2nd fins, making sure the sheet entirely covers the 2nd fin under the file area.

I filed on one side then on the other, until the wrench fit well between the flats of the top fin:
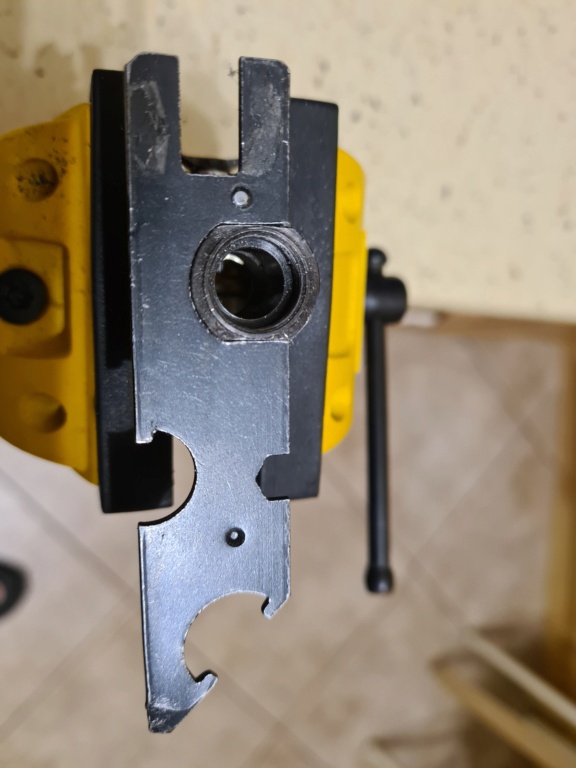
The protecting aluminum sheet tucked between the fins saved the 2nd fin from damages caused by the file.
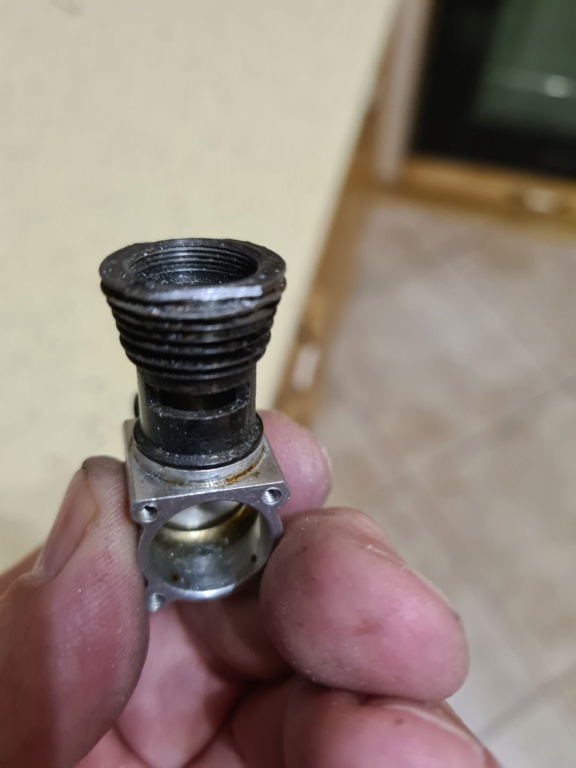
Note that for fixture, I used an old crankcase into which I screwed in the cylinder, and fixed the crankcase between the rubber padded flats of the vice, just snugly. Thus, neither the cylinder not the case gets damaged.
I completed the process with bluing the filed, scratched spots on the cylinder.
My DIY technique may not be a novelty, but I thought i share it with you.
The leather strap method has never worked form me no matter how long and much I had pre-heated the crankcase or soaked the engine in fuel to soften the goo between the case and cylinder threads, so as to allow the cylinder to unscrew.
So I took a deep breath and experimented with filing away the top fin of an scrapped old cylinder, to accommodate the wrench.
In order to limit the filing to the top fin only without damage caused by the file to the 2nd fin, I first cut a protecting sheet from a beer can skin, by using the contour of the COX wrench opening:

Then I slipped the contoured cutout of the aluminum sheet in between the top and 2nd fins, making sure the sheet entirely covers the 2nd fin under the file area.

I filed on one side then on the other, until the wrench fit well between the flats of the top fin:

The protecting aluminum sheet tucked between the fins saved the 2nd fin from damages caused by the file.

Note that for fixture, I used an old crankcase into which I screwed in the cylinder, and fixed the crankcase between the rubber padded flats of the vice, just snugly. Thus, neither the cylinder not the case gets damaged.
I completed the process with bluing the filed, scratched spots on the cylinder.
My DIY technique may not be a novelty, but I thought i share it with you.

balogh- Top Poster


Posts : 4958
Join date : 2011-11-06
Age : 66
Location : Budapest Hungary
 Re: Flats on top cylinder fin for COX wrench - DIY
Good work Andras, thanks for sharing.

Levent Suberk- Diamond Member

- Posts : 2265
Join date : 2017-12-24
Location : Türkiye
 Re: Flats on top cylinder fin for COX wrench - DIY
Good stuff Andras. I think that's the way Cox did it on their later slit cylinders. 
Rates a greenie.
Bob
Rates a greenie.
Bob

rsv1cox- Top Poster


Posts : 11248
Join date : 2014-08-18
Location : West Virginia
 Re: Flats on top cylinder fin for COX wrench - DIY
Thank you Levent and Bob...the cylinder material is soft and files easily. This was just a hastily done experiment taking altogether 10 minutes on this dead cylinder. I will take more time to convert my live cylinders, just wanted to see if this protecting sheet method works or not...nothing would be more frustrating than messing up a workable old stock cylinder.

balogh- Top Poster


Posts : 4958
Join date : 2011-11-06
Age : 66
Location : Budapest Hungary
 Re: Flats on top cylinder fin for COX wrench - DIY
It would be interesting to know how many slit cylinders were produced with no cut top fin before Cox wised up and started modifying them. I would think about 10 to 1. I have both styles.
I only damaged one cylinder using the standard Cox wrench, but it was the wrench with the short ears and I probably didn't seat it fully. I learned a lesson and never damaged another. For awhile I buffered the ears with masking tape even while using the long eared wrench. Gave that up and started snugging the case up in a buffered vice, heating the cylinder and using the long eared wrench "bumped" the cylinder off with the palm of my hand. Never failed to give positive results. Key is to secure the case.
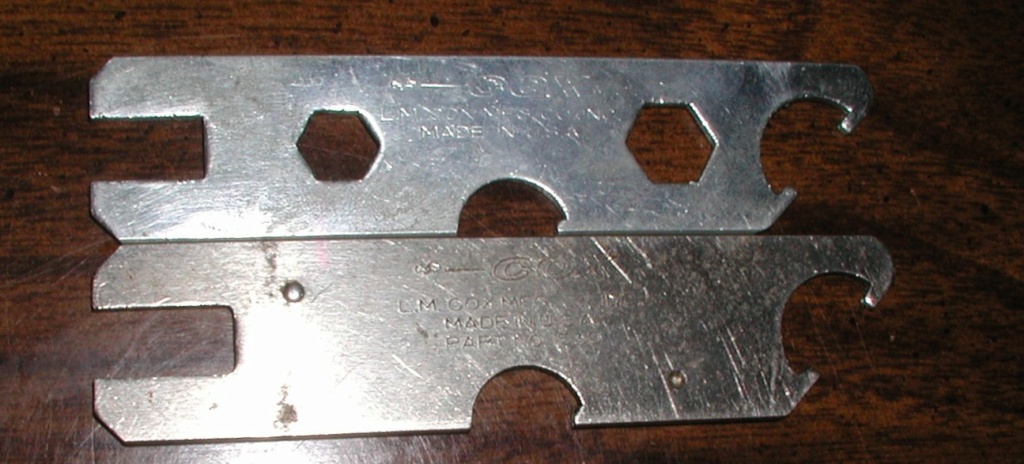
I only damaged one cylinder using the standard Cox wrench, but it was the wrench with the short ears and I probably didn't seat it fully. I learned a lesson and never damaged another. For awhile I buffered the ears with masking tape even while using the long eared wrench. Gave that up and started snugging the case up in a buffered vice, heating the cylinder and using the long eared wrench "bumped" the cylinder off with the palm of my hand. Never failed to give positive results. Key is to secure the case.


rsv1cox- Top Poster


Posts : 11248
Join date : 2014-08-18
Location : West Virginia
 Re: Flats on top cylinder fin for COX wrench - DIY
Very good way to do it. I honestly would not have thought of making a 'shim' of sorts to protect the fin below.

NEW222- Top Poster

- Posts : 3896
Join date : 2011-08-13
Age : 46
Location : oakbank, mb
 Re: Flats on top cylinder fin for COX wrench - DIY
I'm with you when you mention preferring the older cylinders Andras.. especially the dual-bypass ported ones. It seems like I've found those on most of my 190/290 .049 product-engines.. you know; the ones with the postage-stamp backplates.. and fine-thread needles.. 
I especially like your use of the "beer can" aluminum.. and using the Cox wrench as a template. I measured two of my Cox #1530 wrenches having the later feature to engage the flat and found the measurement to be roughly 5/8" because one wrench measured .625" and the other measured a tighter .620".
It would be nice to have a fixture to precision-mill those flats. Maybe find a piece of 5/8" tool-steel and make a fixture to center the cylinder; held snug just below it? We could have BETA-testing here on the forum with volunteers.. and if proven satisfactory, make the fixture available as a loan-a-tool for our members.
 Re: Flats on top cylinder fin for COX wrench - DIY
I have an indexing fixture, but am sure the postage would be crazy. Yhen you would need a milling machine too. A single setup with a bunch of cylinders sent in would be fine, but I know shipping would be likely over $10 each way, at least in this country.

aspeed- Platinum Member

- Posts : 796
Join date : 2013-01-18
Location : Leamington Ont. Can.
 Re: Flats on top cylinder fin for COX wrench - DIY
aspeed wrote:I have an indexing fixture, but am sure the postage would be crazy. Yhen you would need a milling machine too. A single setup with a bunch of cylinders sent in would be fine, but I know shipping would be likely over $10 each way, at least in this country.
Yes.. the shipping..
 A hacksaw (in a standard-type frame) might be easier to control/keep straight when making the cuts.. depending of course on the integrity of the holding fixture for the cylinder. I'm thinking that an old junk Bee-style (billet-AL ) crankcase would be a necessary component.
 I LoVe Cox engines....... and I get charged-up on discussions that deal with making them easier to service.. and keep them running. Andras knows..

 Re: Flats on top cylinder fin for COX wrench - DIY
A lot of work can be done with hand tools if you take it slow. I have a big magnifier with a light for that kind of thing.

aspeed- Platinum Member

- Posts : 796
Join date : 2013-01-18
Location : Leamington Ont. Can.
 Re: Flats on top cylinder fin for COX wrench - DIY
Thanks Roddie and Aspeed for keeping the discussion on this topic rolling! Without exaggeration I think this is one of the more important homeworks we need to solve to make our oldstock COX engines more handy.
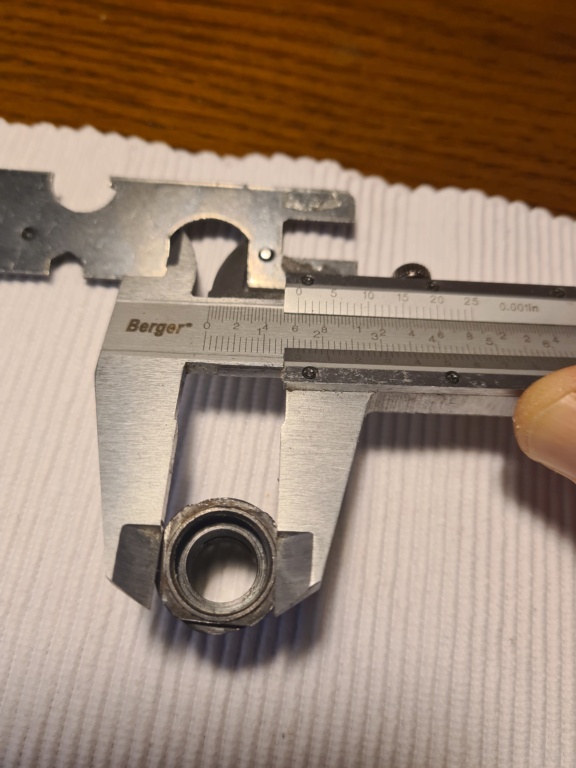
With my basic tooling the challenge for me is how to exactly mark the parallel pattern for the flats at near 16mm apart on the cylinder top. I am thinking of opening the caliper to the width of the wrench, fix the caliper at this opening then position simetrically on the cylinder top and skratch the parallels with an exacto knife on the top fin. I could as well use the pattern of the wrench itself, but its opening is not deep enough to allow the marking of the line in its full length diagonally on the cylinder, if you know what i mean...
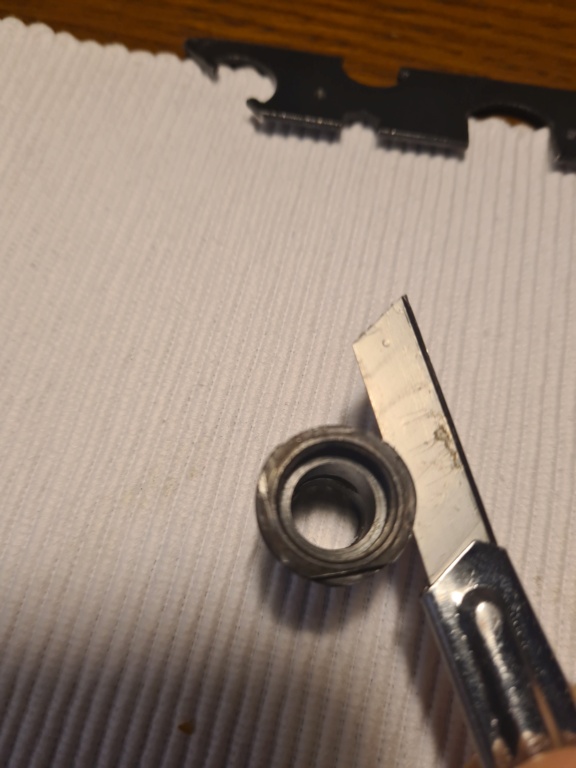
The exacto blade can also replace the aluminum protective sheet I described above. The blade slips easily between the top fin and 2nd fin underneath, and keeping it there with one hand while filing the top fin with the other will save the second from damages.
There are not too many oldstock No.1 and No.4 and 5 high performance cylinders around on the market, affording us mistakes in this irreversible modification, and this explains why I am seemingly too meticulous on the simple steps I plan to follow.
Your great ideas on this small topic are welcome.
With my basic tooling the challenge for me is how to exactly mark the parallel pattern for the flats at near 16mm apart on the cylinder top. I am thinking of opening the caliper to the width of the wrench, fix the caliper at this opening then position simetrically on the cylinder top and skratch the parallels with an exacto knife on the top fin. I could as well use the pattern of the wrench itself, but its opening is not deep enough to allow the marking of the line in its full length diagonally on the cylinder, if you know what i mean...

The exacto blade can also replace the aluminum protective sheet I described above. The blade slips easily between the top fin and 2nd fin underneath, and keeping it there with one hand while filing the top fin with the other will save the second from damages.

There are not too many oldstock No.1 and No.4 and 5 high performance cylinders around on the market, affording us mistakes in this irreversible modification, and this explains why I am seemingly too meticulous on the simple steps I plan to follow.
Your great ideas on this small topic are welcome.

balogh- Top Poster


Posts : 4958
Join date : 2011-11-06
Age : 66
Location : Budapest Hungary
 Cylinder removal
You are very wise to do what you did. Many modelers with cox engines think the sloted end ofth ewrench is for removing the cylinder. In speaking with a cox engineer many years ago said that was there intent with the slot and found that many engines were damaged using it to remove the cylinders is why they started with the flats in the top of the cylinders. After they did that they no longer had a warranty problem. Today the problem still exists. Owners should be reminded to never use the small slotted end to remove a cylinder.balogh wrote:I prefer collecting old stock engines made in the heydays of COX, with thin or stepped wall cylinders, which came with no flats cut in the top fin for the wrench. Removal of such cylinders from the engine is normally done with the forked end of COX wrenches tucked into the cylinder along the exhaust ports, that may end up with the cylinder burred.
The leather strap method has never worked form me no matter how long and much I had pre-heated the crankcase or soaked the engine in fuel to soften the goo between the case and cylinder threads, so as to allow the cylinder to unscrew.
So I took a deep breath and experimented with filing away the top fin of an scrapped old cylinder, to accommodate the wrench.
In order to limit the filing to the top fin only without damage caused by the file to the 2nd fin, I first cut a protecting sheet from a beer can skin, by using the contour of the COX wrench opening:
Then I slipped the contoured cutout of the aluminum sheet in between the top and 2nd fins, making sure the sheet entirely covers the 2nd fin under the file area.
I filed on one side then on the other, until the wrench fit well between the flats of the top fin:
The protecting aluminum sheet tucked between the fins saved the 2nd fin from damages caused by the file.
Note that for fixture, I used an old crankcase into which I screwed in the cylinder, and fixed the crankcase between the rubber padded flats of the vice, just snugly. Thus, neither the cylinder not the case gets damaged.
I completed the process with bluing the filed, scratched spots on the cylinder.
My DIY technique may not be a novelty, but I thought i share it with you.

Dick Russ- Silver Member


Posts : 78
Join date : 2021-11-23
Age : 86
Location : Oklahoma City, OK
 Re: Flats on top cylinder fin for COX wrench - DIY
Thank you Dick, a seemingly simple conversion that I do but it is easy to mess the cylinder up while filing away the top fin.
I am still working on refining the steps with my basic tooling and will revert back with my ultimate method for those interested but also not equipped with a workshop, Dremel handtools and better than average hand skills just like myself.
I am still working on refining the steps with my basic tooling and will revert back with my ultimate method for those interested but also not equipped with a workshop, Dremel handtools and better than average hand skills just like myself.

balogh- Top Poster


Posts : 4958
Join date : 2011-11-06
Age : 66
Location : Budapest Hungary
 Similar topics
» Cylinder wrench flats
» #0 cylinder
» Flats machined on COX cylinder top fin, for the wrench
» Cylinder Performance Figures
» Anyone know what this item is?
» #0 cylinder
» Flats machined on COX cylinder top fin, for the wrench
» Cylinder Performance Figures
» Anyone know what this item is?
Page 1 of 1
Permissions in this forum:
You cannot reply to topics in this forum

 Rules
Rules


