Log in
Search
Latest topics
» My latest doodle...by batjac Yesterday at 10:05 pm
» Retail price mark-up.. how much is enough?
by gkamysz Yesterday at 9:29 pm
» Happy 77th birthday Andrew!
by roddie Yesterday at 9:22 pm
» Roger Harris revisited
by rsv1cox Yesterday at 3:38 pm
» My N-1R build log
by GallopingGhostler Yesterday at 3:04 pm
» Tee Dee .020 combat model
by 1/2A Nut Yesterday at 2:43 pm
» Chocolate chip cookie dough.........
by roddie Yesterday at 1:13 pm
» Purchased the last of any bult engines from Ken Enya
by sosam117 Yesterday at 11:32 am
» Free Flight Radio Assist
by rdw777 Yesterday at 9:24 am
» Funny what you find when you go looking
by rsv1cox Wed Nov 20, 2024 3:21 pm
» Landing-gear tips
by 1975 control line guy Wed Nov 20, 2024 8:17 am
» Cox NaBOO - Just in time for Halloween
by rsv1cox Tue Nov 19, 2024 6:35 pm
Cox Engine of The Month
Shrike X3 Experimental
Page 1 of 2
Page 1 of 2 • 1, 2 
 Shrike X3 Experimental
Times a ticking so I thought I’d better make a move on my entry into the Cars are the Stars tether car build.
While building the Penelope Pitstop Wacky Racer with two engines I was thinking about a three engined version using a Shrike as a base car.
Only a few years back Shrikes weren’t that sort after and I picked up a few at what now seems like bargain prices. I was going to use the green Shrike but as I have a red, black (R/C) and two yellow ones, I decide to keep the green one and use one of the yellow ones instead.
I dismantled and cleaned the Yellow Shrikes this afternoon, the plan being (thinking they were both the same) to make a good one out of the bits and then use the top half of the body off the other car.

Then I noticed that there is a small difference between the two bodies inside the rear wheel fairings. The body that had the number 8 has extra reinforcing inside the fairing while the body that had the number 5 does not. I presume the number 5 is an earlier model. The red, green and black Shrikes I have all have that extra reinforcing. Apart from their engines and decals I could see no other differences between the two yellow cars
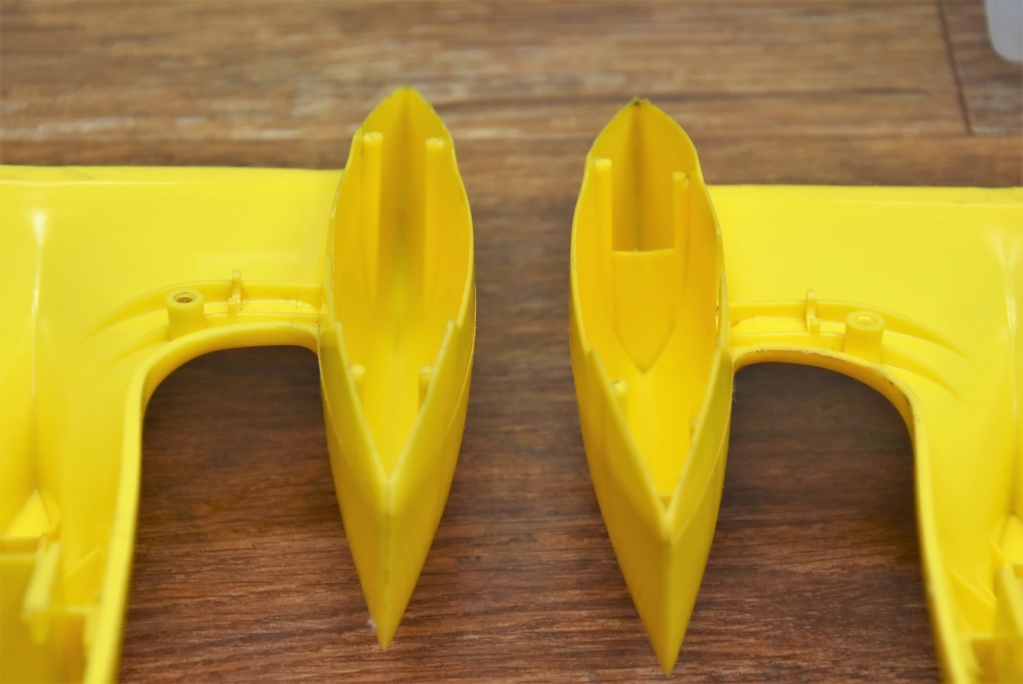
As luck would have it the number 5 is in the better condition and possibly an earlier model so it gets kept as standard. The number 8 body has quite a bit of red staining on it so I’ll use the top off that as it may get painted anyway and keep on the lookout for another yellow body or donor car to finish number 8. The engine off number 8 is one of the pair on the Wacky Racer.
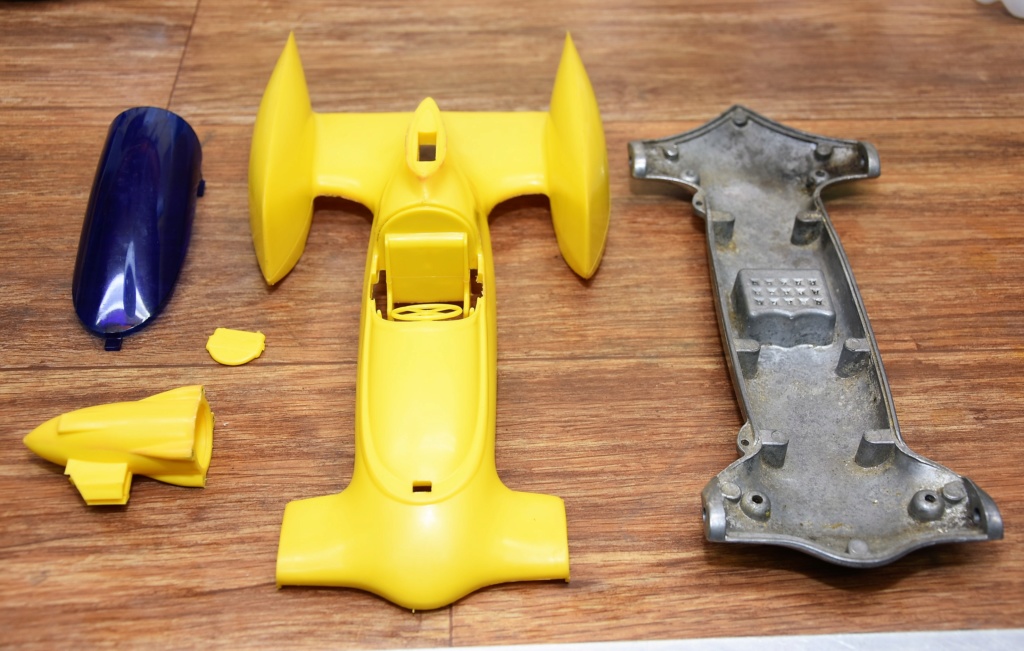
I also have an early Prop Rod metal base which will be much stronger than the later plastic ones and more suited to the build I have in mind.
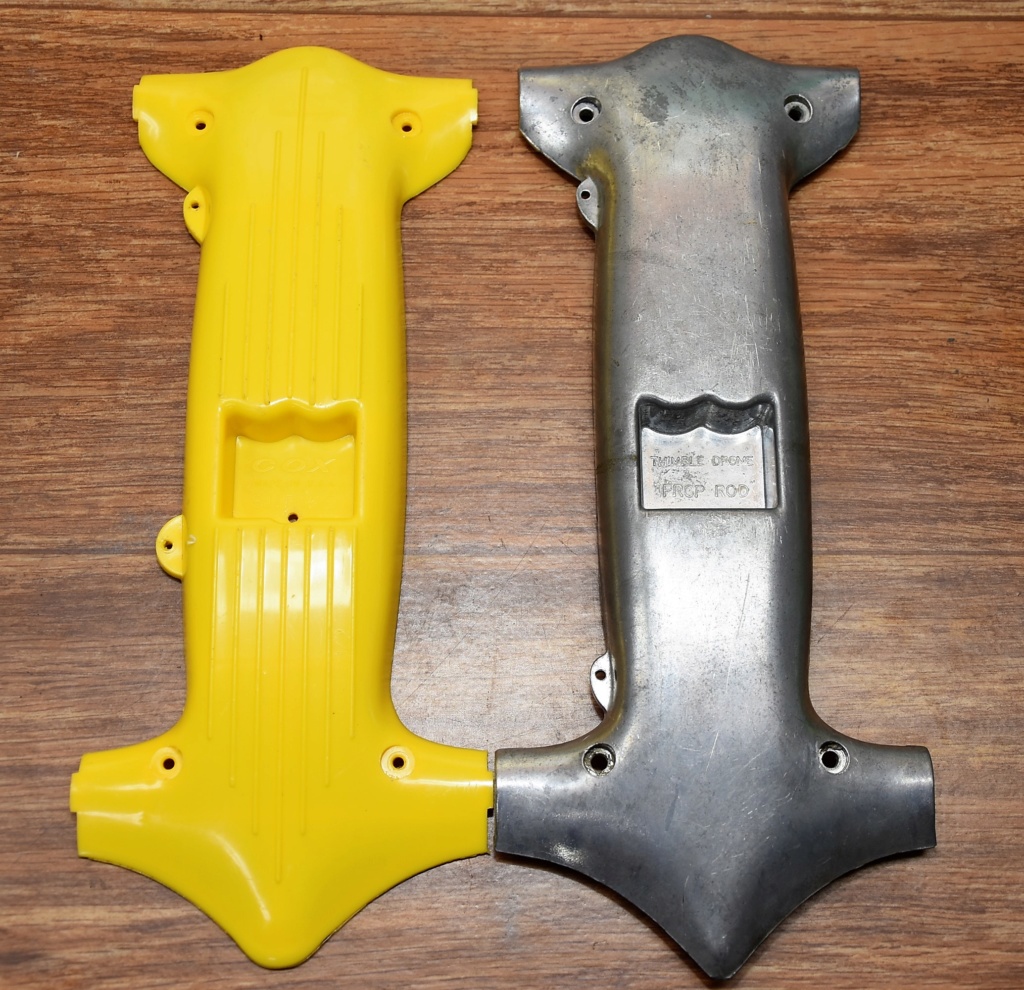
With a little modification to the Shrike top around the axle exit points I reckon it will fit the Prop Rod base. While the mounting screws on the base (front pair and rear pair) are the same width apart as the Shrike top, the distance between the front pair and the rear pair on the Prop Rod base is 195mm as against 192mm on the Shrike top but I think I can overcome that problem. I’ll use the back pair as they are and then sort the front mount later. This keeps the rear axle in the middle of the wheel fairing and after a few measurements it looks like the knife edge wheels like on the Wacky Racer will fit inside the fairing. I’ll just have to make some new axles
There is no centre screw mount on the Prop Rod base like there is on the Shrike base.
Here’s a photo of where I’m heading. If you can imagine the Shrike body lower down where the rear wheels are inside the fairings and a third motor in the centre where it normally sits facing backwards.
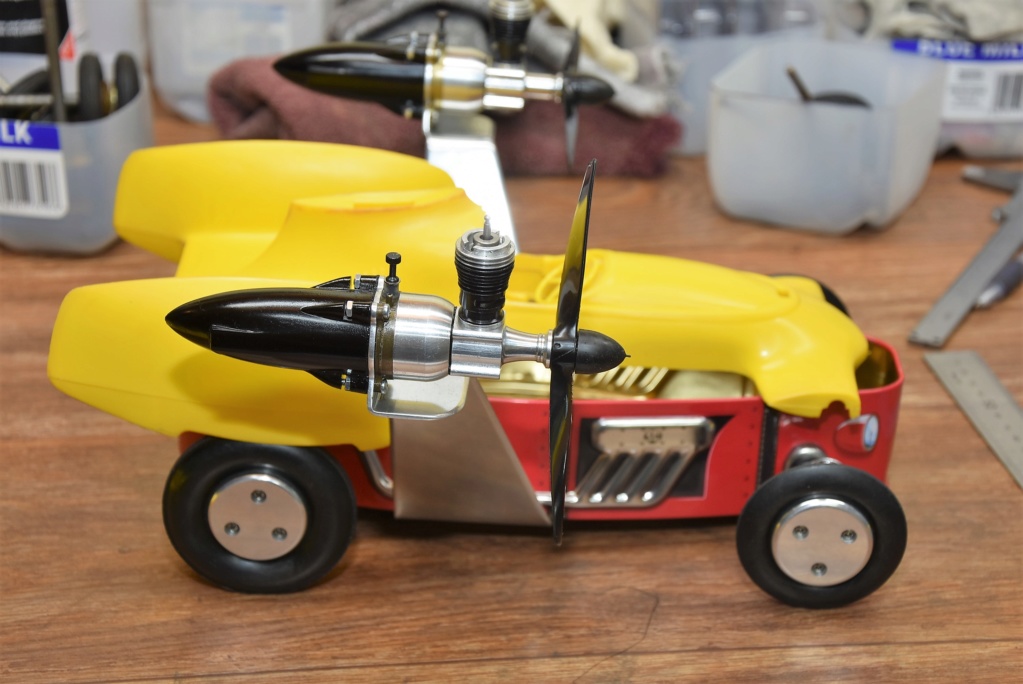
Engines are High Performance 049 Bumble Bees rated at 17,000 to 19,000 RPM with 5x3 prop and 25% nitro. Should be a bit quicker than Penelope’s car.
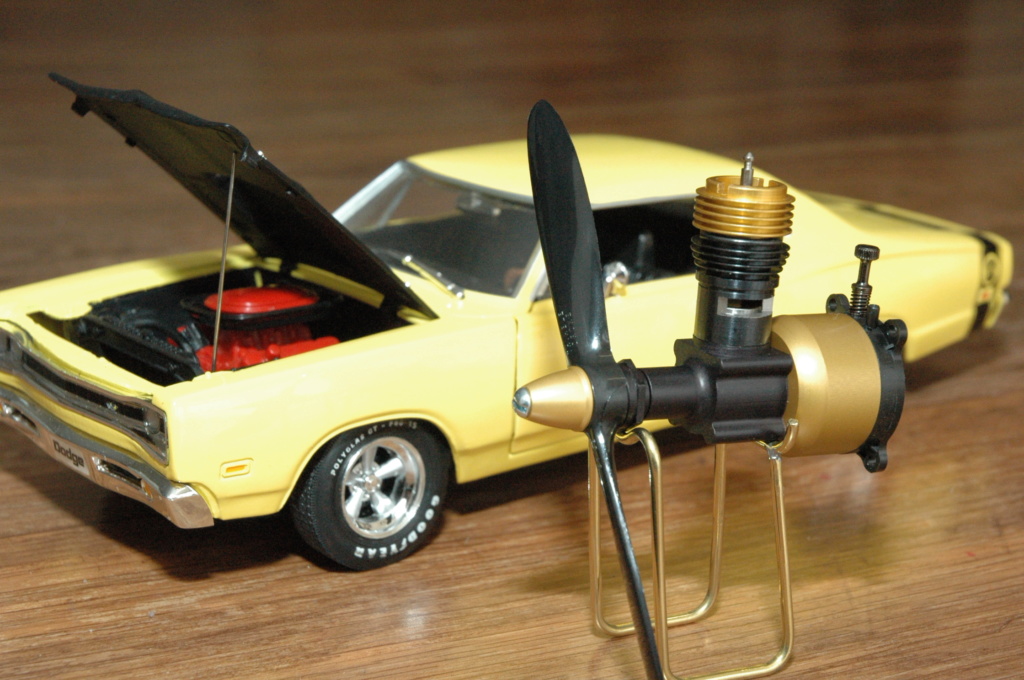
Well I’ve made a start, just have to keep the momentum going.
While building the Penelope Pitstop Wacky Racer with two engines I was thinking about a three engined version using a Shrike as a base car.
Only a few years back Shrikes weren’t that sort after and I picked up a few at what now seems like bargain prices. I was going to use the green Shrike but as I have a red, black (R/C) and two yellow ones, I decide to keep the green one and use one of the yellow ones instead.
I dismantled and cleaned the Yellow Shrikes this afternoon, the plan being (thinking they were both the same) to make a good one out of the bits and then use the top half of the body off the other car.

Then I noticed that there is a small difference between the two bodies inside the rear wheel fairings. The body that had the number 8 has extra reinforcing inside the fairing while the body that had the number 5 does not. I presume the number 5 is an earlier model. The red, green and black Shrikes I have all have that extra reinforcing. Apart from their engines and decals I could see no other differences between the two yellow cars

As luck would have it the number 5 is in the better condition and possibly an earlier model so it gets kept as standard. The number 8 body has quite a bit of red staining on it so I’ll use the top off that as it may get painted anyway and keep on the lookout for another yellow body or donor car to finish number 8. The engine off number 8 is one of the pair on the Wacky Racer.

I also have an early Prop Rod metal base which will be much stronger than the later plastic ones and more suited to the build I have in mind.

With a little modification to the Shrike top around the axle exit points I reckon it will fit the Prop Rod base. While the mounting screws on the base (front pair and rear pair) are the same width apart as the Shrike top, the distance between the front pair and the rear pair on the Prop Rod base is 195mm as against 192mm on the Shrike top but I think I can overcome that problem. I’ll use the back pair as they are and then sort the front mount later. This keeps the rear axle in the middle of the wheel fairing and after a few measurements it looks like the knife edge wheels like on the Wacky Racer will fit inside the fairing. I’ll just have to make some new axles
There is no centre screw mount on the Prop Rod base like there is on the Shrike base.
Here’s a photo of where I’m heading. If you can imagine the Shrike body lower down where the rear wheels are inside the fairings and a third motor in the centre where it normally sits facing backwards.

Engines are High Performance 049 Bumble Bees rated at 17,000 to 19,000 RPM with 5x3 prop and 25% nitro. Should be a bit quicker than Penelope’s car.

Well I’ve made a start, just have to keep the momentum going.

Davenz13- Platinum Member

- Posts : 597
Join date : 2013-11-28
Age : 69
Location : Palmerston North, New Zealand
 Re: Shrike X3 Experimental
Lately, some of my club members have been pulling out many of their older items such as the Cox Champion tether cars. Another had several Shrike cars he just got back together. When connected to the stock holes in the body, we noted that the car pitches when it gets going fast. Rich the owner slowed the video down to see it more clear. The attachment points needs to be raised about 1" higher. https://www.facebook.com/PhillyFliersCL/videos/vb.513140418756097/240970620158052/?type=2&theater

Ken Cook- Top Poster

- Posts : 5637
Join date : 2012-03-27
Location : pennsylvania
 Re: Shrike X3 Experimental
Good luck, Dave, That looks like a great project!! 


OVERLORD- Diamond Member

- Posts : 1807
Join date : 2013-03-19
Age : 58
Location : Normandy, France
 Re: Shrike X3 Experimental
Should be a interesting transformation, nice to know the difference between the body's . Ken thats a cool vid. sounds like a 4 stroke when slowed down 


getback- Top Poster


Posts : 10441
Join date : 2013-01-18
Age : 67
Location : julian , NC
 Re: Shrike X3 Experimental
Your jelly bean Easter egg car set a standard that may never be exceeded. I loved that thing.
Good luck with your latest venture. Looking forward to May first.
Bob
Good luck with your latest venture. Looking forward to May first.
Bob

rsv1cox- Top Poster


Posts : 11248
Join date : 2014-08-18
Location : West Virginia
 Shrike X3 Experimental
Well time ticks on and I still haven’t done much with my entry.
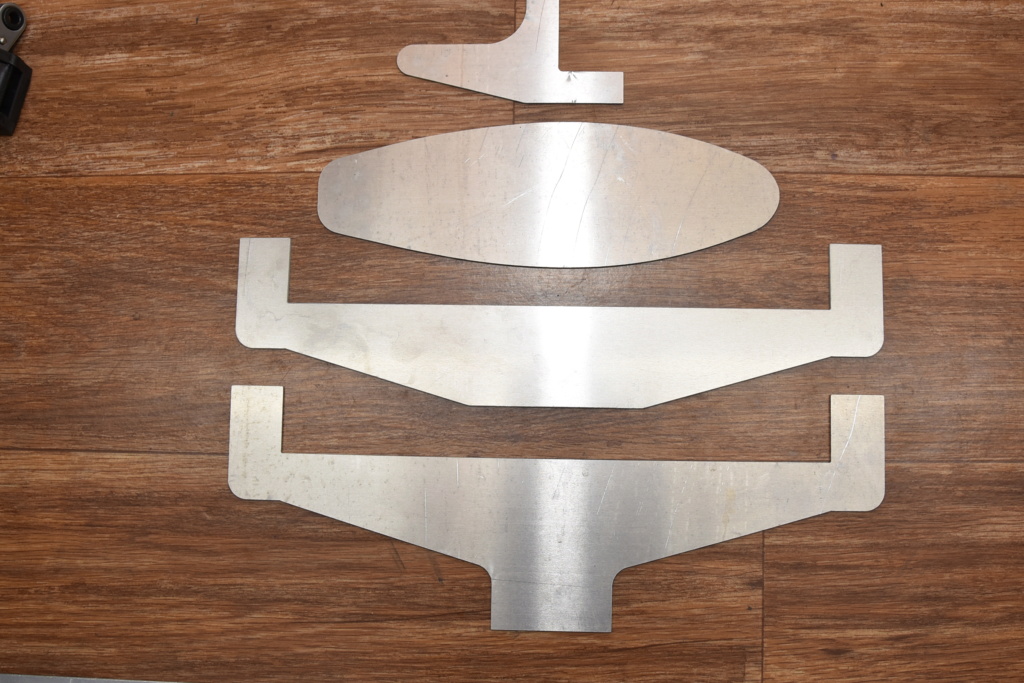
I needed some bits water jet cut for a bike project so thought I better get some bits for the Shrike project as well.
I also got a complete set for the Penelope Pitstop car as I have two spare bodies and …well… they’re there if I have time to build another.
Anyway, yesterday I had a quick look at what modifications I’d need to put a similar engine mount on the Shrike and sent off a drawing for that as well. They all arrived back this morning.
In this photo the first three items from the top down are for the Pitstop car and the bottom item is the modified Shrike engine mount.
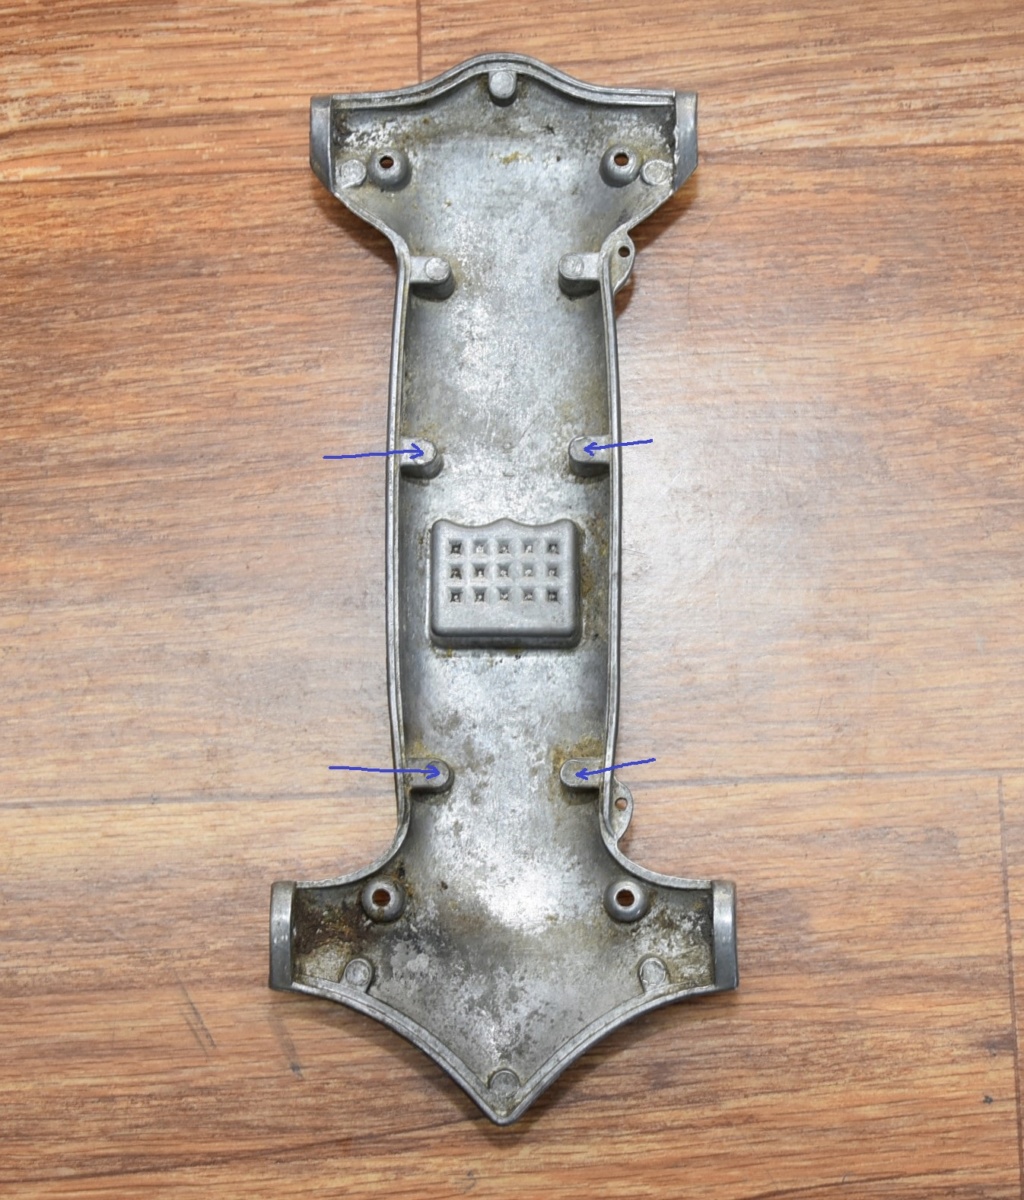
Four of the stiffening points along the sides of the prop Rod chassis will be drilled and threaded for the engine mount.
Showing the engine mount roughly in place.
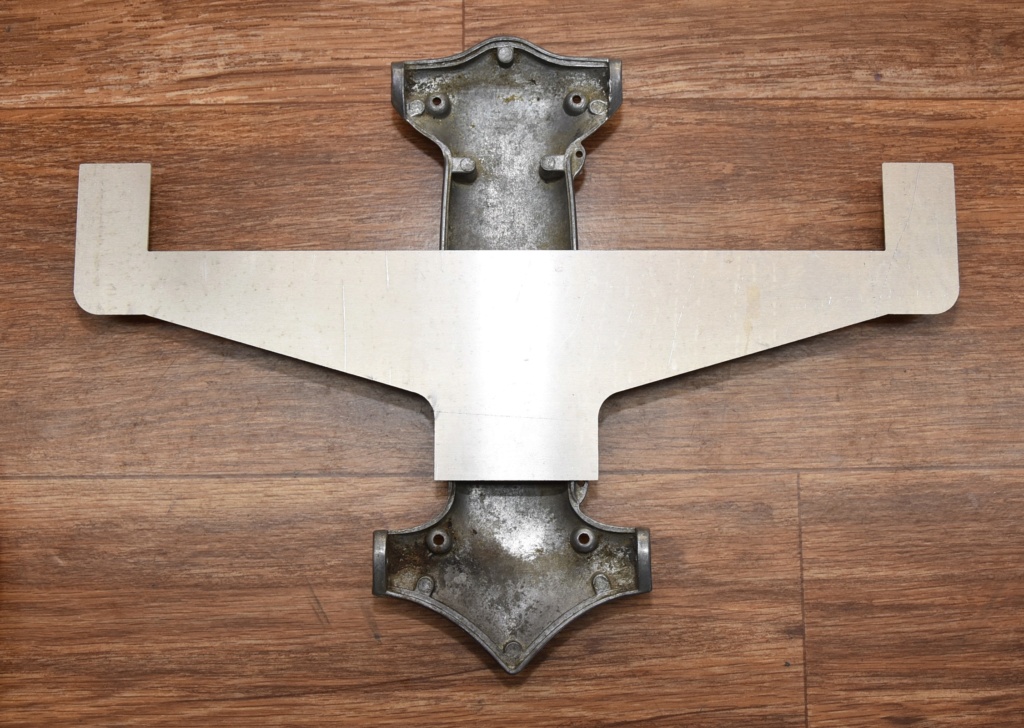
With upper body roughly in place.
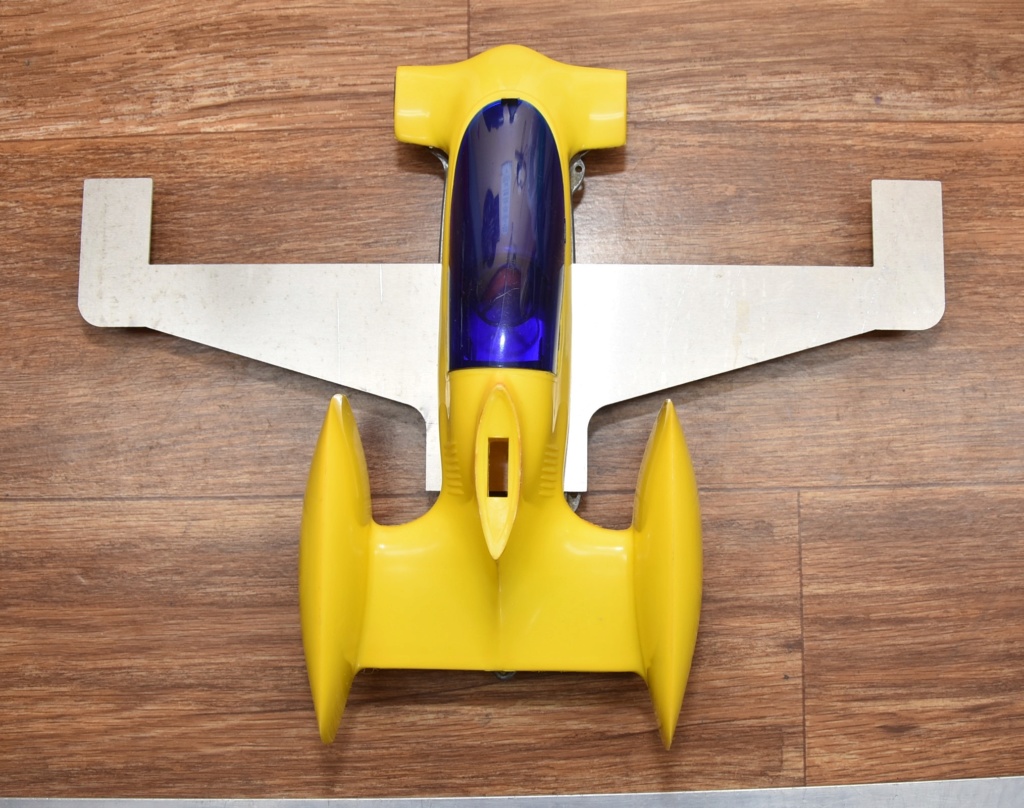
When the sides are bent up they should clear the wheel nacelles.
Still a long way to go
I needed some bits water jet cut for a bike project so thought I better get some bits for the Shrike project as well.
I also got a complete set for the Penelope Pitstop car as I have two spare bodies and …well… they’re there if I have time to build another.
Anyway, yesterday I had a quick look at what modifications I’d need to put a similar engine mount on the Shrike and sent off a drawing for that as well. They all arrived back this morning.
In this photo the first three items from the top down are for the Pitstop car and the bottom item is the modified Shrike engine mount.

Four of the stiffening points along the sides of the prop Rod chassis will be drilled and threaded for the engine mount.

Showing the engine mount roughly in place.

With upper body roughly in place.

When the sides are bent up they should clear the wheel nacelles.
Still a long way to go

Davenz13- Platinum Member

- Posts : 597
Join date : 2013-11-28
Age : 69
Location : Palmerston North, New Zealand
 Shrike X3 Experimental
Got a bit more done.
After a lot of measuring decided where the mounting holes needed to be and drilled and tapped threads in the body pan.
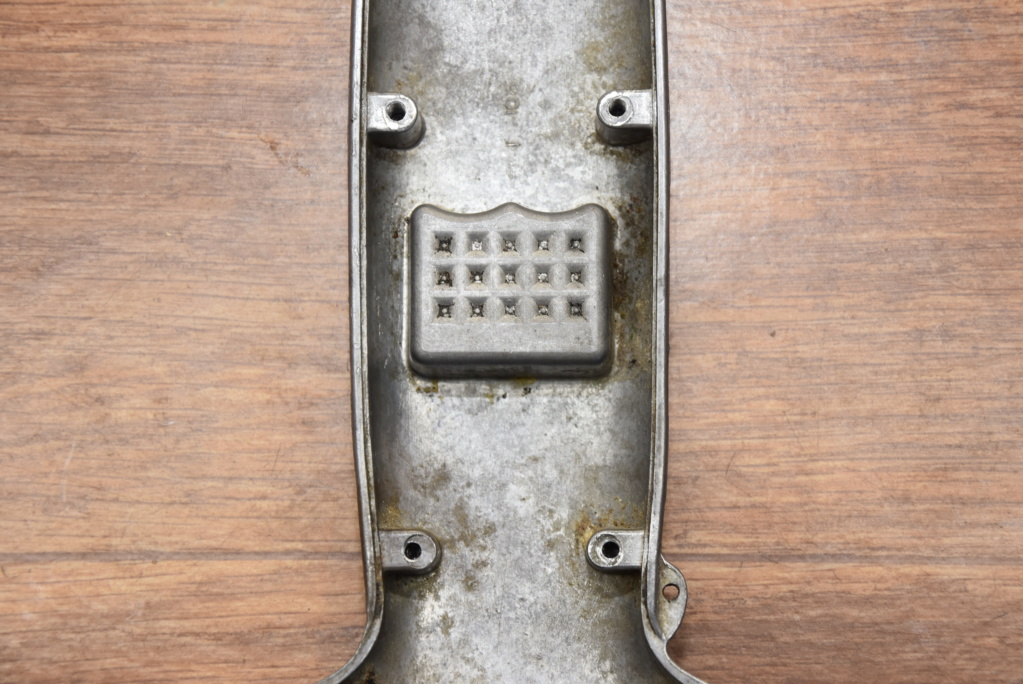
Drilled holes to suit in engine mount.

Dressed mount to the body pan.
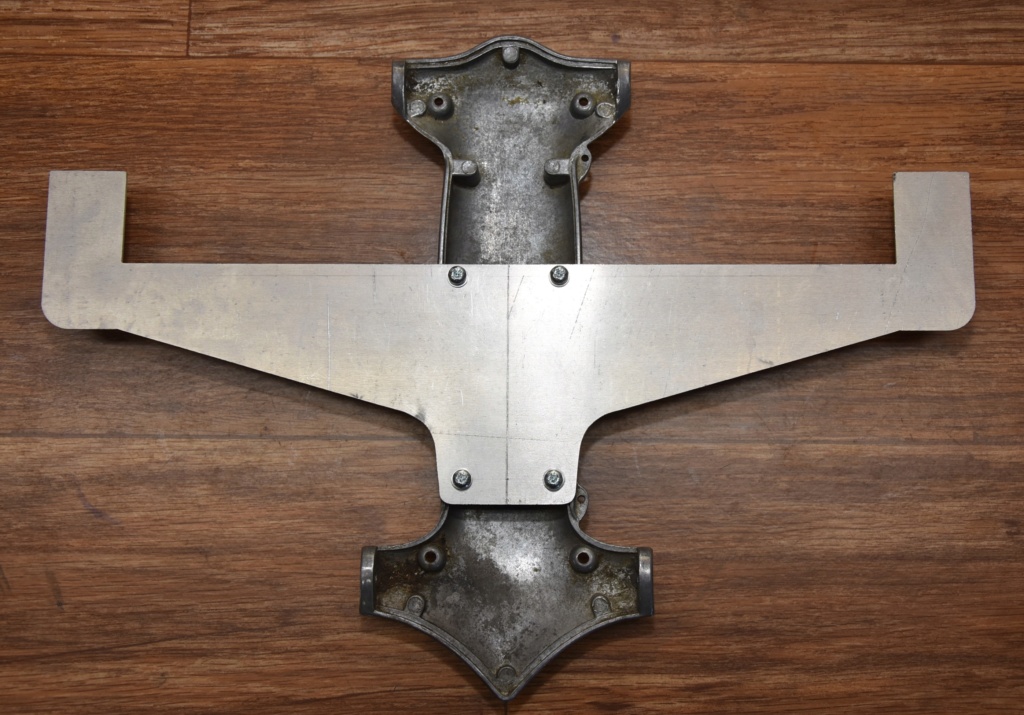
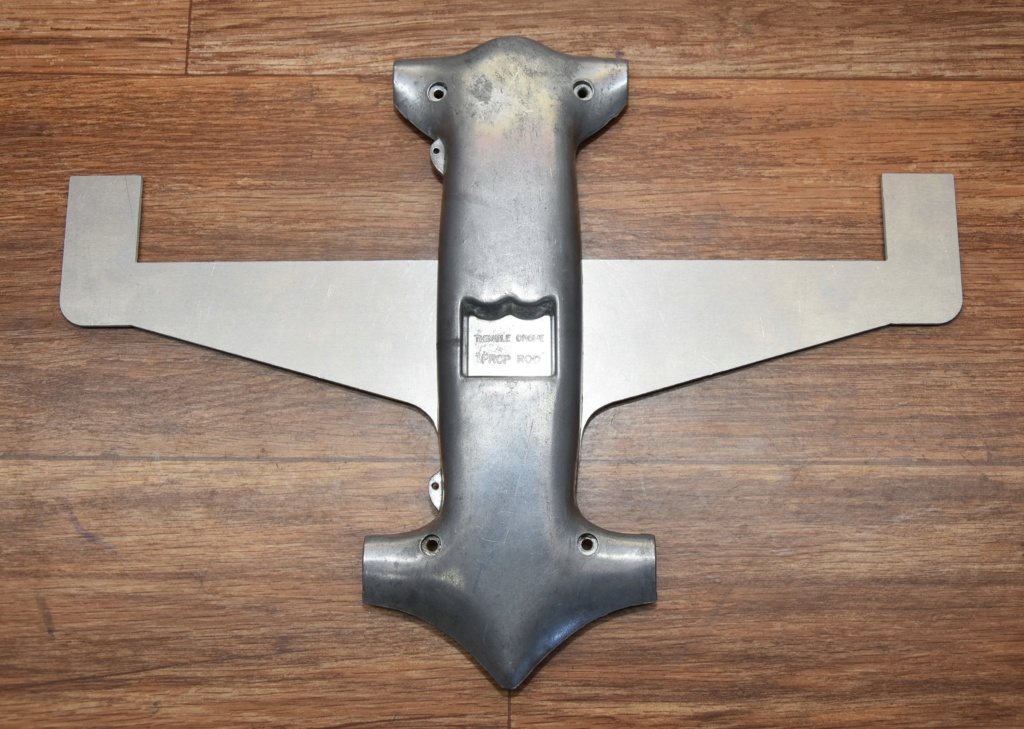
So far so good but I’m starting to have second thoughts about those cast lugs for the tether mount, whether they’ll be strong enough to hold this thing hurling round at speed.
Will think on that
After a lot of measuring decided where the mounting holes needed to be and drilled and tapped threads in the body pan.

Drilled holes to suit in engine mount.

Dressed mount to the body pan.


So far so good but I’m starting to have second thoughts about those cast lugs for the tether mount, whether they’ll be strong enough to hold this thing hurling round at speed.
Will think on that


Davenz13- Platinum Member

- Posts : 597
Join date : 2013-11-28
Age : 69
Location : Palmerston North, New Zealand
 Re: Shrike X3 Experimental
Coming together there Davenz13 , shaping into a speed demon (the twin engine man ) 


getback- Top Poster


Posts : 10441
Join date : 2013-01-18
Age : 67
Location : julian , NC
 Re: Shrike X3 Experimental
Hmm I could have saved myself a lot of trouble by using a Prop-Rod body, which I don’t have, instead of a Shrike body, which I do have but is proving very tricky to adapt to the Prop-Rod belly pan. Anyway, the Prop-Rod body style wouldn’t suit the theme I’m hoping to achieve on completion so the Shrike body must be made to fit.
I’ve started trimming the Shrike body but I need to get the axles and wheels in place so I can see exactly how much to take off. I’m using wheels with bearings in the hubs so the axles need to be fixed in place. The floor of the belly pan where the rear axle runs across is curved so mounting some form of carrier there would be difficult and the alignment a nightmare. The easiest way seemed to be to mount a carrier off the engine mount. This is screwed securely to the belly pan and is a nice flat surface to work off.
Using a scrap piece of 4mm aluminum plate and an offcut of 20mm aluminum bar-stock it looked like the idea might work.
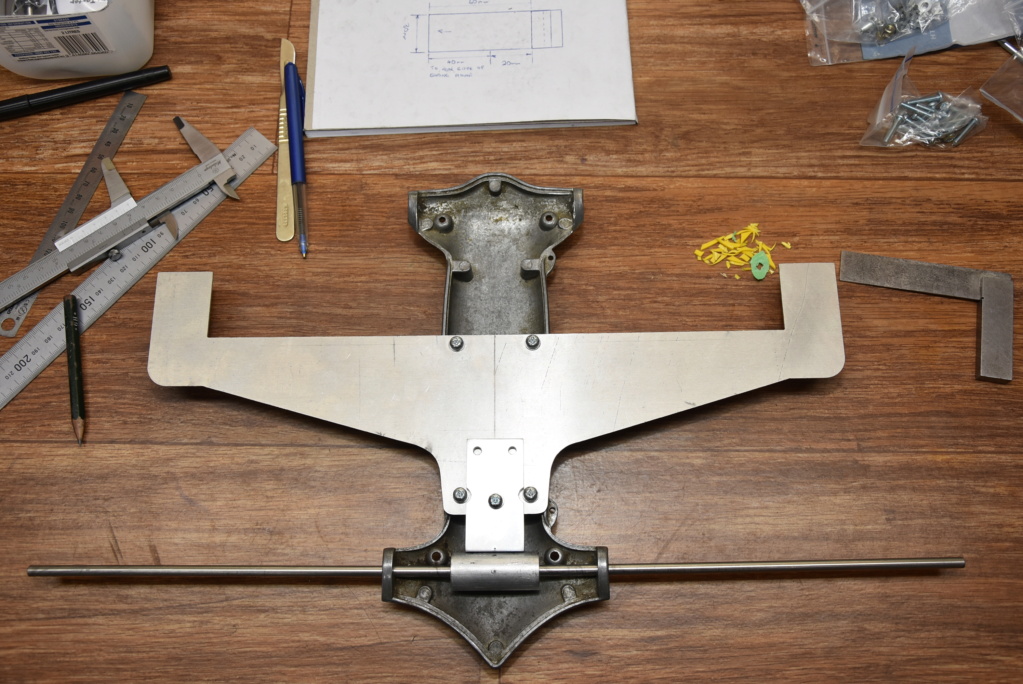
Prop-Rod axles are about 5mm so the axle holes in the belly pan were carefully drilled out to 6mm which also got rid of the wear inside the original holes. Using 6mm axles allows for the ends to be turned down and threaded to provide a lip for the bearing to seat against.
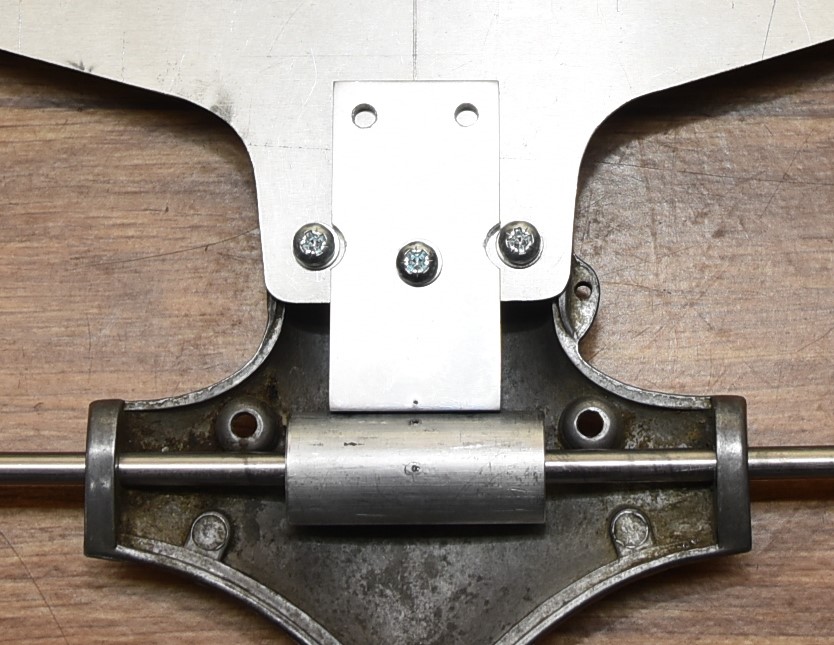
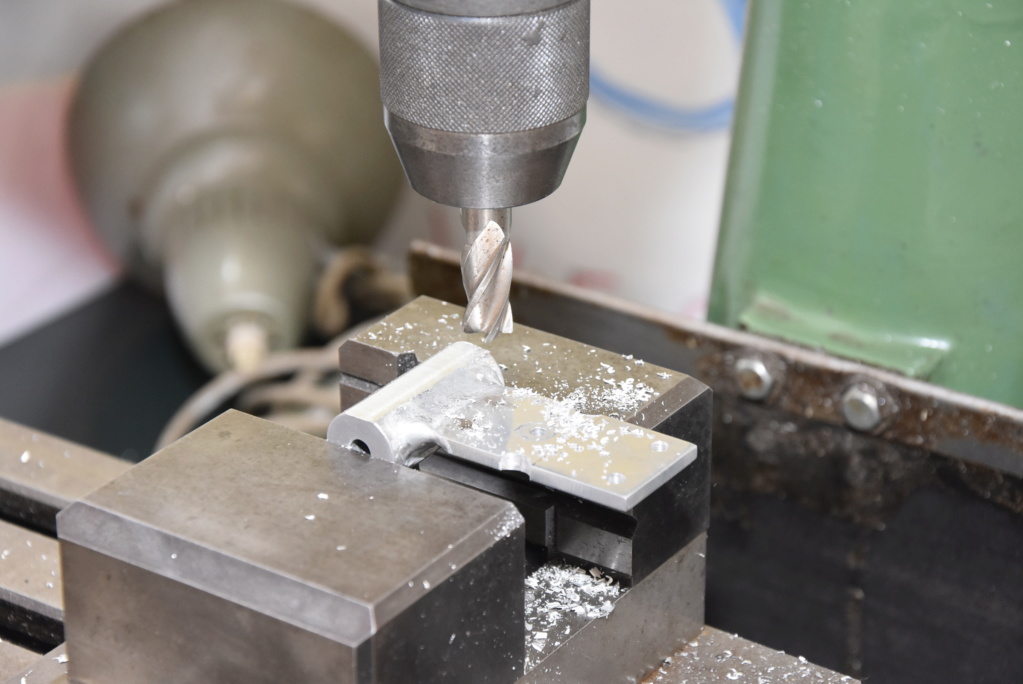
Tomorrow I’ll visit a mate who I’ll get to weld the bar-stock to the 4mm plate. Then the top of the bar-stock and the center portion of the axle will be milled flat and a couple of grub screws fitted to lock the axle in place, once I’ve made it
Slow going but progress.
I’ve started trimming the Shrike body but I need to get the axles and wheels in place so I can see exactly how much to take off. I’m using wheels with bearings in the hubs so the axles need to be fixed in place. The floor of the belly pan where the rear axle runs across is curved so mounting some form of carrier there would be difficult and the alignment a nightmare. The easiest way seemed to be to mount a carrier off the engine mount. This is screwed securely to the belly pan and is a nice flat surface to work off.
Using a scrap piece of 4mm aluminum plate and an offcut of 20mm aluminum bar-stock it looked like the idea might work.

Prop-Rod axles are about 5mm so the axle holes in the belly pan were carefully drilled out to 6mm which also got rid of the wear inside the original holes. Using 6mm axles allows for the ends to be turned down and threaded to provide a lip for the bearing to seat against.

Tomorrow I’ll visit a mate who I’ll get to weld the bar-stock to the 4mm plate. Then the top of the bar-stock and the center portion of the axle will be milled flat and a couple of grub screws fitted to lock the axle in place, once I’ve made it

Slow going but progress.

Davenz13- Platinum Member

- Posts : 597
Join date : 2013-11-28
Age : 69
Location : Palmerston North, New Zealand
 Re: Shrike X3 Experimental
A Lot of modification but with those wheels with bearing in them will make a big difference when she takes to the circle , 


getback- Top Poster


Posts : 10441
Join date : 2013-01-18
Age : 67
Location : julian , NC
 Re: Shrike X3 Experimental
Very aware that I’m way behind schedule on my build (nothing unusual there) I locked the doors, took the phone off the hook (yes, I still use a landline) and headed for the workshop.
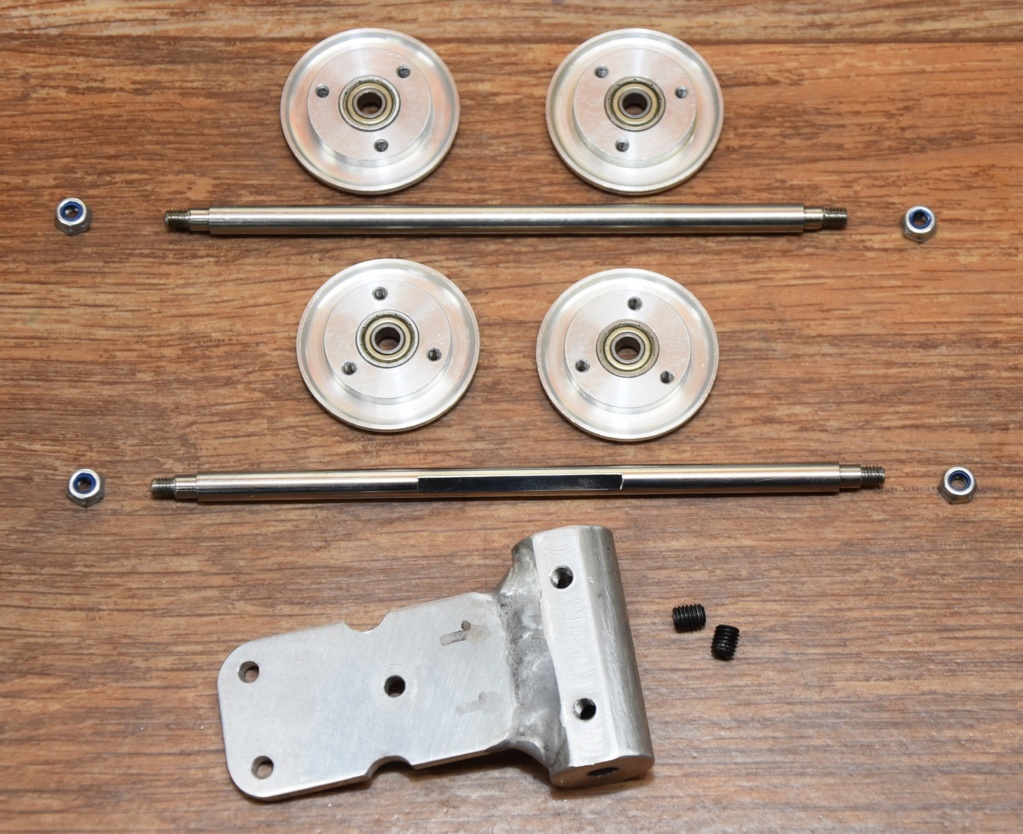
The rear axle carrier had been welded together and after a bit of milling, drilling and thread cutting it’s ready for polishing.
Bearings then fitted to the wheel hubs so axles were next on the agenda.
A lot of scribbling, measuring and calculations later, it’s on to the lathe and the rear axle is made, or so I thought.
On go the wheels and then when I went to fit it to the chassis, I found that I had misread my own scribbling and the axle was five millimeters short.
As it was about to go into the prototype container (often referred to as the rubbish bin or trash can) I stopped cursing for a minute and tried it in the front and perfect fit.
Got to have a win occasionally. Front axle completed
There is not a lot of room for the larger wheels inside the rear nacelles of the shrike body so after
adjustments made to the scribble and after careful concentration, the rear axle is completed and fits perfectly.
Axles and rear carrier all done
Next on the list is the front axle carrier.
The design of the wheel hubs prevents using spacers between the wheels and the chassis so I need to make something similar to the rear setup to hold the axle centered and non-rotating.
That’s today's mission.
The rear axle carrier had been welded together and after a bit of milling, drilling and thread cutting it’s ready for polishing.

Bearings then fitted to the wheel hubs so axles were next on the agenda.
A lot of scribbling, measuring and calculations later, it’s on to the lathe and the rear axle is made, or so I thought.
On go the wheels and then when I went to fit it to the chassis, I found that I had misread my own scribbling and the axle was five millimeters short.

As it was about to go into the prototype container (often referred to as the rubbish bin or trash can) I stopped cursing for a minute and tried it in the front and perfect fit.
Got to have a win occasionally. Front axle completed
There is not a lot of room for the larger wheels inside the rear nacelles of the shrike body so after
adjustments made to the scribble and after careful concentration, the rear axle is completed and fits perfectly.
Axles and rear carrier all done

Next on the list is the front axle carrier.
The design of the wheel hubs prevents using spacers between the wheels and the chassis so I need to make something similar to the rear setup to hold the axle centered and non-rotating.
That’s today's mission.

Davenz13- Platinum Member

- Posts : 597
Join date : 2013-11-28
Age : 69
Location : Palmerston North, New Zealand
 Re: Shrike X3 Experimental
On go the wheels and then when I went to fit it to the chassis, I found that I had misread my own scribbling and the axle was five millimeters short. DAMMIT! wrote:


 I know the feeling , glad it worked out in the front !
getback- Top Poster


Posts : 10441
Join date : 2013-01-18
Age : 67
Location : julian , NC
 Shrike X3 Experimental
I have done same thing on my lathe and mill! Glad it worked out for you.

David S- Gold Member

- Posts : 176
Join date : 2015-06-23
Age : 64
Location : New Jersey
 Re: Shrike X3 Experimental
Well I seem to be getting somewhere with this build.
After taking to the upper body with a small scalpel it eventually became obvious that I couldn’t cut any more material off it, not the amount I needed to get the body to fit to the belly pan anyway. I’ve already removed so much off the mounting screw boss’s as to render them unusable. It was at this point I was starting to have serious doubts as to whether I’d bitten off more than I could chew in trying to mate the two halves off different models together, but I wasn’t giving up yet.
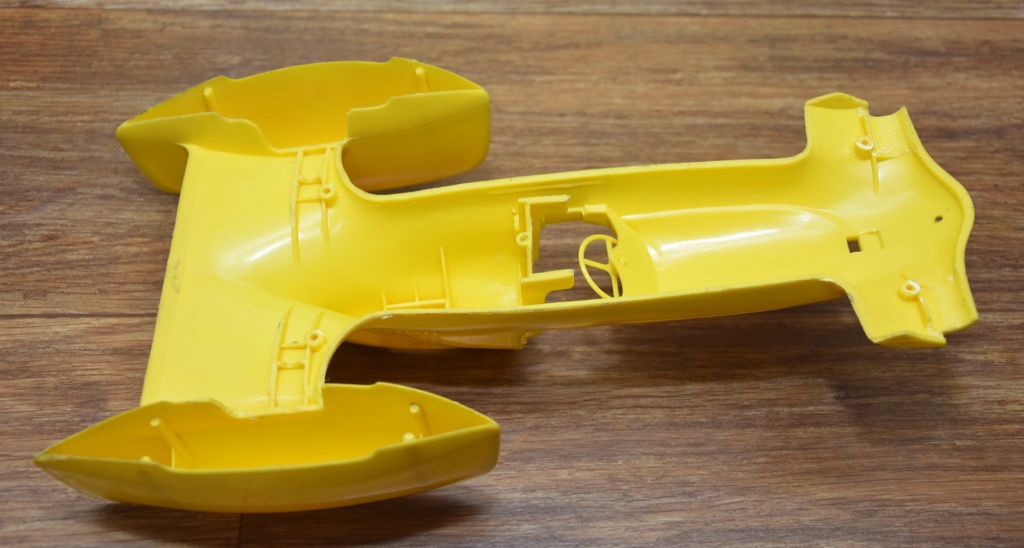
So, I took to the belly pan and trimmed the rear axle supports down to 2 mil wide a side and level with the rear of the belly pan.
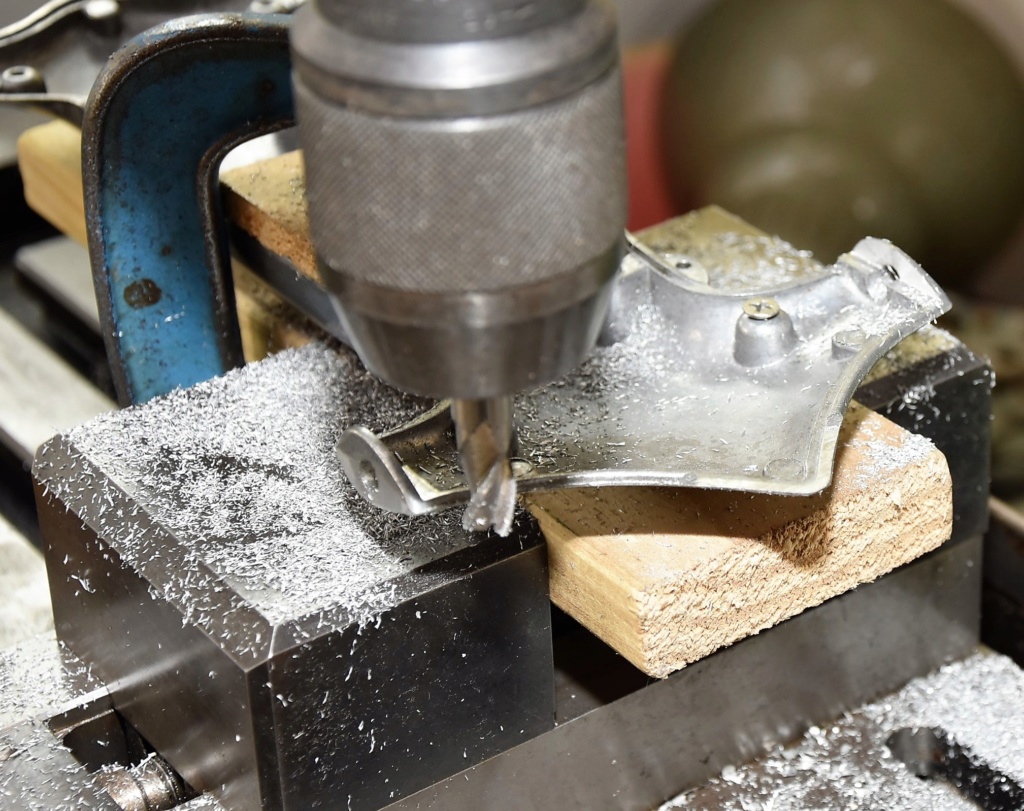
I also trimmed a bit off the tail. This allowed the remaining portions to slide up the inside of the rear wheel nacelles and finally allowed the rear of the body to fit to the belly pan.
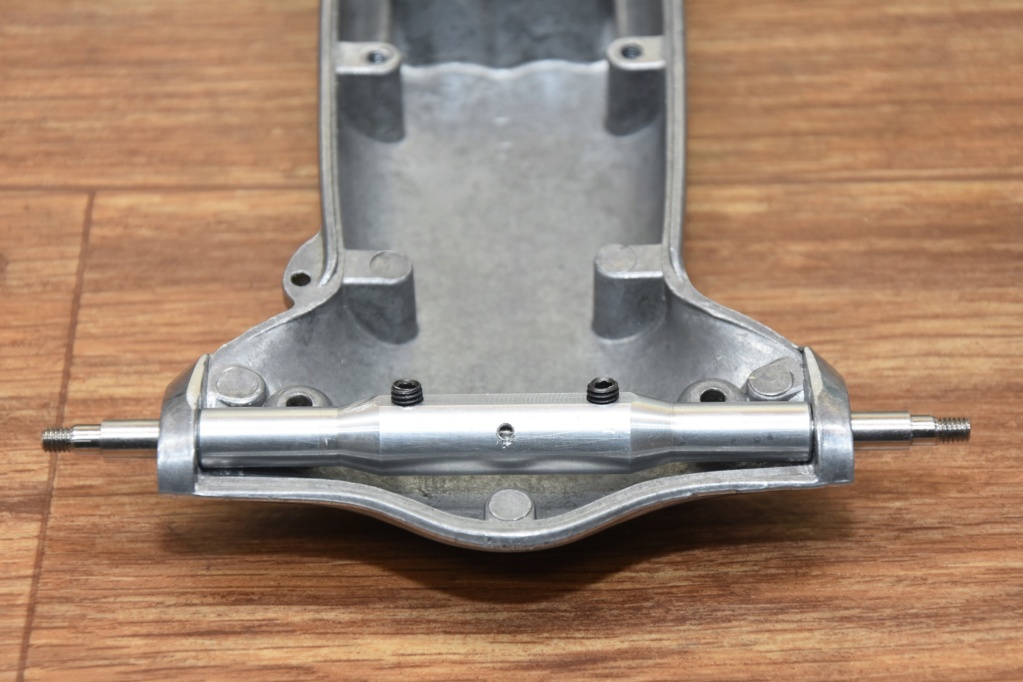
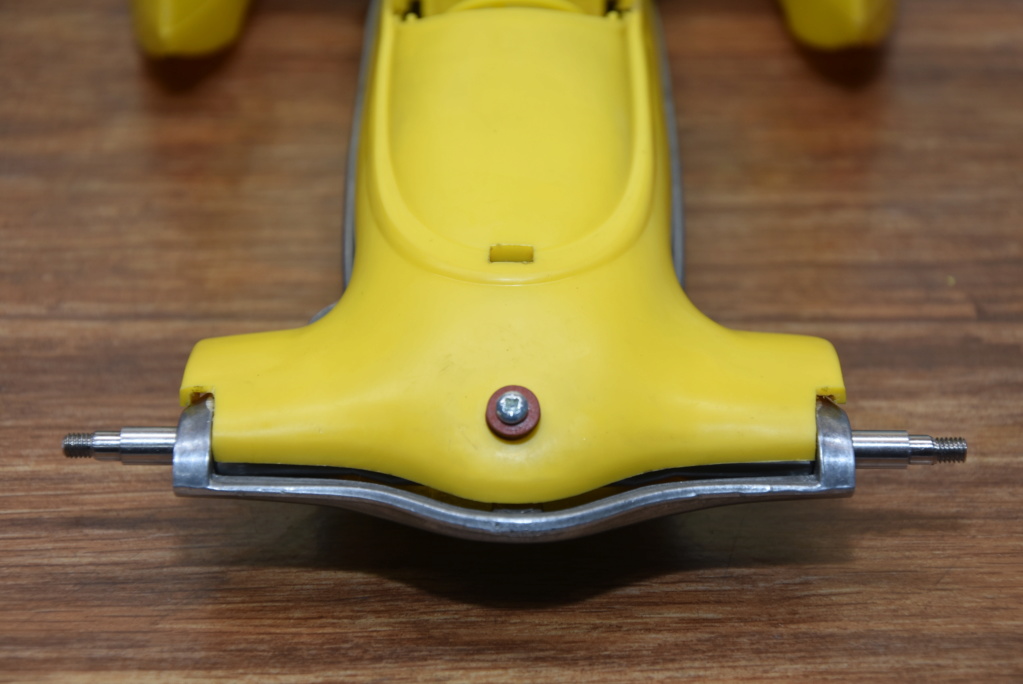
I then tapered the front axle carrier where the nose of the body comes in at the sides and tapped a thread in the middle for securing the front of the body.
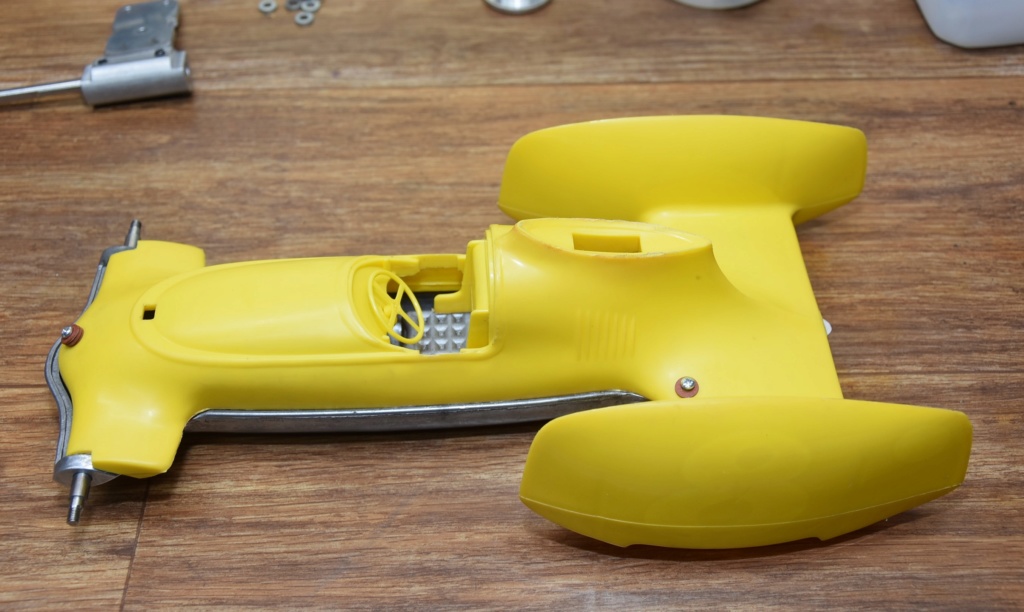
And finally, the body fits the belly pan.
As there is not enough material left for the original mounting screws, the body is now secured by one screw at the front and two at the back. I have 2mm black button head screws coming to replace the silver screws shown in the photos
As the Shrike wheelbase is shorter than the Prop Rod’s I couldn’t do much about the gap at the front so I decided to make a feature of it. The cutaways on the sides became air scoops, every fast car has air scoops and the underbite looks quite aggressive so I plan to fill the gap with a piece of black plastic to give it a bit of a wry smile look, black and yellow being the colour scheme.
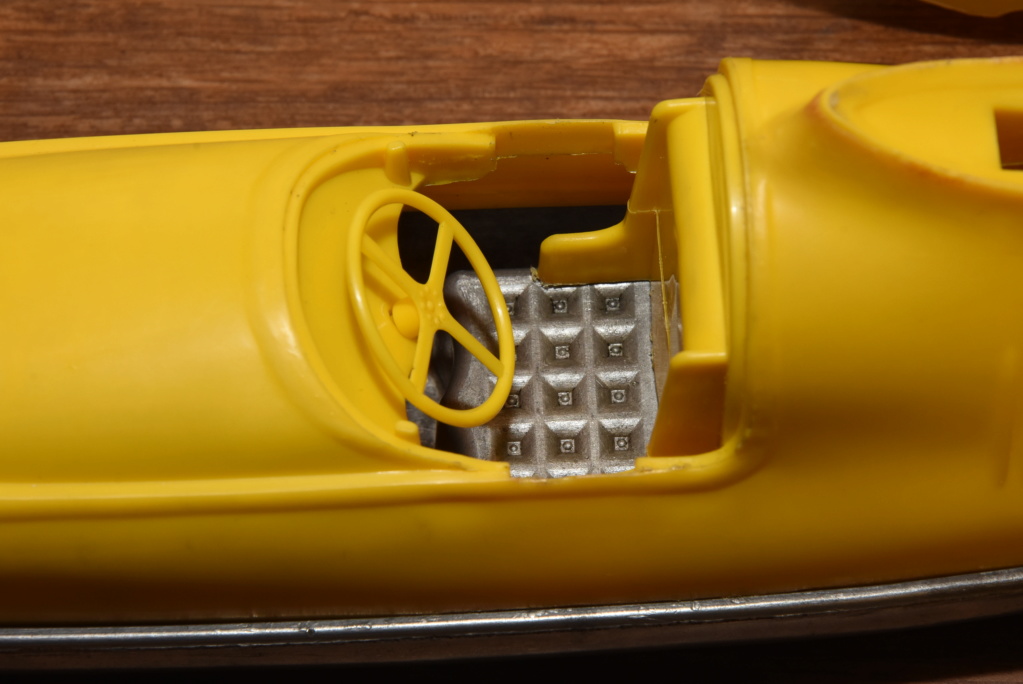
Even the seat lined up perfectly, more by good luck than good management.
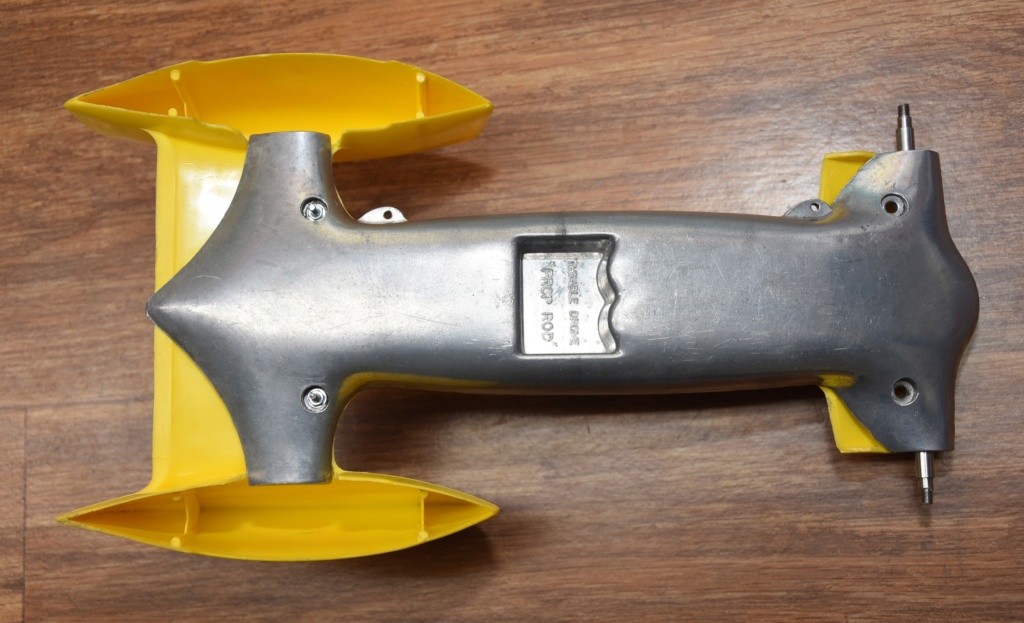
Underneath all looks good.
The pointed tip at the rear of the belly pan trimmed back to the body line.

Now the chassis is built up and a push across the workshop floor shows no sign of crabbing or veering off line. So far so good.
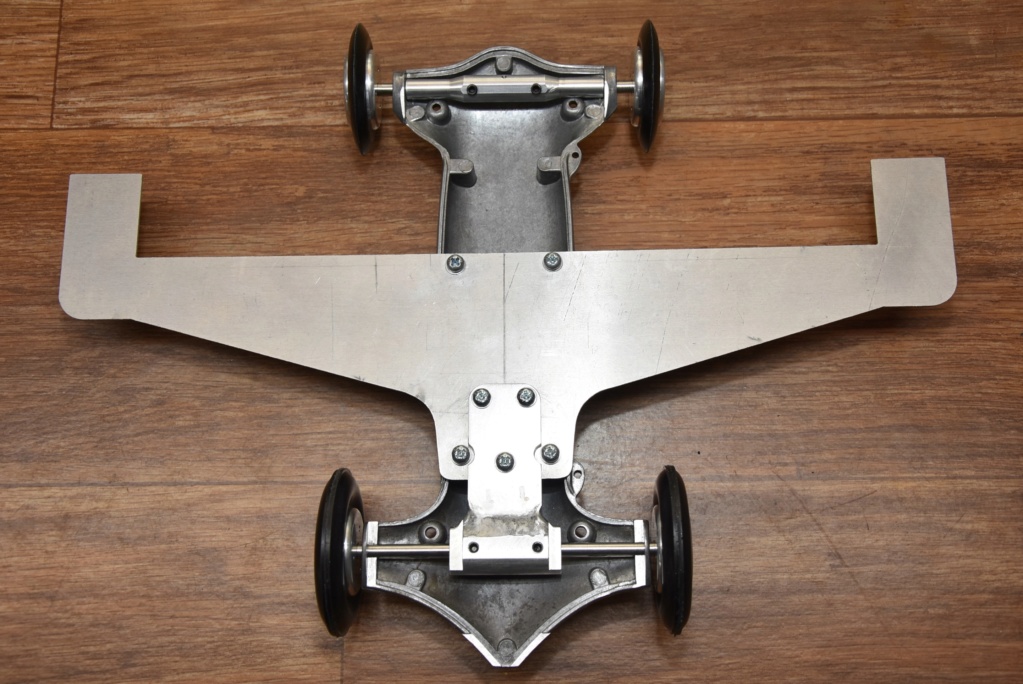
A trial fit and engine mount will clear rear wheel nacelle fronts when bent up.
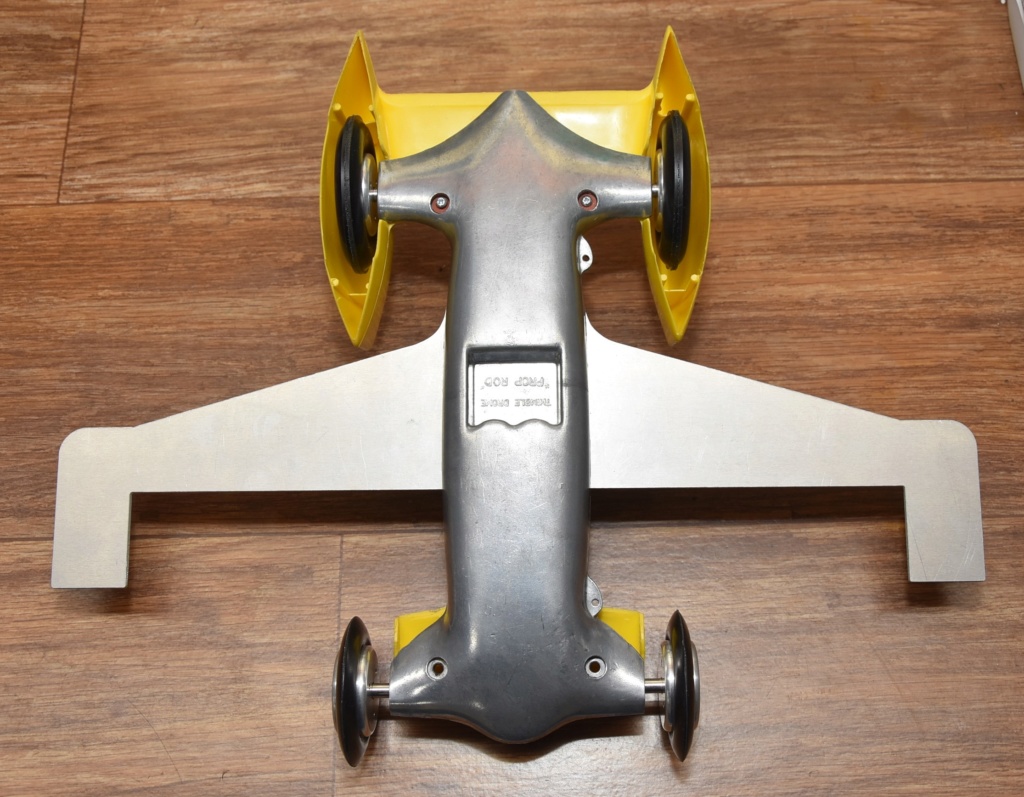
Wheel placement looks good. Don’t need to make another axle. Phew
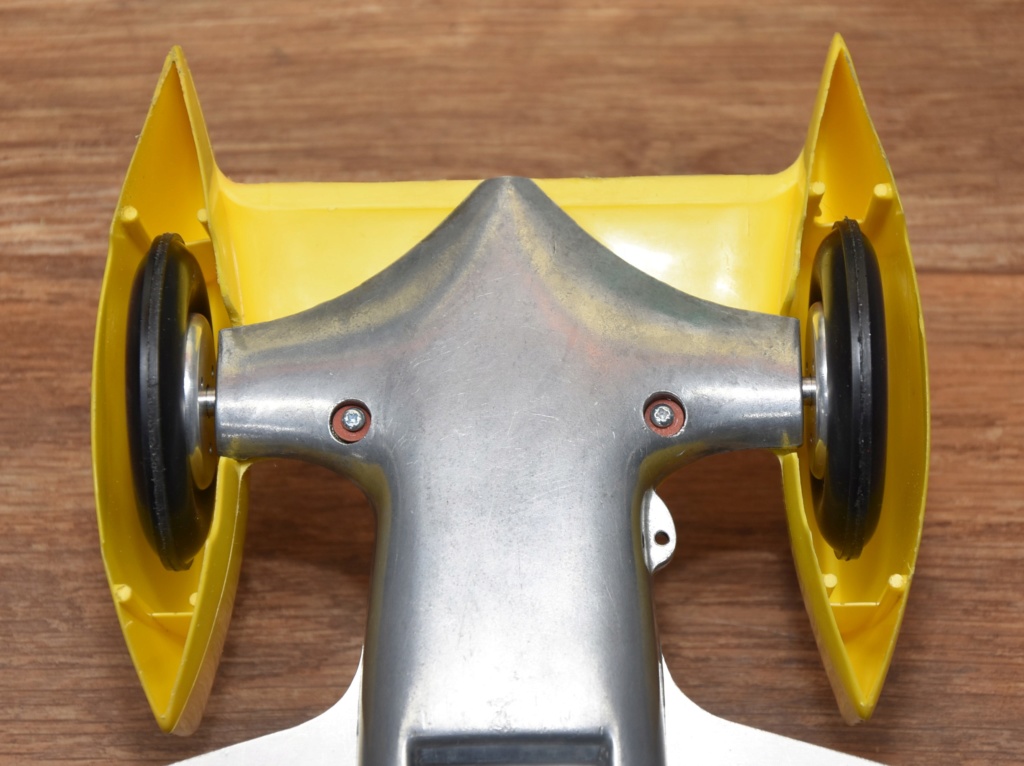
Now to see how much has to be taken off the sides off the body to clear the twin engine mount
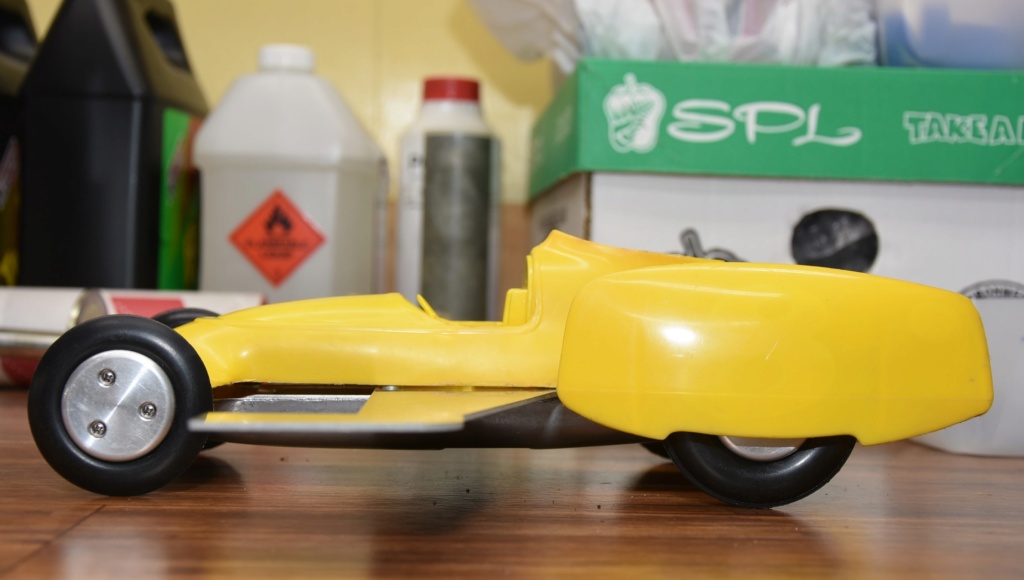
Just need to cut a section out of each side to clear the engine mount plus a bit off the seat base.
Then there is just the mount itself to do.
Getting there slowly. Not sure if I’m going to make the 1st of June deadline but giving it a go.
I know Roddie is almost finished doing a build and I think Bob has an entry. Is anyone else doing an entry?
After taking to the upper body with a small scalpel it eventually became obvious that I couldn’t cut any more material off it, not the amount I needed to get the body to fit to the belly pan anyway. I’ve already removed so much off the mounting screw boss’s as to render them unusable. It was at this point I was starting to have serious doubts as to whether I’d bitten off more than I could chew in trying to mate the two halves off different models together, but I wasn’t giving up yet.

So, I took to the belly pan and trimmed the rear axle supports down to 2 mil wide a side and level with the rear of the belly pan.

I also trimmed a bit off the tail. This allowed the remaining portions to slide up the inside of the rear wheel nacelles and finally allowed the rear of the body to fit to the belly pan.
I then tapered the front axle carrier where the nose of the body comes in at the sides and tapped a thread in the middle for securing the front of the body.

And finally, the body fits the belly pan.
As there is not enough material left for the original mounting screws, the body is now secured by one screw at the front and two at the back. I have 2mm black button head screws coming to replace the silver screws shown in the photos

As the Shrike wheelbase is shorter than the Prop Rod’s I couldn’t do much about the gap at the front so I decided to make a feature of it. The cutaways on the sides became air scoops, every fast car has air scoops and the underbite looks quite aggressive so I plan to fill the gap with a piece of black plastic to give it a bit of a wry smile look, black and yellow being the colour scheme.

Even the seat lined up perfectly, more by good luck than good management.

Underneath all looks good.

The pointed tip at the rear of the belly pan trimmed back to the body line.

Now the chassis is built up and a push across the workshop floor shows no sign of crabbing or veering off line. So far so good.

A trial fit and engine mount will clear rear wheel nacelle fronts when bent up.

Wheel placement looks good. Don’t need to make another axle. Phew

Now to see how much has to be taken off the sides off the body to clear the twin engine mount

Just need to cut a section out of each side to clear the engine mount plus a bit off the seat base.
Then there is just the mount itself to do.
Getting there slowly. Not sure if I’m going to make the 1st of June deadline but giving it a go.
I know Roddie is almost finished doing a build and I think Bob has an entry. Is anyone else doing an entry?

Davenz13- Platinum Member

- Posts : 597
Join date : 2013-11-28
Age : 69
Location : Palmerston North, New Zealand
 Re: Shrike X3 Experimental
Way to go at it Daven , she is coming along Nicely i think she will really perform! I got one ready for the event and still need to put some parts on the GtP 

getback- Top Poster


Posts : 10441
Join date : 2013-01-18
Age : 67
Location : julian , NC
 Re: Shrike X3 Experimental
That is just Slick looking! Lots of nice custom work.. Mine? I am still working on getting a stock of the shelf model cleaned and polished up. Plenty of ideas on a modified version but nothings got past the design napkin yet!! 


Marleysky- Top Poster


Posts : 3618
Join date : 2014-09-28
Age : 72
Location : Grand Rapids, MI
 Great job on your modified Shrike
Great job on your modified Shrike! Maybe the deadline can be extended on the contest so you can be in it!

David S- Gold Member

- Posts : 176
Join date : 2015-06-23
Age : 64
Location : New Jersey
 Re: Shrike X3 Experimental
No you can't do that. Do it for me then you have to do it for others, before you know it's Christmas and we're still going at it.
The date was set months ago. I've just been a bit slack getting going.
The date was set months ago. I've just been a bit slack getting going.

Davenz13- Platinum Member

- Posts : 597
Join date : 2013-11-28
Age : 69
Location : Palmerston North, New Zealand
 Re: Shrike X3 Experimental
Yes,that's true! I was try to get you motivated too finish the Shrike by the deadline!
Last edited by David S on Wed May 22, 2019 8:01 pm; edited 1 time in total (Reason for editing : spelling)

David S- Gold Member

- Posts : 176
Join date : 2015-06-23
Age : 64
Location : New Jersey
 Re: Shrike X3 Experimental
Well David, I’ve taken your motivational push to heart and I’m “going for the doctor” as we say.
I trimmed the sides of the shrike body to fit over the engine mount and had to take two mil off the top of the rear axle carrier but the body now fits down on the belly pan.
I asked a friend, who does all the decals for the race bikes, if she could do some for the car. I told her what I wanted and they’ll be ready on Friday.
Another job done.
I put the rear nacelle in the lathe and cut the groove for the mounting nuts. I’ve never been a fan of the self-tapping screws used as standard.
Fitted a pusher 3 blade 5 x 3 and the rear engine is ready to mount. (all three engines still need to be broken in)

When making the first one of these mounts, I bent the engine tabs and the sides up before I drilled the mounting holes and shaped the backplate outline which then made it somewhat difficult to do. So, this time I’m doing all that before I bend the mounts up, proving to be a lot easier.
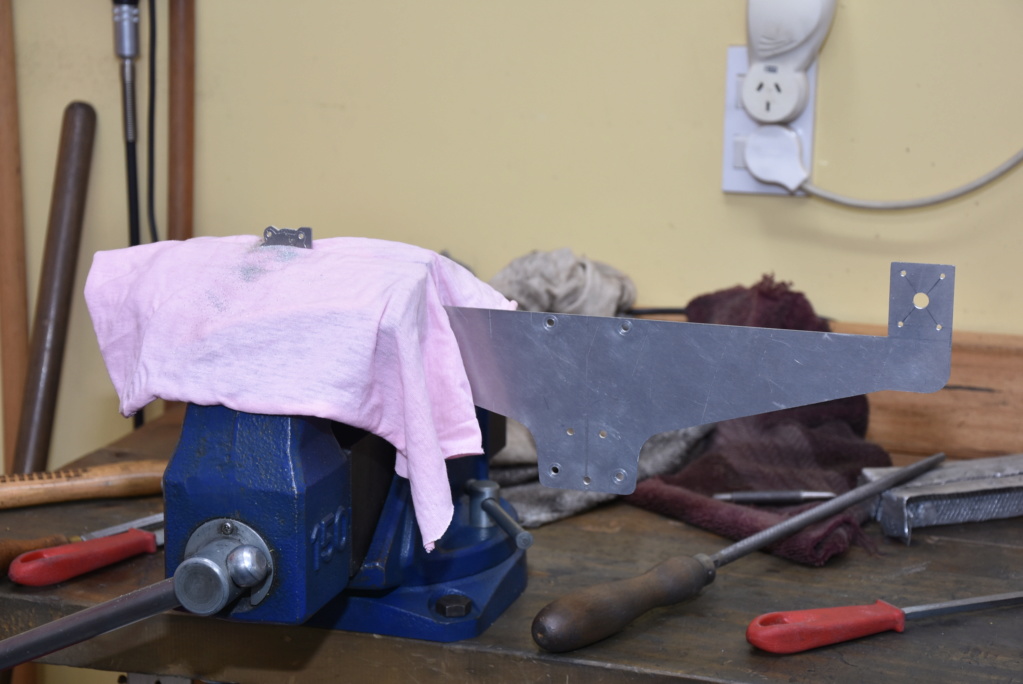
One down one to go
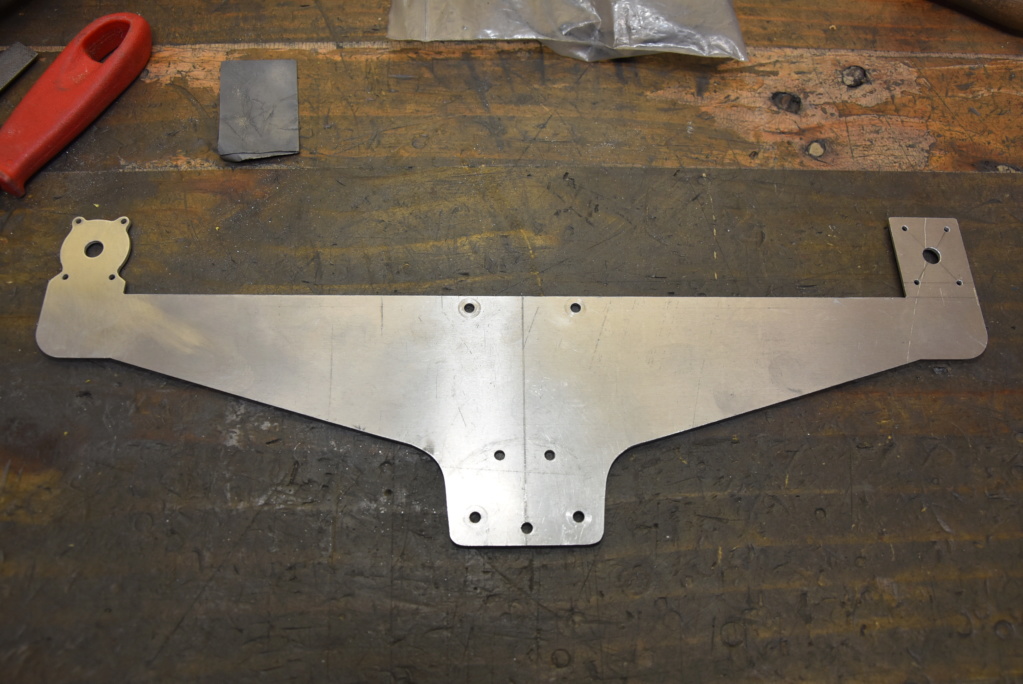
Keeping the momentum going. Hope have the mount finished by the end of tomorrow
I trimmed the sides of the shrike body to fit over the engine mount and had to take two mil off the top of the rear axle carrier but the body now fits down on the belly pan.
I asked a friend, who does all the decals for the race bikes, if she could do some for the car. I told her what I wanted and they’ll be ready on Friday.
Another job done.
I put the rear nacelle in the lathe and cut the groove for the mounting nuts. I’ve never been a fan of the self-tapping screws used as standard.
Fitted a pusher 3 blade 5 x 3 and the rear engine is ready to mount. (all three engines still need to be broken in)

When making the first one of these mounts, I bent the engine tabs and the sides up before I drilled the mounting holes and shaped the backplate outline which then made it somewhat difficult to do. So, this time I’m doing all that before I bend the mounts up, proving to be a lot easier.

One down one to go

Keeping the momentum going. Hope have the mount finished by the end of tomorrow

Davenz13- Platinum Member

- Posts : 597
Join date : 2013-11-28
Age : 69
Location : Palmerston North, New Zealand
 Re: Shrike X3 Experimental
Great! I can't wait to see the finished modified Shrike!!!!

David S- Gold Member

- Posts : 176
Join date : 2015-06-23
Age : 64
Location : New Jersey
 Re: Shrike X3 Experimental
Got the profile of the engine mount done.
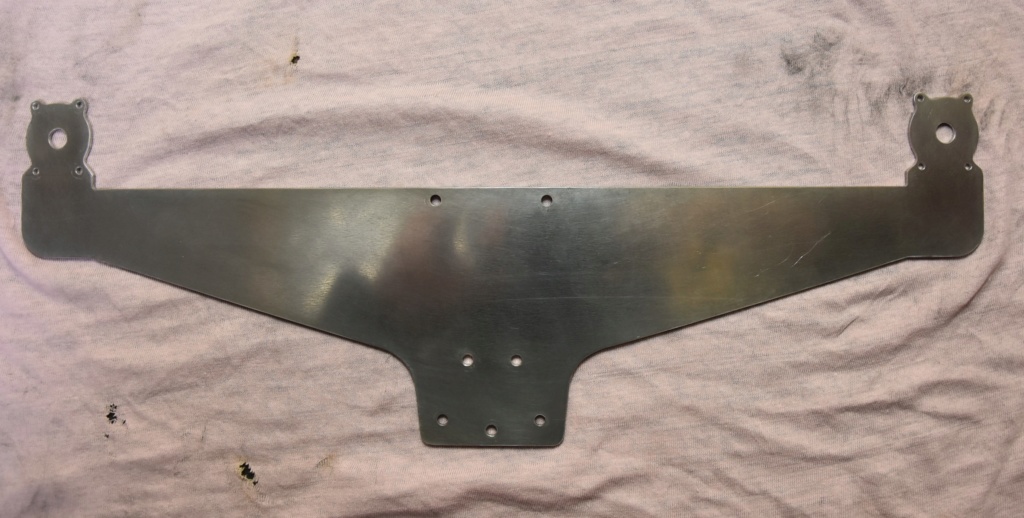
Finishing touches on my very technical bending machine
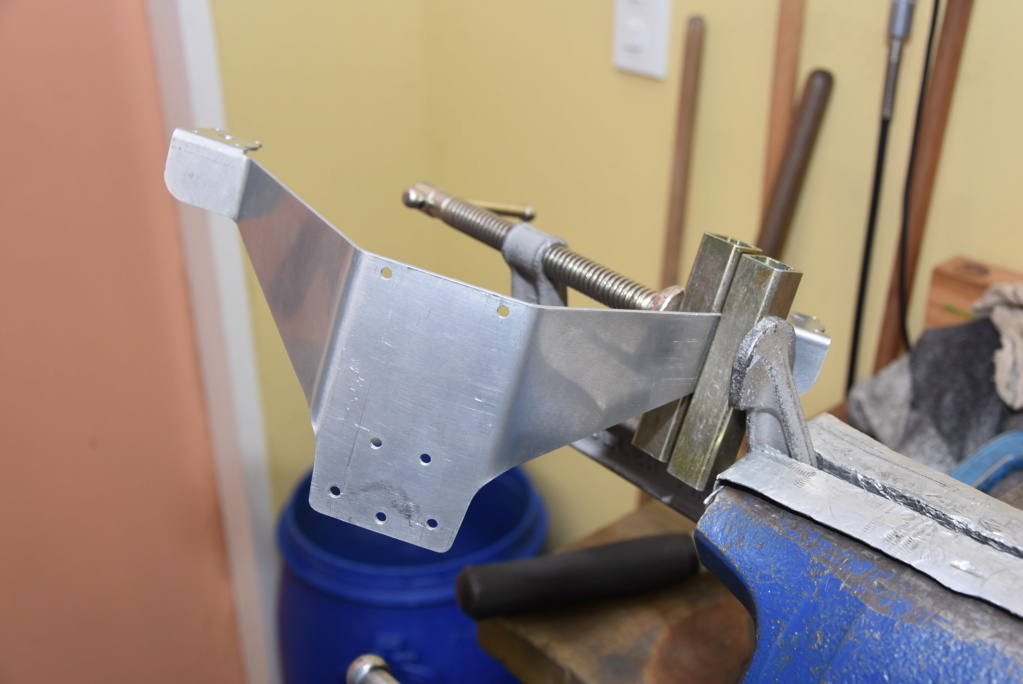
Mount will go off to be coated tomorrow. Will be black.
Went to pick up the decals today and Sharon had fitted them too so one less job for me.
Looks great, very pleased with it
I’ll polish up the belly pan and axle carriers while I’m waiting for the engine mount to get done.
Looks like I’ll make the deadline.

Finishing touches on my very technical bending machine

Mount will go off to be coated tomorrow. Will be black.
Went to pick up the decals today and Sharon had fitted them too so one less job for me.
Looks great, very pleased with it
I’ll polish up the belly pan and axle carriers while I’m waiting for the engine mount to get done.
Looks like I’ll make the deadline.

Davenz13- Platinum Member

- Posts : 597
Join date : 2013-11-28
Age : 69
Location : Palmerston North, New Zealand
 Re: Shrike X3 Experimental
Fantastic! I really enjoyed your build of your Shrike! I hope that you win!!!!

David S- Gold Member

- Posts : 176
Join date : 2015-06-23
Age : 64
Location : New Jersey
 Re: Shrike X3 Experimental
Well thank you for your vote of confidence David but it’s a very tough call.
There are some very very good modelers here and you may well be surprised with what comes out of the woodwork on the day.
There are some very very good modelers here and you may well be surprised with what comes out of the woodwork on the day.

Davenz13- Platinum Member

- Posts : 597
Join date : 2013-11-28
Age : 69
Location : Palmerston North, New Zealand
Page 1 of 2 • 1, 2 
 Similar topics
» Medallion .000 cu. in. engine
» Co Shrike Run
» There was an R/C Shrike?
» Cox .049 Experimental "Crystal" reeds are now available
» experimental reed-valve test 5-5-18
» Co Shrike Run
» There was an R/C Shrike?
» Cox .049 Experimental "Crystal" reeds are now available
» experimental reed-valve test 5-5-18
Page 1 of 2
Permissions in this forum:
You cannot reply to topics in this forum

 Rules
Rules


