Log in
Search
Latest topics
» Roger Harris revisitedby TD ABUSER Today at 2:13 pm
» Tee Dee .020 combat model
by Ken Cook Today at 1:41 pm
» Retail price mark-up.. how much is enough?
by Ken Cook Today at 1:37 pm
» Happy 77th birthday Andrew!
by getback Today at 11:52 am
» My latest doodle...
by roddie Today at 10:43 am
» My N-1R build log
by GallopingGhostler Yesterday at 3:04 pm
» Chocolate chip cookie dough.........
by roddie Yesterday at 1:13 pm
» Purchased the last of any bult engines from Ken Enya
by sosam117 Yesterday at 11:32 am
» Free Flight Radio Assist
by rdw777 Yesterday at 9:24 am
» Funny what you find when you go looking
by rsv1cox Wed Nov 20, 2024 3:21 pm
» Landing-gear tips
by 1975 control line guy Wed Nov 20, 2024 8:17 am
» Cox NaBOO - Just in time for Halloween
by rsv1cox Tue Nov 19, 2024 6:35 pm
Cox Engine of The Month
A Not So Successful Day…
Page 1 of 1
 A Not So Successful Day…
Well, I went out to Delta Park today to maiden a couple of planes and do some practice. I decided to start the day on the Flite Streak doing some Wing-Overs, Loops, and Lazy-8’s. I brought my hat-cam so I could start watching my maneuvers and figure out how to improve them. Sorry about all the trees whizzing by.
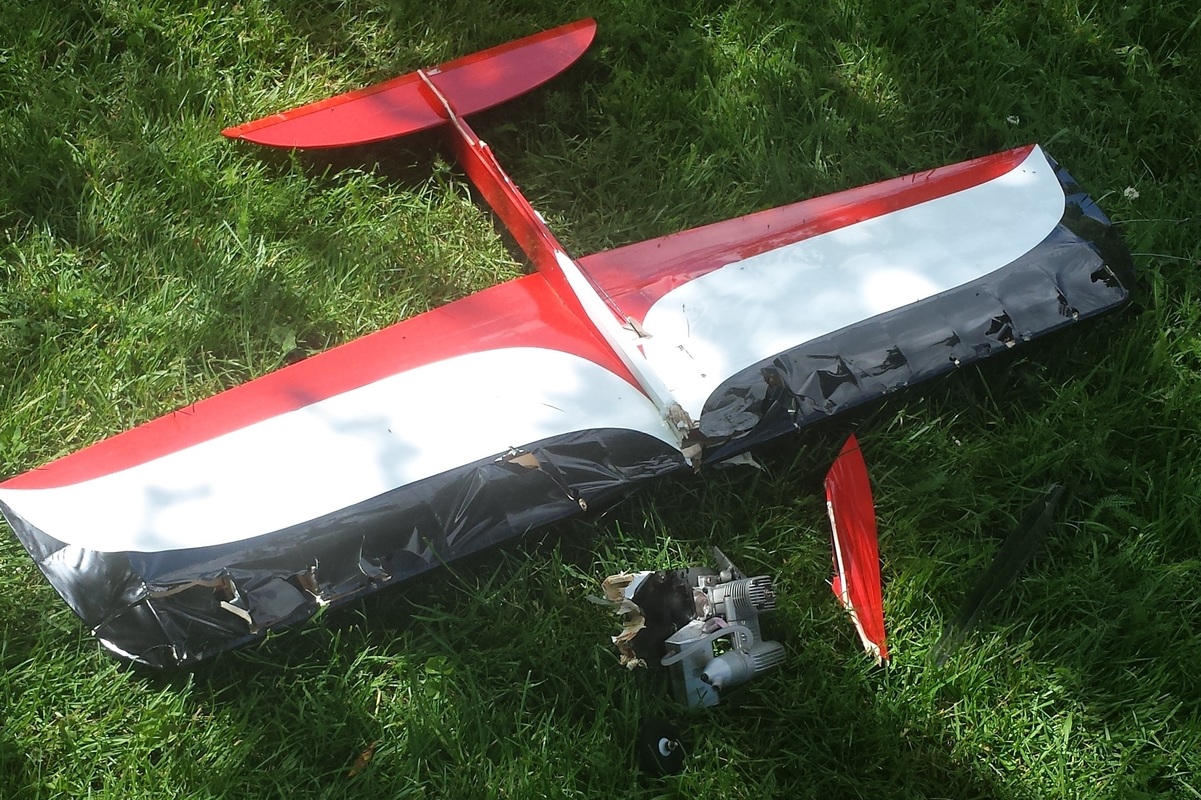

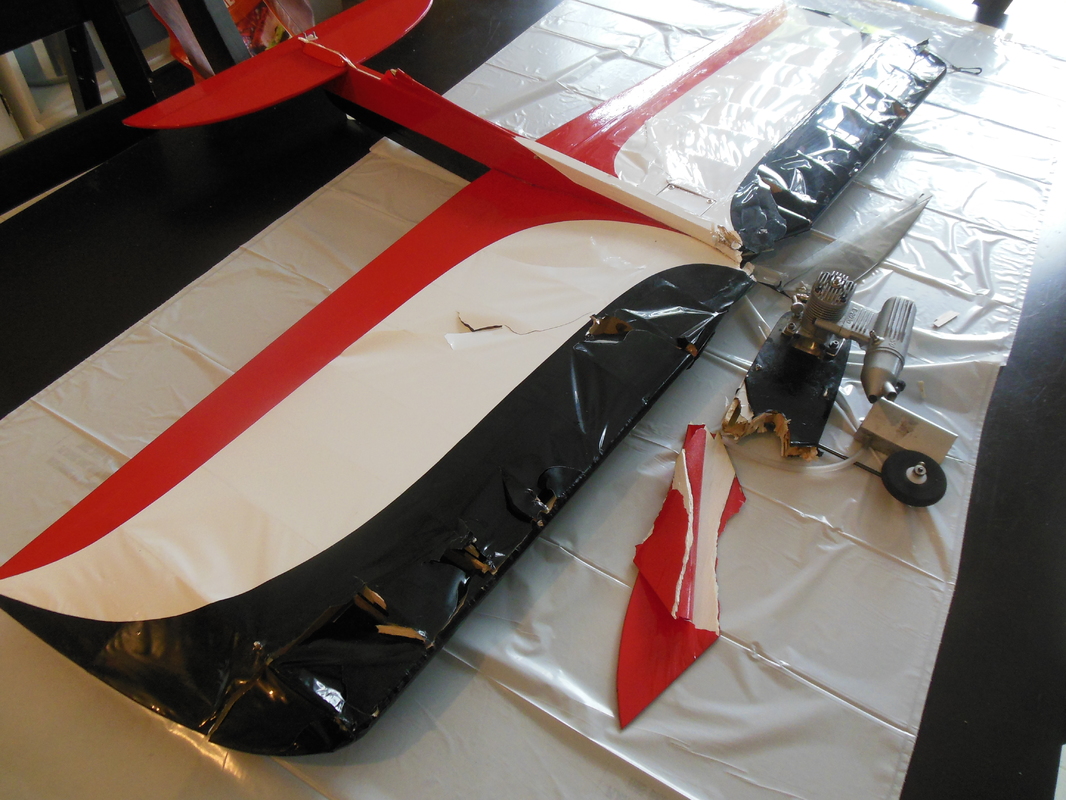

Bottom:
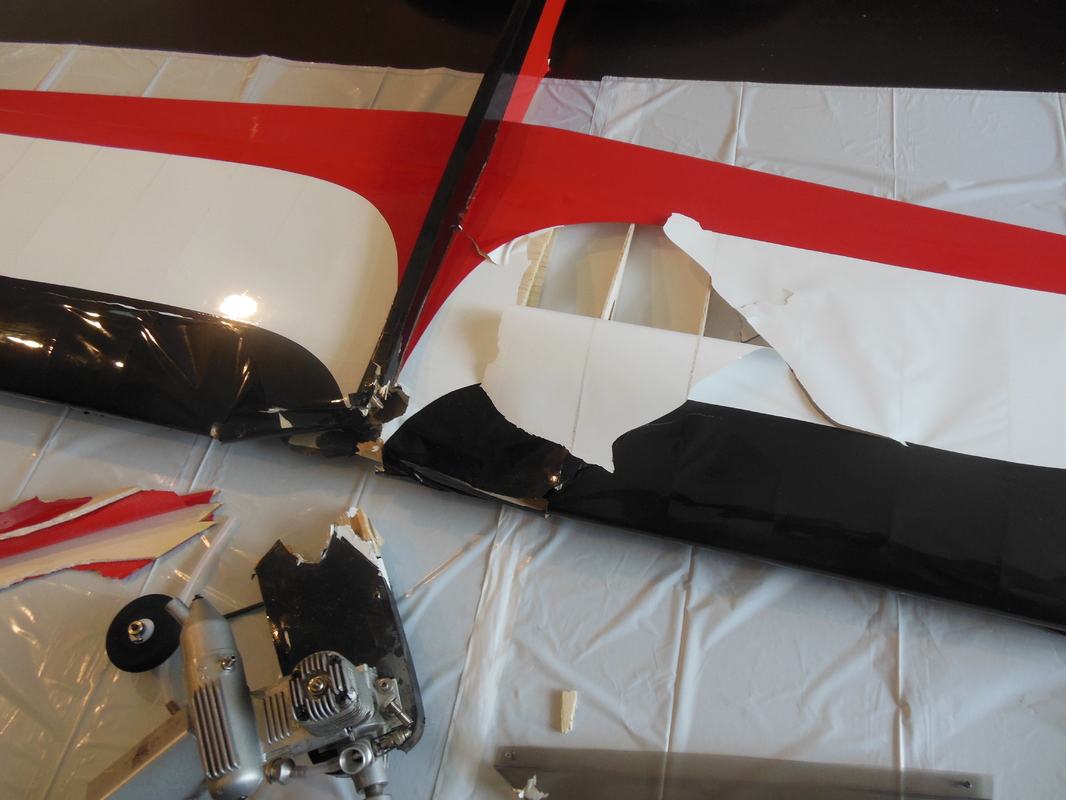
Not a great way to end the first flight of the day….
Then I pulled out the Nibbler I built for the World’s Smallest Travelling Engine:
The roller coaster motion is not PIO, I was not giving it any input at all. It was hunting all by itself. I’m not sure what all is going on. I’ll start by taking off a little tail weight. Also, I think I’ll make up a bellcrank with a larger distance between the line holes. As I was flying it, it seemed the lines were kind of slack. I can’t shorten them any, as it’s doing just over 3-second laps as it is. Maybe a hair more tip weight, or some out thrust on the fin.
Then I moved on to my Pipe Bomb Special:
After the 1:30 minute mark, feel free to stop watching. The rest is just limping along…
I had test run it a couple of days ago and it was turning up around 16K, so it should have done fine. But it wasn’t running well at all today. I put a brand new glow plug on it and it ran better, but still not developing full power. That darn needle wouldn’t hold a steady 2-cycle. It’s about a ¼ turn from the break to being too lean and shutting off. I’m going to try pressing in a Cox needle valve, I think. If nothing else, it should actually hold a needle setting that way. Another interesting thing. The engine might not make great power, but it’s definitely miserly on fuel. That run was 5 minutes on a half ounce of fuel. Lastly, I think I’ll try one of the Testors props I got from Bernie recently instead of the Cox rubber ducky. Who knows, maybe Testors actually did optimize their props to the engines.
The Destroyer Mark


Bottom:

Not a great way to end the first flight of the day….
Then I pulled out the Nibbler I built for the World’s Smallest Travelling Engine:
The roller coaster motion is not PIO, I was not giving it any input at all. It was hunting all by itself. I’m not sure what all is going on. I’ll start by taking off a little tail weight. Also, I think I’ll make up a bellcrank with a larger distance between the line holes. As I was flying it, it seemed the lines were kind of slack. I can’t shorten them any, as it’s doing just over 3-second laps as it is. Maybe a hair more tip weight, or some out thrust on the fin.
Then I moved on to my Pipe Bomb Special:
After the 1:30 minute mark, feel free to stop watching. The rest is just limping along…
I had test run it a couple of days ago and it was turning up around 16K, so it should have done fine. But it wasn’t running well at all today. I put a brand new glow plug on it and it ran better, but still not developing full power. That darn needle wouldn’t hold a steady 2-cycle. It’s about a ¼ turn from the break to being too lean and shutting off. I’m going to try pressing in a Cox needle valve, I think. If nothing else, it should actually hold a needle setting that way. Another interesting thing. The engine might not make great power, but it’s definitely miserly on fuel. That run was 5 minutes on a half ounce of fuel. Lastly, I think I’ll try one of the Testors props I got from Bernie recently instead of the Cox rubber ducky. Who knows, maybe Testors actually did optimize their props to the engines.
The Destroyer Mark
batjac- Diamond Member


Posts : 2375
Join date : 2013-05-22
Age : 61
Location : Broken Arrow, OK, USA
 Re: A Not So Successful Day…
Darn Mark , sorry to see the Flite Streak down , it was moving on pretty good there . But considering i can't do 8s at all not bad ! That little nibbler was hauling the mail , bout got me dizzy sitting and watching  Look like one mad Nat ! Hope you get her straightened out , i am thinking tail heavy . Pipe bomb was doing good till the engine leaned out .
  Thanks for the morning entertainment
 Look like one mad Nat ! Hope you get her straightened out , i am thinking tail heavy . Pipe bomb was doing good till the engine leaned out .

getback- Top Poster


Posts : 10442
Join date : 2013-01-18
Age : 67
Location : julian , NC
 Re: A Not So Successful Day…
Hello Mark, I'm sorry, it always hurts me when a model crashes, it's inevitable in me, it's what it costs and the time it takes to dedicate them, putting them together and putting them to the test, but it's also part of this exciting hobby-sport. I wish you many lucky days and that this happens to the memory. A hug!

MauricioB- Top Poster

- Posts : 3712
Join date : 2016-02-16
Age : 53
Location : ARG
 Re: A Not So Successful Day…
Yeah, I feel your disappointment over the Steak too. But now you get to build a proper nose for it and it'll be better and stronger. I do prefer grass over pavement for sporting. I like the tarmac for contests because I can pick up another 5-10 points on takeoffs and landings. But, hey, you got out there and flew, good for you. Keep it up and the crashes will come less often. I had an enjoyable day of flying too, about 6 hours at the field regaining my depleted strength from my winter layoff.
Keep us posted on the Streak.
Rusty
Keep us posted on the Streak.
Rusty
_________________
Don't Panic!
...and never Ever think about how good you are at something...
while you're doing it!
My Hot Rock & Blues Playlist
...and never Ever think about how good you are at something...
while you're doing it!
My Hot Rock & Blues Playlist

RknRusty- Rest In Peace

- Posts : 10869
Join date : 2011-08-10
Age : 68
Location : South Carolina, USA
 Re: A Not So Successful Day…
batjac wrote:
Then I moved on to my Pipe Bomb Special:
After the 1:30 minute mark, feel free to stop watching. The rest is just limping along…
I had test run it a couple of days ago and it was turning up around 16K, so it should have done fine. But it wasn’t running well at all today. I put a brand new glow plug on it and it ran better, but still not developing full power. That darn needle wouldn’t hold a steady 2-cycle. It’s about a ¼ turn from the break to being too lean and shutting off. I’m going to try pressing in a Cox needle valve, I think. If nothing else, it should actually hold a needle setting that way. Another interesting thing. The engine might not make great power, but it’s definitely miserly on fuel. That run was 5 minutes on a half ounce of fuel. Lastly, I think I’ll try one of the Testors props I got from Bernie recently instead of the Cox rubber ducky. Who knows, maybe Testors actually did optimize their props to the engines.
Hi Mark, I'd been wanting to see that airplane fly! Congrats.. it fly's pretty good! Don't know if you've put a different needle in the engine yet.. but I was thinking about the possibility of securing the Testors needle somehow, to stop it from drifting?
A spring will "twist" radially.. as well as holding linear-compression during needle-adjustment. Where you say that there's only 1/4-turn of optimal adjustment.. I can see this as a possible factor. Example; if your final-adjustment was a clockwise-lean, the radial-tension on the spring is now in the opposed direction. Vibration will naturally cause the spring to unwind which could turn the needle.
That said..
Edit/add; I have Bobby-pins coming later.. so I'll do a mock-up and take photos. Call it a friction-clip for its function. If it works they way I hope.. it will be effective, very lightweight.. and fairly easy to mount on a model-airplane having a reed-valve engine where needle is close to the firewall. The loop-end of the pin provides the perfect attachment-point to the firewall/nose.

There's four detents/reliefs to choose from for retaining the needle-shaft, so you can trim the open-end's length to suit.. leaving enough length to install the retaining sleeve that provides the friction-clipping action. There will be no "click" that you can feel with knurled-needles that use friction-springs.. but I doubt it will matter on these small engines.
Last edited by roddie on Sat Jun 03, 2017 1:35 pm; edited 1 time in total
 Re: A Not So Successful Day…
Nice. That was an exciting wingover there. You ain't kidding about the fuel usage. If you'd been running fast and lean it would've probably flown for 10 minutes.
_________________
Don't Panic!
...and never Ever think about how good you are at something...
while you're doing it!
My Hot Rock & Blues Playlist
...and never Ever think about how good you are at something...
while you're doing it!
My Hot Rock & Blues Playlist

RknRusty- Rest In Peace

- Posts : 10869
Join date : 2011-08-10
Age : 68
Location : South Carolina, USA
 Re: A Not So Successful Day…
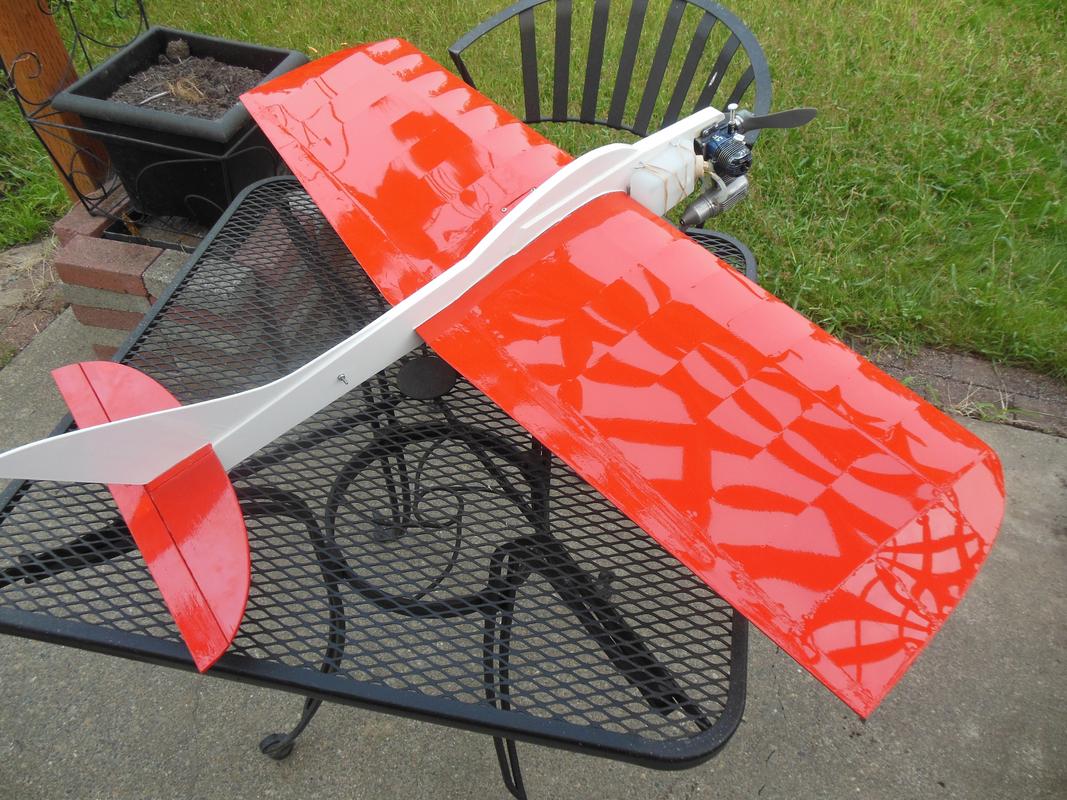
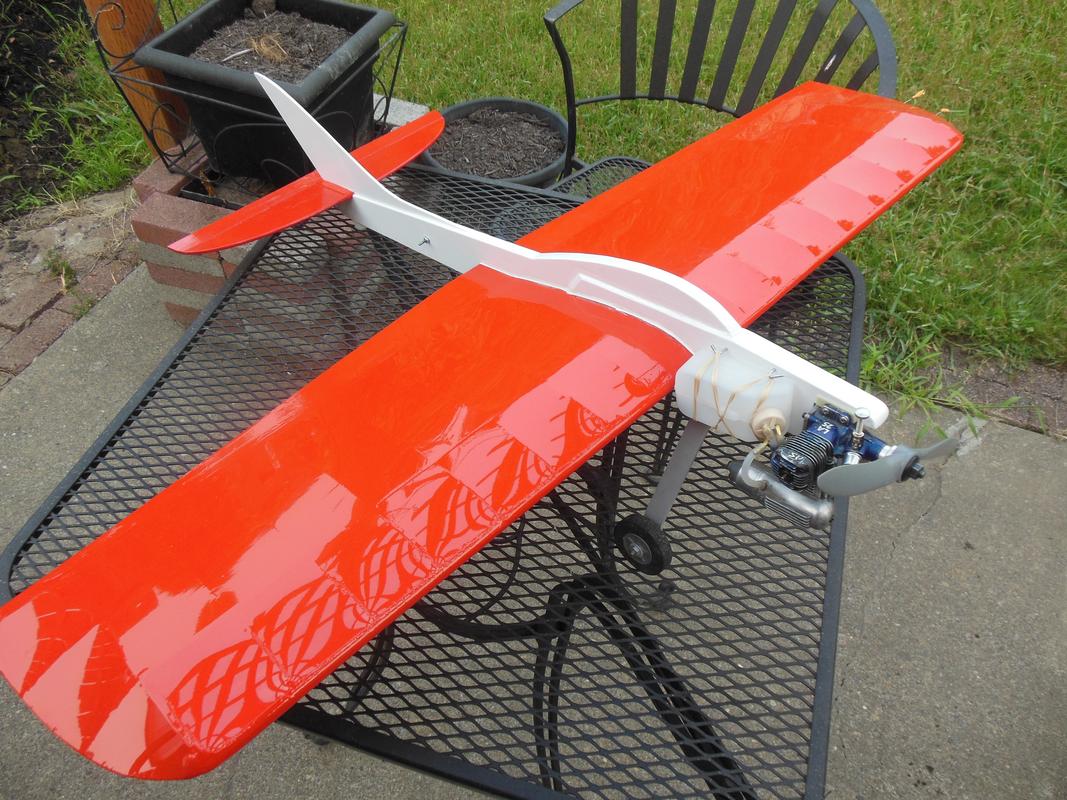
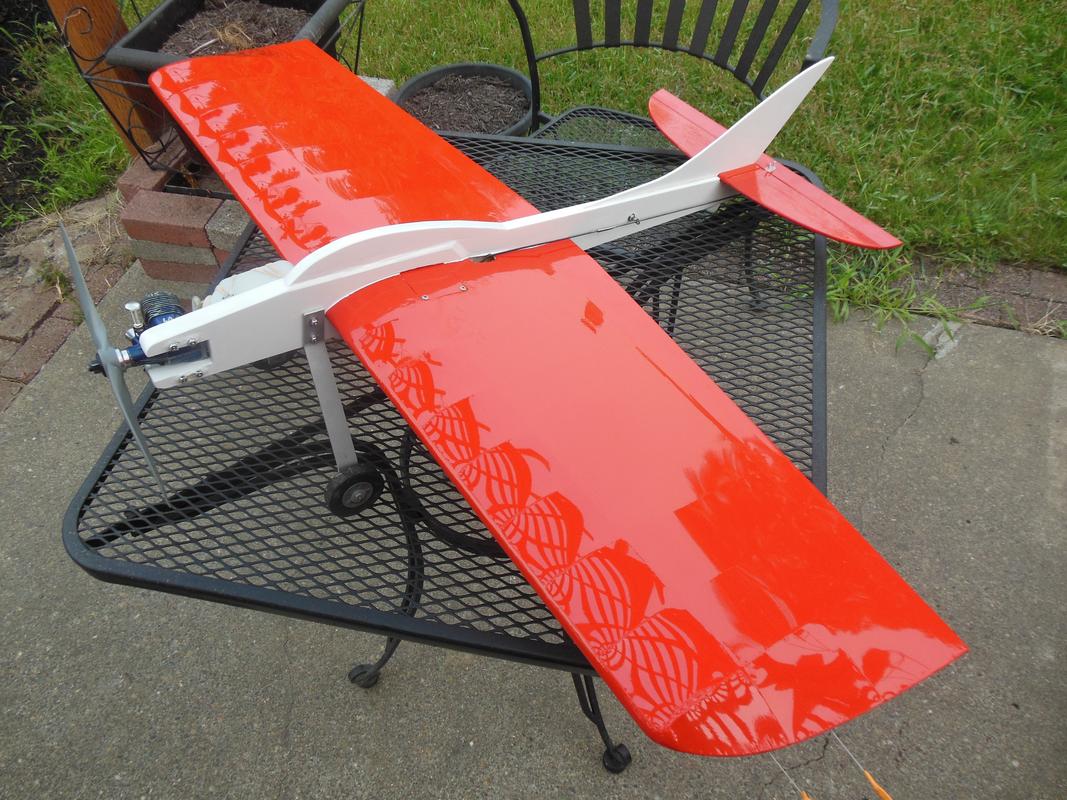
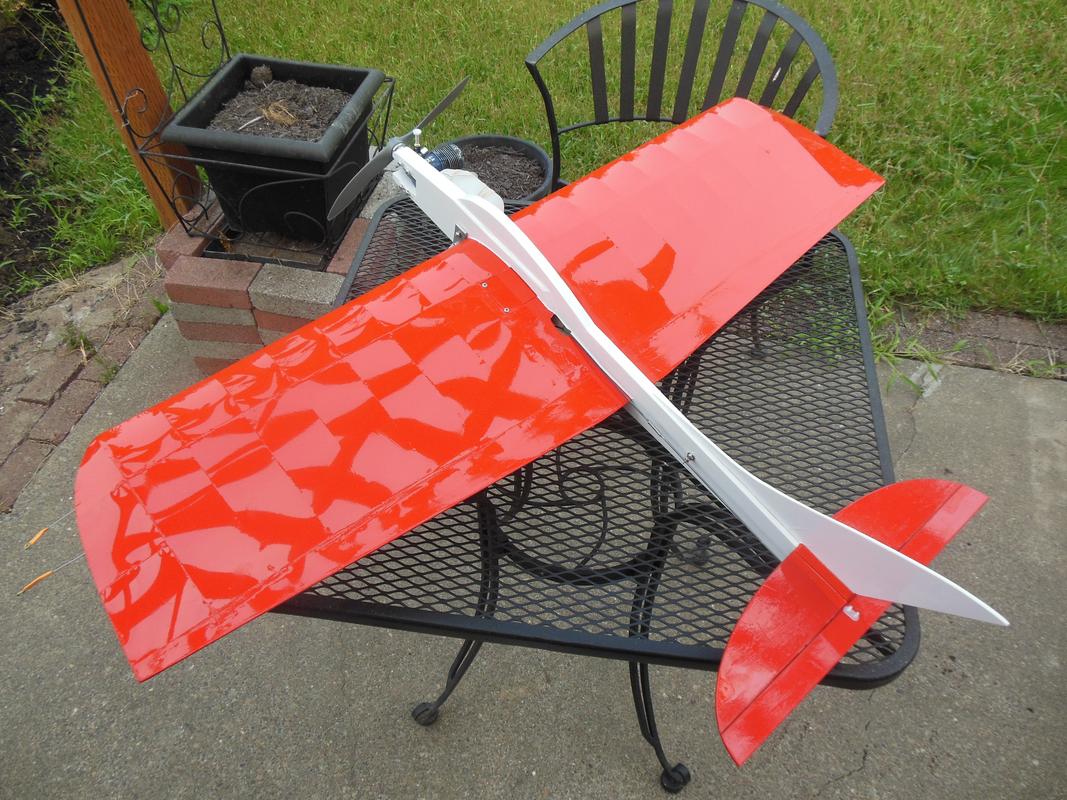
Well, I finally made some time to get back to this thing. The fuselage could have been patched up, but I decided to go with a longer nose/tail. I’d read over on Stunthangar about putting a Flitestreak wing in a Skyray fuselage. Since I’d just finished building three Skyray 35s, I figured I’d do that.
I tore off the covering to see what I had with the wing. Both leading edges had dents and divots in them. The center section was mostly okay from the spar back, but wrecked spar forward. The center ribs did need replacing. Almost all the other ribs were either cracked or broken forward of the spars.


The first thing I did was either glue the cracked ribs, or make up new half ribs to repair the broken ribs. Then I made new full ribs for the three center ribs. I re-glued the bellcrank plate securely to the center section. I cut a piece of square stock to replace the leading edge piece, reinforced it, and sanded it to shape. Then I made up new center section sheeting. Next I filled in all the leading edge divots.
Once I had the wing repaired, I cut away the rear fuselage. I had left the wing in the fuselage so I could use the rear fuse as a holding fixture while I glued the repair pieces back in. It kept the wing from flexing as I played with it. Sorry, no pics of this as I was just wanting to get this over with and done. An interesting thing, I knew the nose was hollow with formers, but I didn’t know the entire fuselage was hollow. Makes for a light fuselage, but the wood that was used was garbage wood. But, I’ll have to remember this method in the future. I cut the new fuselage from ½” balsa before I finished the wing repair and cut away of the old fuse. I now wish I had cut away the old first. I’d have liked to have built the rear of the replacement fuselage the same way using quality wood for a lighter plane. I’d have used a solid front piece, of course.
Next I covered the wing using the last of some 20 year old red Monokote I had on a roll. Just enough covering to do the whole wing with some scraps left over to cover rough spots on the stabilizer. I covered the fuselage and fin with white Econokote I had in the covering box. I didn’t care about using different types of covering. I’m just trying to use up all the old stuff I have on hand. I glued in the wing and empennage to the fuse (yes, I know the tail looks crooked, either to the left or right depending on which pic you're looking at. It's just the cheap camera). Then I made up new and improved leadouts, de-soldered the original pushrod and made up a new aft piece to fit the longer fuselage. The new pushrod ended up 1 ¾” longer than the original.
To finish, I bolted on a set of landing gear I got at a swap meet last year for $1.50, installed a Sullivan 4 ounce clunk tank, and then an O.S. .25 LA I got last week through the Classifieds over on Stunthangar that I converted to LA-S configuration using the appropriate stock O.S. venturi and needle assembly I got from Tower.
Voila!
The Paint and Fender Mark
I tore off the covering to see what I had with the wing. Both leading edges had dents and divots in them. The center section was mostly okay from the spar back, but wrecked spar forward. The center ribs did need replacing. Almost all the other ribs were either cracked or broken forward of the spars.


The first thing I did was either glue the cracked ribs, or make up new half ribs to repair the broken ribs. Then I made new full ribs for the three center ribs. I re-glued the bellcrank plate securely to the center section. I cut a piece of square stock to replace the leading edge piece, reinforced it, and sanded it to shape. Then I made up new center section sheeting. Next I filled in all the leading edge divots.
Once I had the wing repaired, I cut away the rear fuselage. I had left the wing in the fuselage so I could use the rear fuse as a holding fixture while I glued the repair pieces back in. It kept the wing from flexing as I played with it. Sorry, no pics of this as I was just wanting to get this over with and done. An interesting thing, I knew the nose was hollow with formers, but I didn’t know the entire fuselage was hollow. Makes for a light fuselage, but the wood that was used was garbage wood. But, I’ll have to remember this method in the future. I cut the new fuselage from ½” balsa before I finished the wing repair and cut away of the old fuse. I now wish I had cut away the old first. I’d have liked to have built the rear of the replacement fuselage the same way using quality wood for a lighter plane. I’d have used a solid front piece, of course.
Next I covered the wing using the last of some 20 year old red Monokote I had on a roll. Just enough covering to do the whole wing with some scraps left over to cover rough spots on the stabilizer. I covered the fuselage and fin with white Econokote I had in the covering box. I didn’t care about using different types of covering. I’m just trying to use up all the old stuff I have on hand. I glued in the wing and empennage to the fuse (yes, I know the tail looks crooked, either to the left or right depending on which pic you're looking at. It's just the cheap camera). Then I made up new and improved leadouts, de-soldered the original pushrod and made up a new aft piece to fit the longer fuselage. The new pushrod ended up 1 ¾” longer than the original.
To finish, I bolted on a set of landing gear I got at a swap meet last year for $1.50, installed a Sullivan 4 ounce clunk tank, and then an O.S. .25 LA I got last week through the Classifieds over on Stunthangar that I converted to LA-S configuration using the appropriate stock O.S. venturi and needle assembly I got from Tower.
Voila!


The Paint and Fender Mark

batjac- Diamond Member


Posts : 2375
Join date : 2013-05-22
Age : 61
Location : Broken Arrow, OK, USA
 Re: A Not So Successful Day…
Mark, the Flite Streak is quite twitchy in stock form. The tail moment for someone still in the crashing stage is already too long. However, I see you extended the doublers ( Good thing) and you added a heavier gear. The nose of a stock Streak has little room on it. It appears you lengthened it a bit as well. Where does the plane balance currently? All your mods and the fact your running the stock muffler suggests to me that all should be close. The plane looks great! A 4 oz. tank on a LA .25 is a lot of fuel. I wouldn't top that tank off. A lean setting would keep that in the air for a awful long time. As you mentioned, the hollow fuse is great for weight. It's not strong and it also vibrates badly. A solid fuse is superior to it in regards to engine runs and durability. I have seen the noses break off when people were just hand flipping them. I have also witnessed the nose tear right off in flight and the engine flew a considerable distance across the field. Many times a crash like that yields so much repair work that it relinquishes the plane to the trash pile. During repairs like that, I give the wing a considerable pull test. Areas such as where the bellcrank mount is are done in the rib with a dado and these areas can split with the grain going unrecognized. Sometimes hidden damage doesn't always show it's ugliness at first. Sheeting splits, trailing edges can be notorious for splitting along the grain and it can appear intact until it shows signs of stress later on. I'm certain by the quality of your repair work that you examined the wing closely. I wish you luck. Ken

Ken Cook- Top Poster

- Posts : 5640
Join date : 2012-03-27
Location : pennsylvania
 Re: A Not So Successful Day…
Yeah, everything Ken said. You did a beautiful job. I hope it turns out to be a superior flyer. The red and white looks great too.
_________________
Don't Panic!
...and never Ever think about how good you are at something...
while you're doing it!
My Hot Rock & Blues Playlist
...and never Ever think about how good you are at something...
while you're doing it!
My Hot Rock & Blues Playlist

RknRusty- Rest In Peace

- Posts : 10869
Join date : 2011-08-10
Age : 68
Location : South Carolina, USA
 Re: A Not So Successful Day…
Nice Repair !! Mark , Looks better than before to me . About that hollow fuse i would not have thought anyone wood do something like this to a .25 or larger profile plane ? 1/2A large wing would be as far as i would take that method. I like the BC hatch (is that in the plans or a Batjac inspiration things ?  Keep us up on your progress were with you man .
 Keep us up on your progress were with you man .
getback- Top Poster


Posts : 10442
Join date : 2013-01-18
Age : 67
Location : julian , NC
 Re: A Not So Successful Day…
I give you a LOT of credit man... That airplane looks terrific! Great job on the repair-work.. So.. the tail-moment is now 1.75" longer? The covering-job looks beautiful! I've been so hesitant to use my iron-on coverings. I never had much experience with them.. outside of covering "flat" surfaces. My Jr. Ringmaster is the only model that I have experience with; covering a built-up "air-foiled" wing. It's not "terrible".. but the wing-tips are "wrinkly".. 
I have two rolls of "TowerKote" low-heat "white" that I bought for foam-applications. My 1/2-scale Voodoo-foamie uses an "Ace" foam-core.. with built-up 1/16" balsa wing-tips.. to be covered with that.. when I get the nerve to try working with it again.
I have two rolls of "TowerKote" low-heat "white" that I bought for foam-applications. My 1/2-scale Voodoo-foamie uses an "Ace" foam-core.. with built-up 1/16" balsa wing-tips.. to be covered with that.. when I get the nerve to try working with it again.
 Re: A Not So Successful Day…
Thanks, All.
Ken, I only used the 4 ounce tank because no one makes a 3 ounce tank other than the ones from Hobby King. I plan to only add 1½ ounces the first flight or two, then go to 2½ for a normal Beginners pattern. The balance point is at 1 5/8” back from the L.E. where it was in original FliteStreak trim.
Eric, the hollow center is a pretty popular thing. If you look at the kits Pat King sells, some of his profile kits .25-.45, and almost all profile kits over .45 are hollow framework kits with side sheeting. There’s a nice profile Spitfire design from a ‘76 Model Aviation issue with an option to build either solid or hollow that I’ve been seriously considering building for N-30 competition for a while now. The hatch is what came with the original ARF wing. I seriously considered doing the same thing with my Skyrays, but just omitted them. It’d be easy to do on just about any plane.
Roddie, the tail moment is 1 ¾” longer, and the nose is about an inch longer. I’ve been using the iron on films, in one form or another, since my first R/C airplane back in 1977 or ‘78. Ironing on low temp covering on the Ace foam wings works pretty good if you keep the temperature to the minimum needed to adhere the covering. Do NOT use a heat gun to take out any wrinkles (don’t ask).
The best way to avoid wrinkles in built up wing tips that I’ve found is to not use the iron for your wing tips. Iron down the covering tight to the leading and trailing edges and the center section. Then, using a heat gun, carefully pull the film over the wing tips while applying heat from the gun to the covering over the tip. The heat softens the film as it shrinks, making it conform to the curved shape while shrinking and adhering. Doing small portions at a time makes for a smooth wingtip cover. Here’s a video of a guy doing it the same way. His heat gun must be much cooler than mine. I’d burn through the Monkote if I spent that much time on one small area. I also tend to heat more on the end/backside as I pull the covering tight. And I use a glove on the hand that is pulling the covering as it gets real hot and my fingers don’t like being cooked.
The Tutor Mark

batjac- Diamond Member


Posts : 2375
Join date : 2013-05-22
Age : 61
Location : Broken Arrow, OK, USA
 Re: A Not So Successful Day…
Thanks for that Vid Mark. It's a great reference. I have two hobby irons (one that my dad gave me recently) and bought a heat-gun a few years ago on clearance. I used it for the first time a few days ago to heat-up the cylinder/head of my old Tee Dee .09 (no wrench-flats on the top of the cylinder) to help remove the head. The gun is a "Wagner" model HT 1000 dual-temp (750/1000F) and I used the low-heat setting for about 30 seconds concentrated on the parts.. which did the deed. I can't imagine needing the higher-setting for shrinking film.
Decades ago, I bought a Top-Flite "Hot-Sock" iron shoe-cover.. and fleece-mitt. I can't remember if they were packaged "together".. as shown in this photo.. but I believe that they were separate purchases.
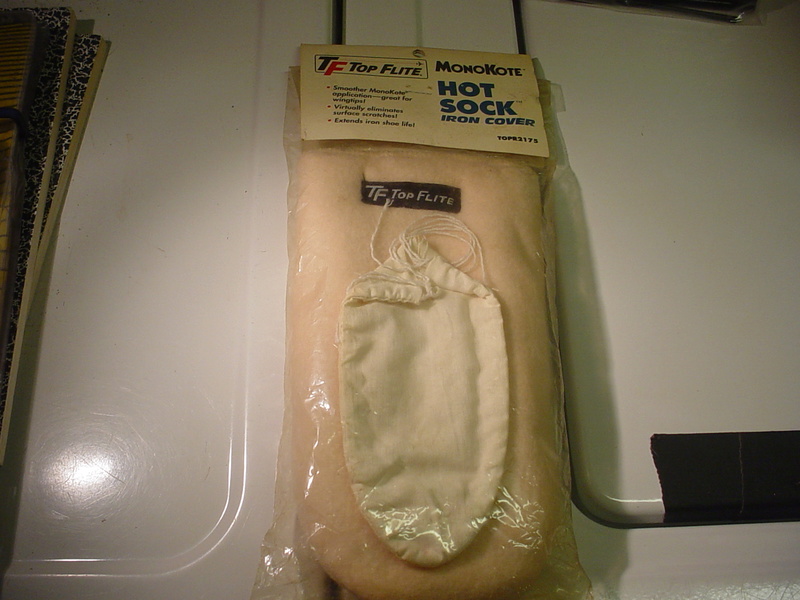
I've used the iron-cover.. but not the mitt.. as I didn't have a heat-gun until years later. I'm not sure how useful the mitt would be.. as compared to a modern heat-resistant silicone-glove with fingers..
I've often wondered whether a few more gussets would help with the covering of a built-up wing-tip?
Decades ago, I bought a Top-Flite "Hot-Sock" iron shoe-cover.. and fleece-mitt. I can't remember if they were packaged "together".. as shown in this photo.. but I believe that they were separate purchases.

I've used the iron-cover.. but not the mitt.. as I didn't have a heat-gun until years later. I'm not sure how useful the mitt would be.. as compared to a modern heat-resistant silicone-glove with fingers..
I've often wondered whether a few more gussets would help with the covering of a built-up wing-tip?
 Re: A Not So Successful Day…
roddie wrote:I've often wondered whether a few more gussets would help with the covering of a built-up wing-tip?
Roddie, if you look at a lot of older designs, many planes had four and five gussets on the top and bottom of the wingtips. That would make it much easier to cover. It also makes it look much more rounded on the tips.
The Oldie Mark

batjac- Diamond Member


Posts : 2375
Join date : 2013-05-22
Age : 61
Location : Broken Arrow, OK, USA
 Similar topics
» 1960 Scientific P-40 Profile kit
» The B.O.T. Tri-Motor's Successful Retirement !!!!!!!!!
» Micro 12VDC Generator with a Cox .049 Sure Start Diesel Engine
» Dangling landing gear, model airplane parts falling from the sky, a big, cranky C-123 that just doesn't want to fly, and 3 successful flights on my rebuilt-rebuilt Super Ringmaster...
Page 1 of 1
Permissions in this forum:
You cannot reply to topics in this forum

 Rules
Rules


